
Installing Butcher Block Countertops
Updated June 4, 2023
There are many options for kitchen countertops, and choosing the right one for your space can feel daunting. Do you know what makes that decision easier? Having a teeny tiny budget. When your decision is narrowed down between laminate and butcher block, it’s pretty much the easier choice ever. Fortunately, not only is butcher block easy on the bank account but it’s also just as beautiful (or maybe even more beautiful) than the more expensive alternatives.
Are you looking for warmth and timeless design? Maybe something you can DIY? Look no further than butcher block countertops.
What is butcher block?
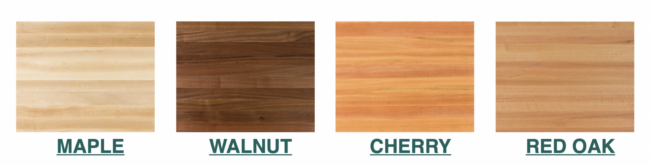
The easy answer is that it is a countertop made out of wood. The complicated answer is that butcher block is a type of wood construction consisting of solid wood strips tightly bonded together to form a thick, sturdy slab. The wood used for butcher block is typically hardwood species such as maple, cherry, walnut, or oak. These woods have dense grain patterns that help prevent the accumulation of bacteria and make the surface suitable for food preparation.
Why use butcher block?
I choose butcher block for three reasons.
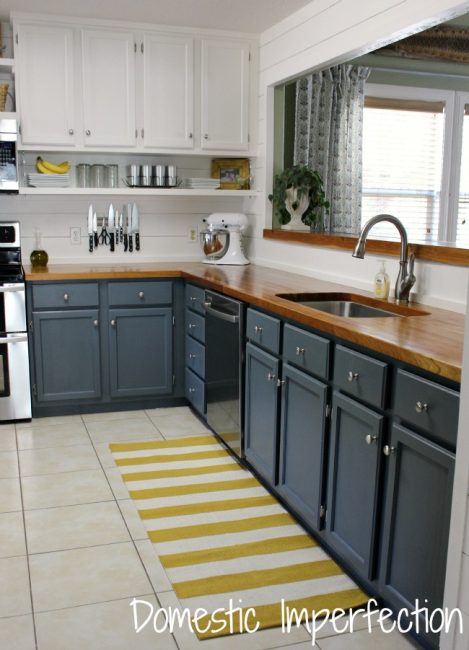
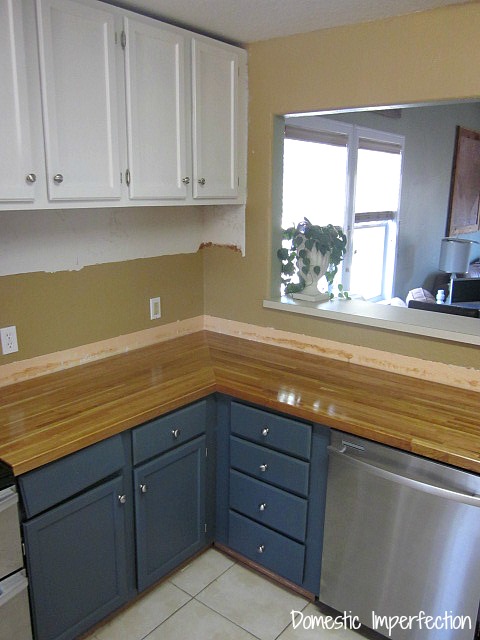
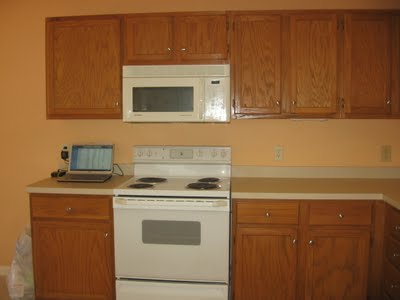
- Butcher block countertops are warm and inviting. I strongly believe that every room needs wooden elements. That can be anything…flooring, furniture, beams, or decor. My kitchen has none of that, it’s just ugly pink beige tile, and now painted navy and white cabinets.
- Butcher block is the most affordable option. I collected quotes for all the other types of countertops…granite, marble, corian, quartz…everything was welll over $2,000. We bought our counters (12ft and 8ft cherry slabs) from LL Flooring for $750.
- Butcher block may be more easily damaged than other types of countertops, but it is also easily fixable. If/when butcher block starts to look a little rough, it just needs to be sanded and resealed to look brand new again.
Looking to save even more money and make your own wood countertop? I have a tutorial for that!

HOW TO MAKE A COUNTERTOP OUT OF WOOD FLOORING
Choosing the right butcher block slabs
The final look of the countertop will vary greatly depending on the type of wood that you choose. While you can stain your wood countertop to get your desired color, I personally wouldn’t. A much simpler, longer-lasting, more food-safe way to get your desired color is to buy a wood that is naturally a color you like.
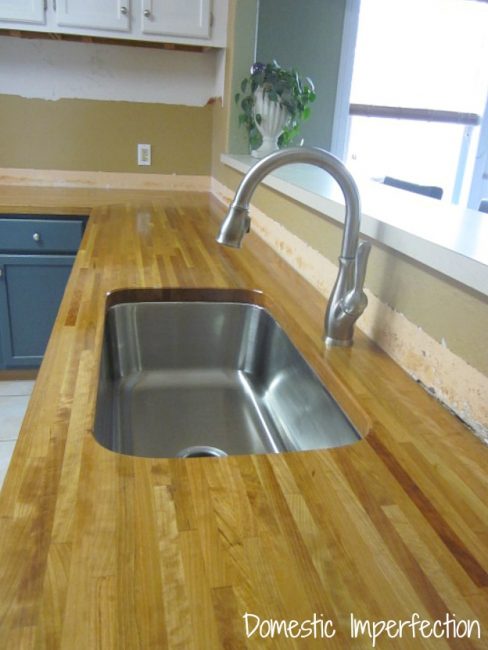
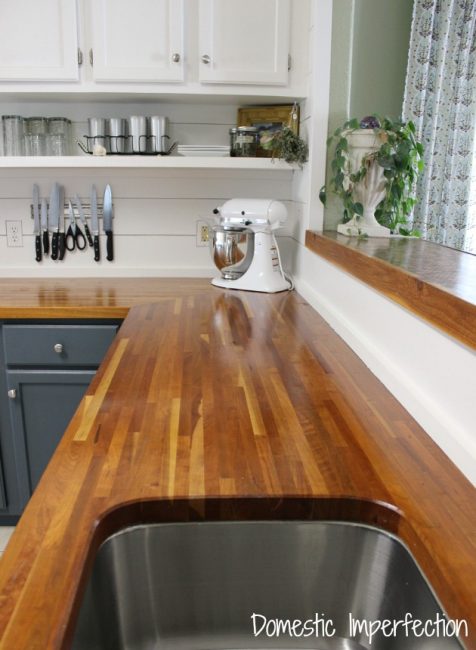
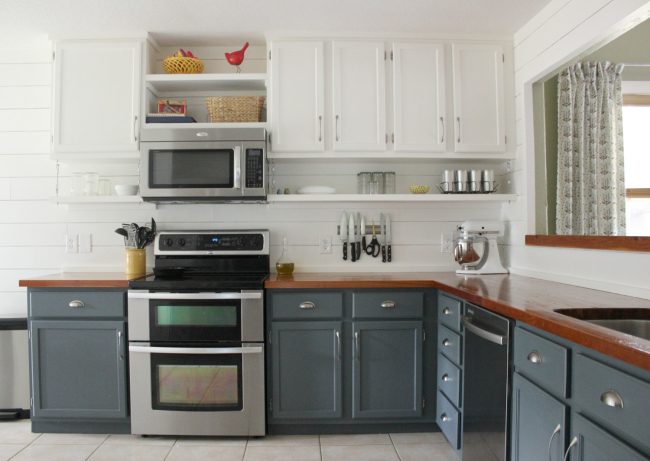
We installed cherry, which is a warm red/orange. Also keep in mind that the wood will darken with age. Here is our cherry countertop just after install, and then two years later. It’s way prettier with age, in my opinion.
After you decide what type of wood to get, you will need to know how much to buy. Butcher block comes in slabs, usually 6 – 12 feet long and 25 inches deep (a standard cabinet is 24 inches deep, so that leaves 1 inch of overhang). Measure how many linear feet of countertop you will need, keeping in mind there will be waste, corners, and you want as few seams as possible.
For our kitchen, I spent $750 on one 8 ft and one 12 ft cherry slab from LL Flooring.
Installing Butcher Block Countertops
Alright, now let’s dive into the DIY!
Prep the space
The first step is to remove the sink. I can’t give you any more details than that. Just make it happen.
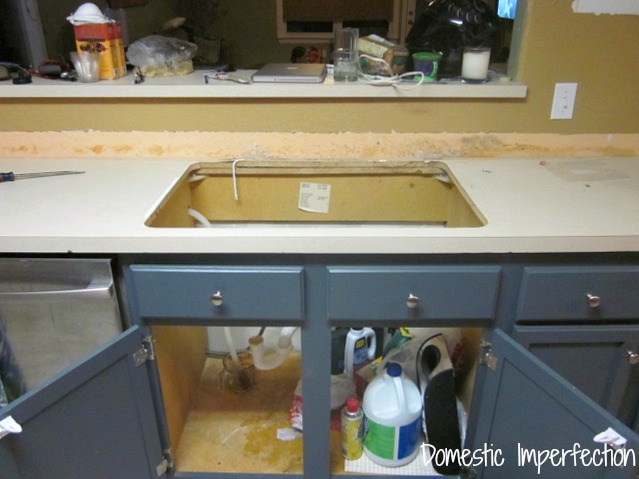
Next you will need to remove the old countertops. Your old countertops could be installed in a multitude of ways, so climb underneath and see what you’re working with. For me this part was crazy easy, I literally just had to remove a few screws and they lifted right off.
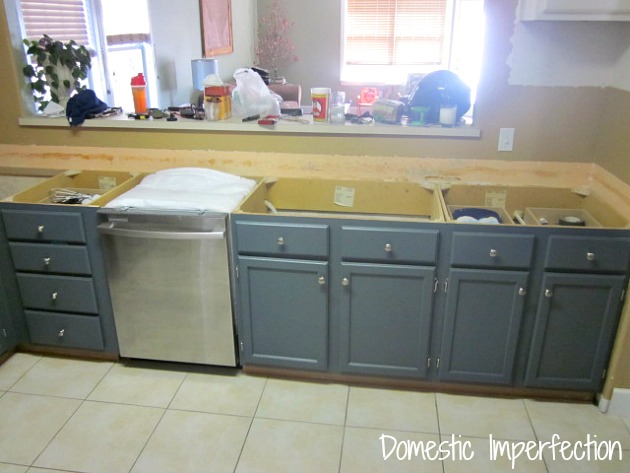
Measure and cut the countertops
When I say measure, I mean do it like 14 times. Don’t jack this up, it would be a very expensive mistake. If you need to make a template out of cardboard or plywood to make sure your measurements are perfect, do it. Ain’t no shame.
Every kitchen is going to be different, and you may or may not need to have two slabs join in a corner.
There are two ways to join the countertops. The simpler way is to have one slab go all the way to the wall and the other one butt up against it.
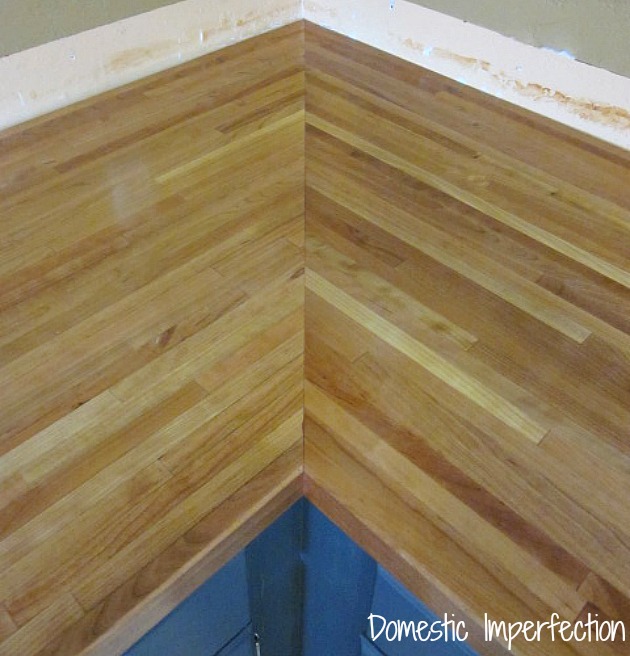
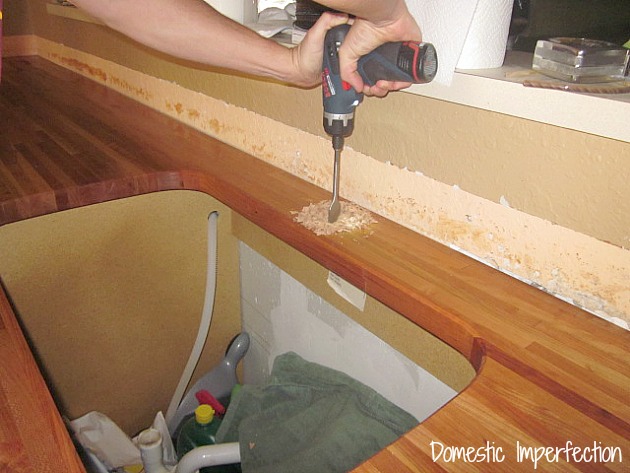
The more difficult and more professional way to do it is to cut both wood slabs at a 45-degree angle and join them in the corner. This is what we did. And by we I mean my husband and his brothers.
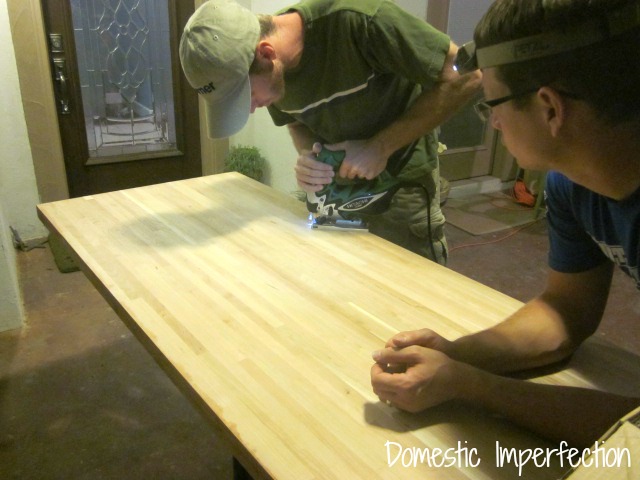
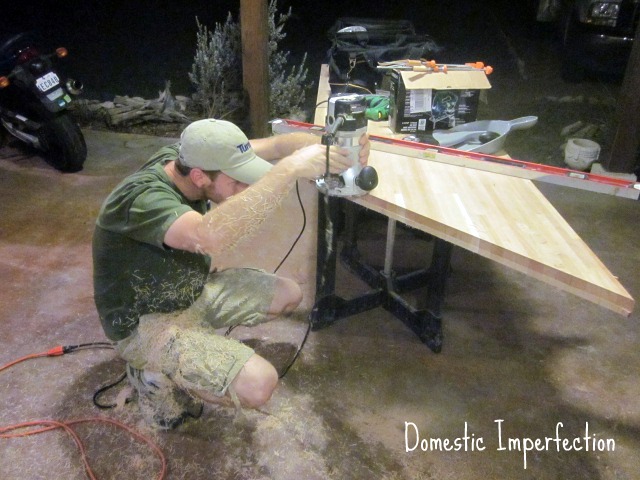
Please completely ignore the tools they are using in the photo, a jigsaw and a router are not the best way to go about cutting your countertop. Ideally, you should use a table saw or a circular saw with a track system (like the Kreg Rip-Cut).
How to join butcher block slabs
To join the two slabs my husband and his brother used wood glue on the edges and draw bolts on the underside. They made a template out of scrap wood and used that to to cut out the shape with a router.
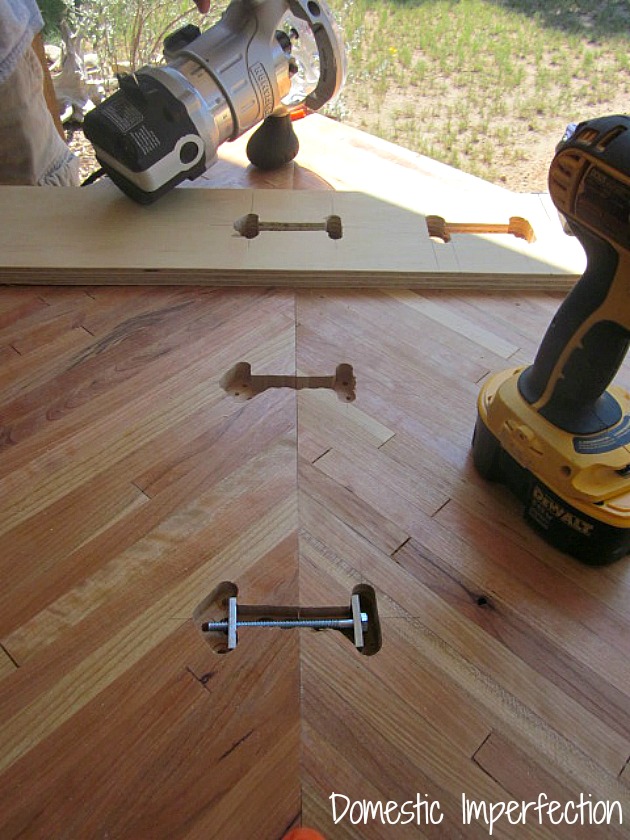
Other good ways to do this would be with a biscuit joiner or a pocket hole jig. Wood glue by itself will not be enough.
Create a cutout for the sink
The next step was cutting a hole for the sink. We choose and undermount sink, and admittedly this was a sketchy decision. A drop-in sink is a safer route with wood countertops, since it would protect the wood from water damage. The look of an undermount sink is just so much prettier though, so we decided to chance it.
The kitchen sink you buy will come with a paper template. You can put the paper template directly onto the butcher block and cut it out like that, but the boys opted for transferring the paper template to a 3/4 inch piece of plywood first.
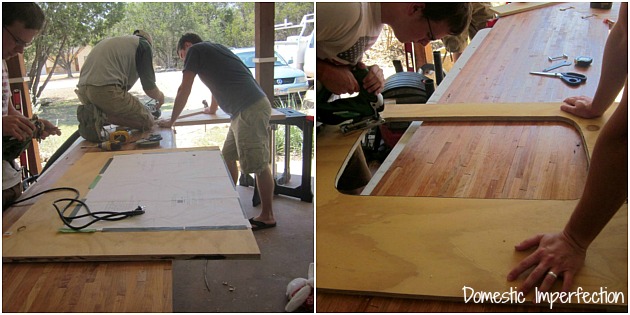
Then they used that template to cut out the hole using what tools we had (which I was told, once again, were not ideal).
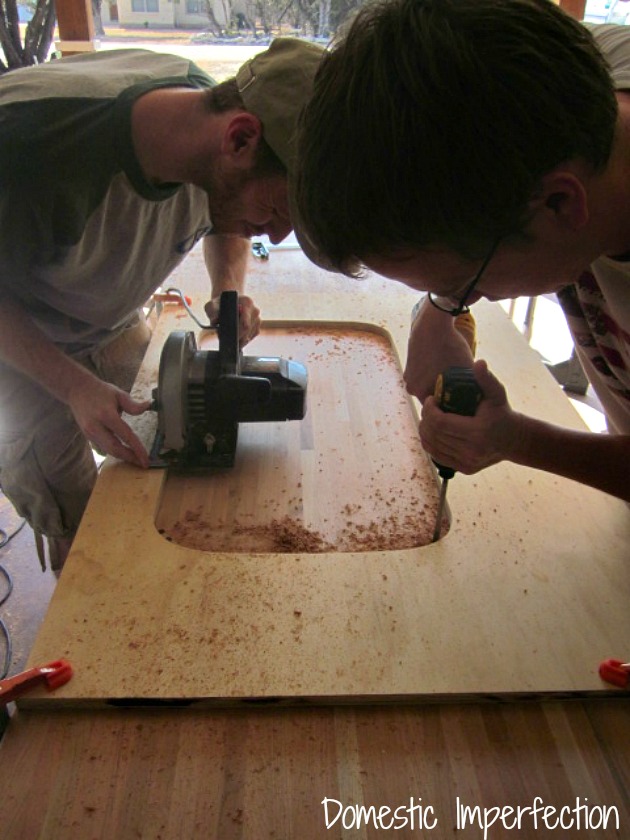
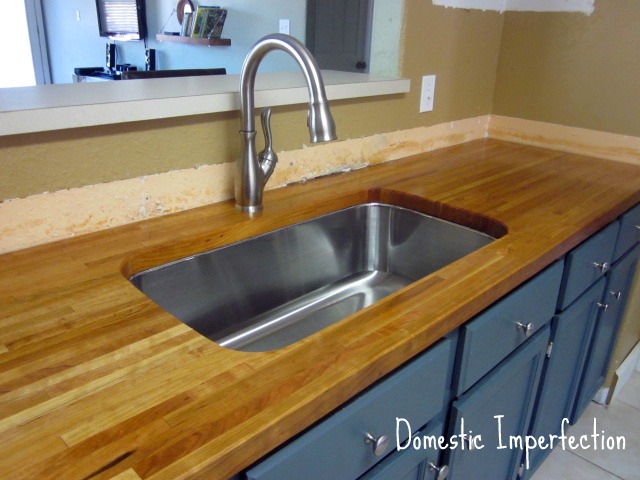
After much cutting, routing, and sanding…we had a sink hole!
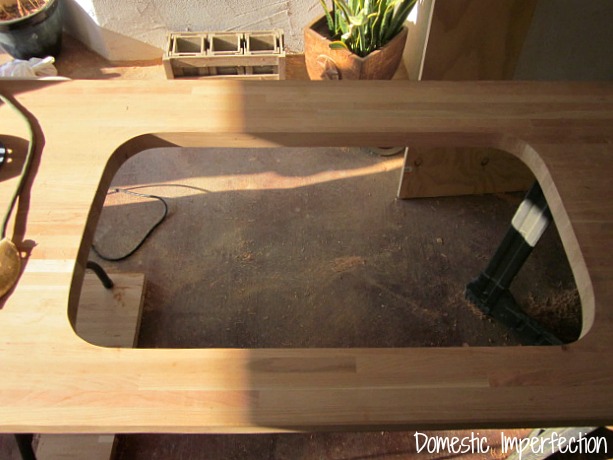
Attach your countertop to your cabinets
This part is simple. Once your butcher block counters are in place, use a handful of L brackets to secure it. Clear silicone caulk is also a good solution, but don’t use glue.
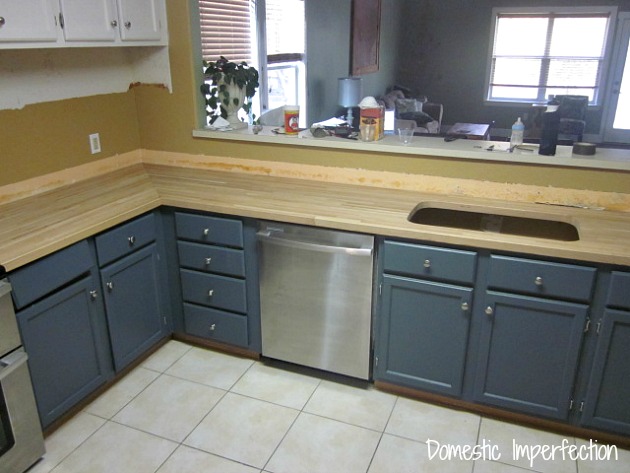
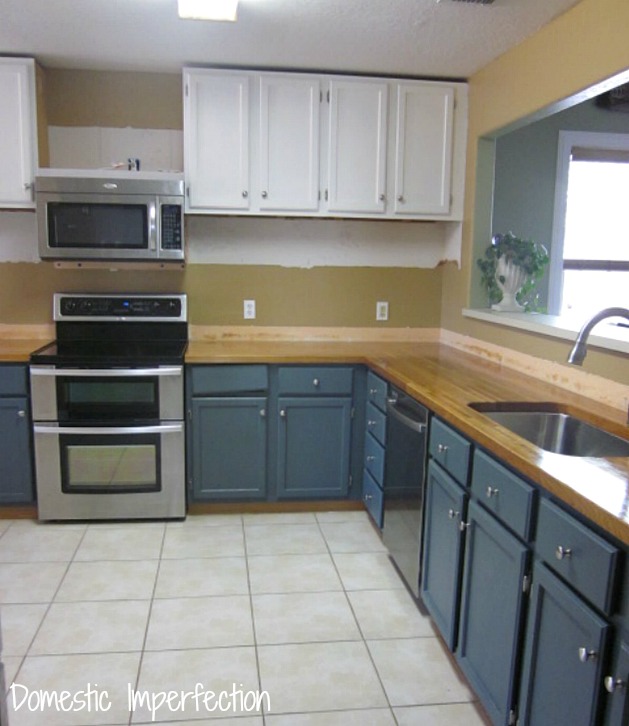
Here are the countertops installed without any sealant.
Sealing your butcher block countertops
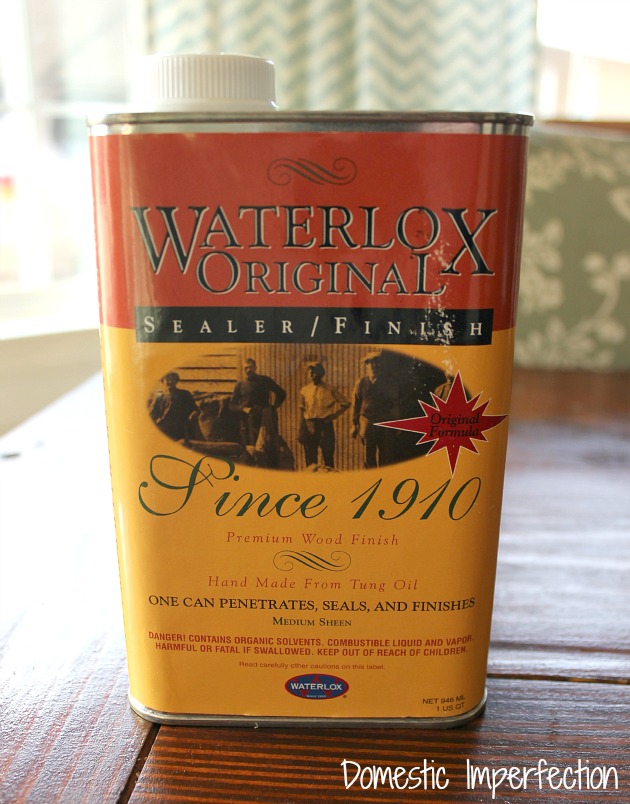
Sealing your countertops well is essential. Sealer keeps the moisture out of your wood, repeals stains, and gives it a rich and beautiful finish. Also, it is much easier than all the previous steps. There are a ton of options when it comes to sealer, and I did quite a bit of research before choosing one. Water-based sealer is my go-to (it’s so much easier to use and clean up) but for this project I knew I needed an oil-based sealer for maximum durability.
The winner? Waterlox.
What is the difference between water-based and oil-based sealer? Click below to learn the pros and cons of each.

OIL BASED VS. WATER BASED SEALER - WHICH TO USE AND WHY
Once again, I do NOT recommend staining your butcher block. If your wood contertop gets damaged (it will) you can easily sand down the small area, reapply the sealer, and boom…flawless new countertop. If you add stain this would be nearly impossible, you will never perfectly match it.
The oil-based sealer penetrates the wood and beautifully brings out the color and grain. It’s really satisfying to watch the wood come to life, actually.
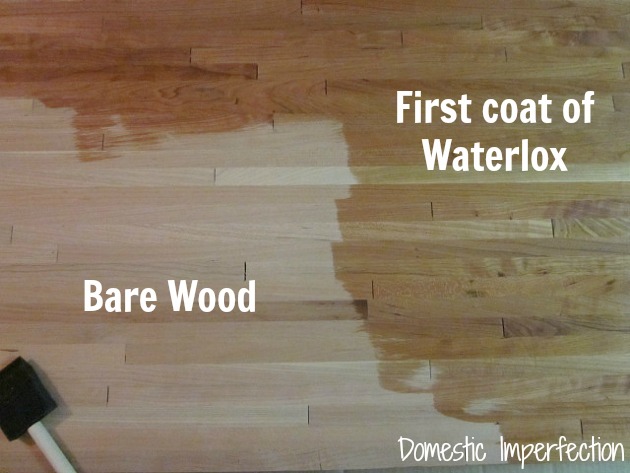
The Waterlox worked really well and was easy to use. I applied it with a foam brush (to avoid cleanup) and let each coat dry for 24 hours before adding the next. I ended up doing five coats, and before the final coat I sanded with 400-grit sandpaper, and it’s smooth as silk!
Everything has a downside though, the downside of Waterlox is that it smells HORRID. So strong that I would apply a coat…then me, my giant baby belly, and my toddler would leave the house for a while.
In case you are doing the math here, this countertop project was not quick. If you are thinking you can get this finished in an afternoon or a weekend, I’m sorry to tell you that probably will not happen.
From start to finish, this butcher block countertop project took us two weeks.
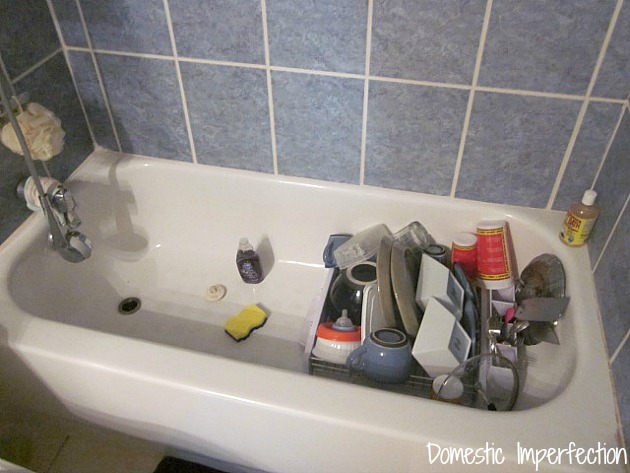
During this two week process, I was doing dishes (and all other kitchen sink activities) in the bathtub. You know what really fun at 34 weeks pregnant? Leaning over a bathtub doing dishes. Bathtub dishes are the best.
After the final coat of Waterlox dried my husband installed the sink, and that was a wrap!


Want to know how the butcher block has held up over time? CLick the link below!

MY BUTCHER BLOCK COUNTERTOPS - TWO YEARS LATER
In conclusion…
DIY butcher block countertops are a cost-effective and timeless solution for upgrading your kitchen. With the right tools and a little determination, you can create a stunning and functional surface that adds warmth and character to your space.
Kitchen Remodel Links

I love your countertops!
here's a fun and different idea for your other counter: http://www.epbot.com/2010/09/money-money-money.html
those countertops look GREAT!!!!! good choice with the butcher block!
It's looking awesome so far!! The guys did a great job with the countertops!!
it's looking amazing!!!!! how cool =)
Wow. It looks so beautiful and I'm green with envy! I want wood countertops SO BADLY!! But I'm a little scared (okay maybe a lot) of staining…how has it held up for you?? I'd love to hear!
evie @ brown paper packages
The countertops are amazing. I absolutely love the cherry. It really pops against the blue!
Your new kitchen must make you smile every time you go in there…really lovely re-do…
Deborah (happily visiting from
http://upcyclingmylife.blogspot.com…hope you can stop by too…)
I love the colors. I can't wait to see what it looks like all complete!
I looove your counter tops!! I have been thinking about butcher block for a while. Your kitchen transformation is going to be amazing!!!
Oh my gosh, I absolutely adore this. Fantastic job!
Beautiful!
*hugs*deb
Your counters are gorgeous! Thanks for sharing!
Oh my goodness, I love to see your butcher block counters, they're great!!…we had them in our other house and we loved them,in this new one we have granite and our breakfast nook table is butcher block, so to work in it too when I need to prepare more food! Congrats, they're the best! Hugs,
FABBY
How very happy seeing the transformation of your kitchen must be making you and your family.. I went through the same thing months ago and I still walk into the space with a big smile.. (especially my new sink)…. It looks so good! Great Job!
Sandy
Totally LOVE your countertops.
I redid my kitchen a few years ago, and had REALLY cheap wood put in, and no extra bolts, etc, :( So mine are looking pretty sad at the joints, but I STILL love them so much. Waterlox is the best, totally love that sealer!
Your hubby and his brothers did s SUPER great job, I wish I got a drop in sink too, it looks great!!
I would LOVE to invite you to check out my weekly parties. I would be so happy if you linked up, this and any other fabulous project you are working on. MAYBE even add me to your party LIST (yikes). That would be RAD!!!
Stop by anytime to say hello!!!
Hugs, Bella :)
**AMAZE ME AUGUST** @ Bella Before and After Any projects, recipes, diy welcome.
Euro Style Cakes. My cake blog :)
Looks fantabulous. I think I will invite myself over for dinner and a cocktail. :) Thanks so much for linking up your inspiring kitchen to Becolorful. I know everyone will love it.
Pam
This looks very pretty! Super impressed with your work, great color and design choices!
Oh, I'm so jealous. Your counter tops are beautiful!
liZ
(simplesimonandco)
Everything looks great! I love the colors you chose and the butcher block counters are so warm looking. You'll have to keep us updated on how well they hold up! It seems like you applied plenty of sealer to insure that they do though.:)
Super awesome.. Love it..Hello there.. I'm following ya officially from the inspiration board hop..Lovely blog you have here.Can't wait to read more.. Hope you can stop by & visit me sometime / follow back.. TY So much.. Have a great week.Marilyn from http://theartsygirlconnection.blogspot.com ps: Would love for you to participate in a pinterest linky :)) TY
Simply gorgeous!
I am so impressed! I can't believe you made your own counter tops! Awesome job! And now you have these beautiful counters! I would love for you to share this @ Show & Share-
http://southernlovely.blogspot.com/2011/09/show-share-5.html
Another important and ubiquitous tool is a putty knife. When you are doing your kitchen remodeling, you’ll need one if you’re going to replace kitchen countertops or your kitchen floor.
Lovely! Just lovely! Thanks for linking to Wicked Awesome Wednesday!
Husband is a custom cabinetmaker and he installed butcher block countertops in a custom home 2 years ago. Seems the trend in higher end homes ($750-1.1M and up) seems to be BACK to the butcher block. Seems that all the granite & stainless etc makes kitchens cold…there has to be more wood in them. We rent and I would LOVE to replace ours with butcher block…am seriously considering painting them….yours are stunning.
Looks GREAT!! I would die for these countertops!
BEEEEEEAUTIFUL!! We are planning on changing our counter tops to butcher block- I can't wait to show my hubbie our post. It turned out absolutely gorgeous!
Your countertops look gorgeous! Found you from the Serenity Now party today.
They are beautiful!
They are beautiful!
These countertops are gorgeous!! nice job!!
I totally want to have your countertops! We have pink tile, yeah gross but I'm dealing with it for now. I was also told by my dad to never stain or paint cherry….you guys did a great job and I really like the blue on the bottom cabinets!
I love the butcher block countertops paired with the grey! looks fabulous!
Thanks for the information on your new countertops. They look fabulous! I've been wanting to try this in my kitchen and it's always nice to have posts for reference. Great job!
Your pictures of doing the dishes in the tub made me laugh…and reminded me of our own kitchen renovations. (I was sooo happy to get that over with).It looks great!
Wow! These countertops were certainly worth those weeks. They are beautiful! Thank you so much for linking up at Savvy HomeMade Monday and I hope you will party again tomorrow!
Your kitchen transformation is going to be amazing. Thanks for the information on your new countertops. They look fabulous!
I LOVE it! What a gorgeous look, that wood is divine! I'm featuring this on Topsy Turvy Tuesday's! Thanks for linking up.
My gosh that is wonderful!! I love it! And so jealous of all your space!!
Thanks for linking up to Southern Lovely's Show & Share!! We hope to see you tomorrow!!
Amazing!! I looove the one giant sink and I just pinned the crap out of this post. Hah. Great job!
They look great! I am looking for ideas on my counters. WIll send this to my hubby asking if he can make these for me LOL
I found your post from TDC's linky party and I am over the moon with this project. First of all, your second inspiration pic is my most inspiring kitchen inspiration pick of all time, and I, too, had decided to do slate blue on the bottom and white on the top. Second, I also have a kitchen with short cabinets and a lot of ceiling height to take up. Mine are way too HIGH on the wall, and I was thinking I would replace them with some used cabinets (hoping to find some that are solid wood – mine are not) but you've given me a lot to think about with the open-shelving-under-the-cabinets idea. Finally, I am also planning to do butcher block countertops for the most part, and I've been toying with the idea of another material for a little bit of my counter. I'm thinking of using a soapstone remnant from this source: http://www.soapstones.com/store/buy_soapstone_slabs.html. Right now it doesn't have much that's helpful, but that link changes regularly and they often have a large assortment of different sizes of soapstone slab remnants, at great prices. (Plus, soapstone is not hard like granite, so you can do the finish work yourself without stone-cutting tools.)
So…in case my link is helpful, I'd like to propose a little trade…I don't suppose you'd share the paint colors you used for the slate and white?
Awesome job on the kitchen!
I have a butcher block right now but want to increase the size. I'll be anxiously waiting to see how your project turns out as I've been looking for idea of butcher block too. Thanks for the great tutorial.
Great post! We are looking to put granite countertops in my New Jersey home-I would like butcher block though! We'll see who wins this one, me or the husband! Great job-looks beautiful!
wow. It's stunning! Gooood work!
That's looks awesome. Great work
I love the natural look of the butcher block, especially in cherry. The kitchen looks great!
I just did a similar project too! We used REALLY cheap butcher block, our material was 40.00 each at IKEA, we needed two pieces. So less then 100.00! yours looks just fantastic! For anyone who has an ikea near them, check it out!
What tools did you use to do the miter? Right now I’m looking at making a jig and using a skill saw. I’m from a small town so I’ve not been very successful in finding anyone in the professional field with the right sliding miter saw.
They look beautiful, can’t wait to do mine.
I LOVE butcher block countertops! I sooo want to do this in my home! It looks great!
Oh my gosh, i want to lick those countertops!! I LOVE butcher block and have been really thinking about using that when ever i get around to re-doing my kitchen!!
It looks absolutely beautiful in y’alls home!
Bwahaha! Lick my countertops….I love it. Thanks Amy :)
I LOVE the look of butcher block counter tops, but am curious how they have held up? Water stains, or marks from cutting, hot pots, etc? Just found you via Pinterest and am having so much fun looking at your house.
They still look pretty much new and don’t have any of the stuff you mentioned. That being said, I’m really careful with them…always use cutting boards and hot pads. I like the butcher block a lot, but next time I think I would like counter tops that I can abuse.
We just bought our butcher block countertops from IKEA today. Can’t wait for them to be done acclimating so we can get started! I stumbled upon your blog while drooling over all the other butcher block counters that I can find. I love the cherry!! Gorgeous! We went with oak for ours and we will be using a dark walnut stain. We are also painting our cabinets–Dove White by Benjamin Moore. Kitchen projects are quite an undertaking, but well worth it in the end. :) I just want to know, where on earth can you find travertine for under $2/sq ft?! Do tell! We have wood laminate in our kitchen (& whole house) and initially planned to do ceramic tile but decided that since we want to do hardwood down the road, we won’t want to rip up the ceramic tile, so we’re going to wait on flooring…but we drooled over all the gorgeous travertine we’ve seen, nothing less than $5/sq ft around here though. :(
We are still waiting to buy our flooring…I’m just not sure I’m ready to destroy the kitchen again. I’m so enjoying having it finished (or at least fully functional). The best travertine tile prices I have found are on this website http://www.builddirect.com/Travertine-Tile.aspxand, they are right around the $2 range (some are a little more and some are a little less). You can order free samples too!
This site has a lot of very useful stuff on it. Thank you for informing me!
Your kitchen looks great. I’m getting great ideas and inspiration from it. One question: I didn’t know that you can do an undermount sink with butcher block counters. No problems there?
No problems there, but I’m not sure I would do it again. I wrote a follow-up post that goes into more detail, here is the link https://wildfireinteriors.com/2013/08/my-butcher-block-countertops-two-years-later/
Did you stain the butcher block before you applied Waterlox? Thanks! JM
Nope, no stain. The waterlox brings out the natural color and it looks great. I was leery when my husband said we weren’t going to use stain, but he was right!
Thanks for all the info and for the 2 year follow up post! I laughed while reading it because I am also 34 weeks pregnant, we also have been without a kitchen sink for a week, and I have been enjoying some bath tub dishes myself. At least I know I’m not the only crazy one to do a DIY kitchen remodel while super pregnant :)
Have you thought of concrete counter tops or bar
How did you join the 2 portions together after you made the 45 degree cuts? Was it just those brackets or was something else done as well?
You did a really good job on your countertops. I have been thinking about getting new countertops for a while now. I think that the ones I have right now look too run down. New countertops will really improve the look of my kitchen. I guess that I had better get my wife and go shopping for countertops.
I swear that you have our kitchen!!! We are finishing up ours … white on top, gray-blue on the bottom, stainless appliances … same layout! I’m begging hubby to do the butcher block countertops :D
Thanks for the inspiration!!
Hi! We are in process of installing ours…can I ask how you mounted the countertops to your cabinets?
Hi Ashley,
Great story on your countertop. They look great! I’m doing the same thing and I found that my 45 degree joint won’t seat completely with the miter bolts. Did you have trouble with that part too? Any guidance you can provide would be greatly appreciated.
Thank you,
Trevor
Hi there,
From recent experience, we found that we needed to router the edge guided by a straight edge e.g a length of factory cut MDF to assure it was as precise as possible. We didn’t get it right first time, but had to have another try taking literally only about a thirty second of an inch with the router using a 1 1/2 inch fluted bit. After the second attempt, we found it much improved.
I am so impressed with how your countertops turned out! I actually really love how the wood looks, and after the sealant, it definitely feels more put together. I don’t know if I could do this on my own, though, so I’ll have to enlist a professional to help me.
I’m planning to renovate the entire home but thinking from where should I start. I thought to place edge grain butcher block tops which have parallel wood rails that run the length of the piece. End grain butcher block tops are created by fusing together the end pieces of wood rails into a checkerboard pattern. It is considered the stronger and more durable style. But after seeing this one, I have made up my mind for this butcher block countertop.
Thanks for this amazing stuff! Keep sharing!
Great
Your willingness to try something a little of of the box or “funky” with the counter top bar area is an adventurous one. Your comments about being 34 weeks pregnant and leaning over to do dishes were amusing.
Hi!
Thanks so much for this post- it’s been incredibly helpful as we redo our kitchen. We are doing cherry butcher block counters and shiplap backsplash as well. For your counters, did you sand them before your first coat of Waterlox and if so, what grit sandpaper did you use? And did you router the edges and ends of your counters? We just got ours in yesterday and are surprised by how sharp the corners are.
Thanks for your advice!
Hey, I’m doing this same thing, and I came across your blog researching waterlox. Here’s my question. I have made all the cuts and have everything ready to seal. Did you do three full coats on the bottom and then flip to do the top, or did you flip each time? If so, did you wait the full 24 hours between each coat? Did you have an issue with marring the top surface when flipping? Thanks in advance!!
Tim
If I remember correctly (it was probably six years ago now) we just did one coat on the bottom and then flipped it and did three coats on the top. I remember it taking a few days to finish but I don’t think we waited 24 full hours between coats, probably more like 12.
I have to say it being a carpenter. wear some eye protection.
Beautiful! How did your husband learn to make kitchen cabinets?? Did he take a class?? The kitchen is gorgeous!
This turned out so amazing!!! It made such a huge difference in your kitchen. We are making a list of home projects to do this summer and will have to add this to the list. Thanks so much for sharing!
STUNNING. WELL DONE!!
I absolutely loved this post! The step-by-step guide made the installation process seem so much more manageable. I can’t wait to try this in my own kitchen. Thanks for sharing your tips on maintaining the countertops as well!
I absolutely loved this post! The step-by-step instructions made the installation process seem so manageable. I can’t wait to try this out in my kitchen. Thanks for the helpful tips, especially about sealing the countertops!
Great post! I love the detailed steps you provided for installing butcher block countertops. Your tips on sealing and maintenance are super helpful, too.
I absolutely loved this post! The step-by-step guide made the installation process so much clearer for me. The tips on finishing and maintaining the butcher block were especially helpful. Can’t wait to start my own project! Thank you, Wildfire Interiors!
I love the step-by-step instructions you provided for installing butcher block countertops! The tips on sealing and maintenance are especially helpful. Can’t wait to try this out in my kitchen renovation!