
How to Turn a Dresser into a Bathroom Vanity
Updated November 22, 2023
Dressers are super versatile, you can transform them into a host of things. I’ve seen them made into media centers, changing tables, buffets, benches, bookshelves, toy storage, and bathroom vanities.
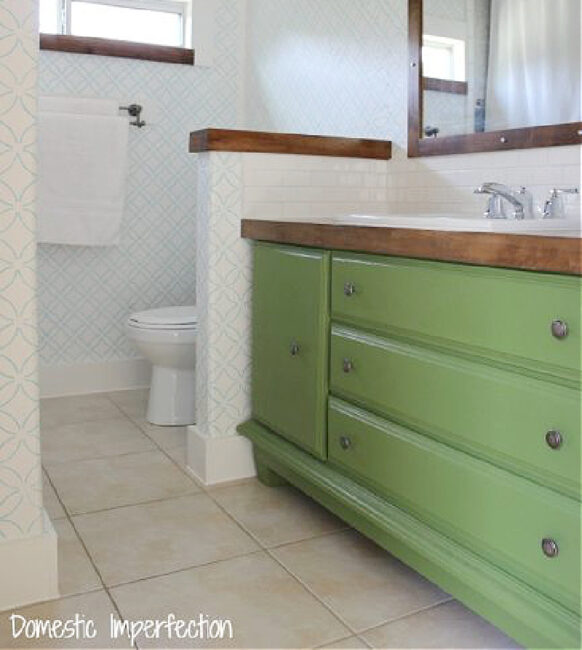
When we decided to start renovating our small master bathroom, I knew I wanted a dresser as the new bathroom vanity. I liked the idea of it looking like a piece of furniture, and wanted the storage.
So here is the story of exactly how we did that!
Dresser into Bathroom Vanity Tutorial
Step one – Find a dresser that is the right size
Here is more good news about dressers…they are pretty easy to come by. You can pick them up for cheap secondhand, and you may even have an extra one hanging around that you can easily repurpose. That’s what happened over here, I ended up using the dresser we have been using as a changing table into our bathroom vanity.

As far as finding the right size dresser for your space, this could be easy or hard. If your bathroom doesn’t have walls on both ends of the vanity, then you have a little leeway on the size. If it does (like mine), you will have to find something that is spot on lengthwise, or be willing to do some modifications.
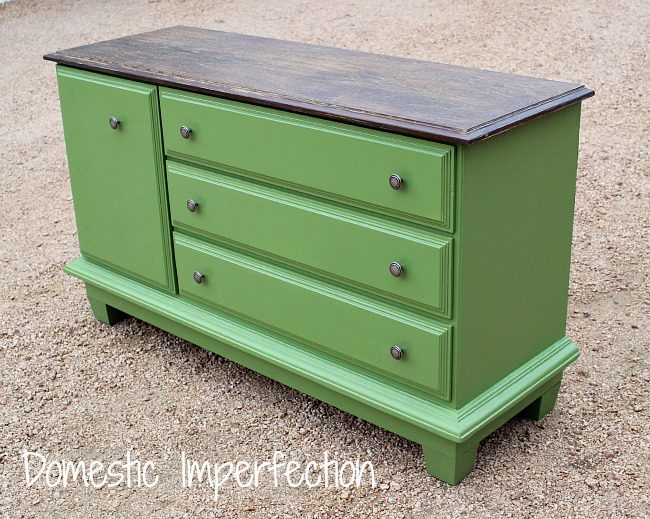
Step Two – Make your dresser pretty
If you want to paint your dresser or modify it in any way, do it before you install it. It’s just easier that way.
I’m not going to give a whole furniture refinishing tutorial here, but if you want details you can read about how I transformed this piece by clicking the link below.
Step Three – Cut a hole for the sink
For us, this step included building a whole new top for the dresser, but depending on your dresser and the sink you choose, this step may not be necessary.
We wanted a larger sink, but the problem was that any decent-sized sink was too deep for the counter (as in it hung over the dresser in the front.) We decided to build a countertop out of hardwood flooring, which is a great solution for those of you (us) who don’t own a ton of tools.
I have two blog posts about how to make a countertop out of wood flooring. The first one is how we make this exact countertop, and the second link is an updated tutorial on a later project.
- HOW TO MAKE A WOOD FLOORING COUNTERTOP (THIS EXACT COUNTERTOP)
- HOW TO MAKE A COUNTERTOP OUT OF WOOD FLOORING (UPDATED TUTORIAL)

Step Four – Remove the old vanity
This part is easy, I promise. You just unhook all the plumbing connections (have a towel handy!) and get to ripping.

Just FYI, the drain pipe that sticks out of your wall will stink. Bad. My husband swears it not just us and that all drain pipes smell horrid. Whew. Just cover the pipe with a plastic bag and rubber band until it’s time to hook everything back up.
Step Five – Cut a path for your drain pipe
Here is where the actual tutorial part of this post kicks in. So you have a sink, and your sink has a drain. That drain has a pipe, and that pipe has to connect to the drain pipe in the wall, much further down. And those dresser drawers that are going to be so great for storage and currently a big problem.
Dry fit everything. Place your counter on your vanity, and drop in your sink, with the faucet installed. Then you are going to use a pencil and a tape measure to sketch out a path for the pipe.
Here is our dresser stripped down, and you can see that the drain pipe is right in the middle of everything.

After you have sketched out your path and double and triple-checked it, get out your jigsaw and go to town. That’s really about as much advice as I can offer, but I think these pictures might give you a better idea of what is involved…


I know, those pictures make this look like a daunting task. The drawers do complicate things, and if you could find a dresser with a door in the center it would make this part much simpler.
Step Six – Put it all together
After all the path for the drainpipe is clear, the next step is to put it all together.
First, install the drain and make sure it is leak-free. Then install your countertop. Next, drop in your sink, and connect the drains and hot and cold water supplies to your faucet.
After you have once again checked that nothing is leaking, secure in your sink with caulk.
Quick tip – You want your caulk lines to be straight because they will be right out there in the open. The best way to do this is to use painter’s tape along both sides of where you are going to caulk (I wrote a tutorial about that HERE). Also, I found that smoothing it out with a baby wipe works great.

Also, make sure you wait until the sealer on your countertop is cured (so like 72 hours) before you put painters tape on it…it WILL pull up the sealer. Trust me on this.
And there you have it!


The dresser-turned-vanity has a ton of room for storage…

(We thought about adding surrounds around the holes to keep stuff from falling in the holes, but decided to see if it’s a problem before we make more work for ourselves. It’s been a few weeks and we haven’t had any “incidents,” so I think we’ll leave it.)
Also, it’s WAY better looking than our old vanity…

(It is nearly impossible to take a decent picture in this bathroom – I had to stuff myself in my linen closet and take a million photos to get that aftershot!)
Next, we tackle the rest of the bathroom….

Want to see the finished bathroom? Click the link below!
Ooooooooooooooooh I’m so excited to finally see your master bedroom! I saw it that one time when you told about the spider-fiasco (or was it wasps?), but still….And I love love love this post so much, for so many reasons. All of which you know! Perfect, girl! Pinning! xo
It was wasps, but after a month in the front yard there were plenty of spiders too :) Your bedroom is probably your most blogged about space, and mine is a big mystery. I can’t wait to start, but first I have to finish the bathroom AND the boys room. Sooo, yeah…it might be awhile.
Love this project! I’m planning to do this in our bathroom and I’m bookmarking this when I find the right piece. Thanks for sharing!
Great job! I love it! I am in the process of doing similar. I am very grateful for your little tutorial. One thing I would do though, is put some surround around the gap for the pipe so nothing would fall through. Can’t wait to do mine now!
Thanks Maria! We thought about adding surrounds (and still might), I’m going to see if it’s a problem first. Most of the stuff in the drawers is pretty big or in a container so hopefully it will be fine.
I love the pop of green! There’s no doubt it’s a truly unique & custom piece. Also love the quilt…there are so many directions you can go with the colors in it! Looking forward to seeing the masterpiece you’ll create for your bedroom, even if it takes a while!
I don’t want to complicate what looks to be an already complicated process, but I think I would have to put some ‘sides’ around those cutouts in the drawers. I would be concerned about things sliding during open and closing, and falling through into the drawers below.
We thought about adding surrounds (and still might), I’m going to see if it’s a problem first. Most of the stuff in the drawers is pretty big or in a container so hopefully it will be fine. Kinda ready to be done with this part :)
man, all that storage is great! love it
Ashley,
I love your blog! The reason why: its normal… it looks like a normal house where people live ie. children that love to play outside and husband that can get just as dirty. I’m all over your style. I like that I feel like I can achieve a similar look without breaking the bank. I LOVE IT! keep up the great work sister! And keep keepin it REAL!
Girl, that is amazing! And gives me hope for our guest bath! I’m getting sick of that ugly builder’s grade vanity… blech!
Great job putting this all together, Ashley
You guys did an amazing job! Wow, night and day from your old vanity. I love the colour, and also the other colours in the quilt – the bedroom will be fun to do (and well-deserved! Busy parents need a relaxing space to call their own.)
That came out amazingly well! Absolutely love the color too. This makes my cheapo hardware store vanity feel very very vanilla!
It looks fantastic. I love that you added the feet. Great project.
Warmly, Michelle
I love this! It looks great! Drawers are so much nicer for keeping things organized! I actually have a custom top drawer cut out around the sink in my vanity. http://exploringdomesticity.blogspot.com/2013/05/secret-vanity-drawer-taking-advantage.html. It is so nice to have!
You guys did a great job and your little one is so cute in picture #1. :)
Kristin
http://Www.exploringdomesticity.blogspot.com
I love your new vanity! Truly unique. The pop of green is awesome. If you get a chance, please share this on my link party http://suburbsmama.blogspot.com/2013/05/sunday-link-party-8.html
that settles it-put legs on anything, and I like it 10 times better! and gorgeous quilt!
This is amazing!!! I love how it turned out and the color is great!
Thanks Kaysi! I’m loving the green too. I’m in the process of putting a turquoise stencil on the walls (stenciling takes for.ev.er!) and they are so fun together…or as my husband says “very interesting”, haha.
WOW! I love it that it was a dresser! you did a very good job; it looks very nice!
so glad to have stopped by your lovely blog today from The 36th Avenue party!
Ingrid
Looks awesome and great tutorial! I would love if you stopped by my linky party happening now to share this!
Stacey of Embracing Change
staceyembracingchange.com
I would love for you to share and link up at my TGIF Link Party. The party is open every Thursday night and closes Wednesday’s at midnight.
http://apeekintomyparadise.blogspot.com/
Have a wonderful week!
Hugs, Cathy
What an amazing transformation! The color is beautiful, and the knobs you chose are perfect!
Looks great, girl! So much work. DEFINITELY worth it!! Good job to you + hubby! (:
Thanks! It was a bit more work then we were expecting, mostly cause we had to make a new top. But now that’s its in there and functional we have forgotten about the pain…kinda like childbirth, lol.
You did a great job. I will be featuring this tonight at my Swing into Spring party that opens at 8pm EST. Please stop by and pick up an I’ve Been Featured button. Thanks.
That’s awesome, thanks Judy!
I love the vanity!! But then I’m a little partial to green since I painted mine the same colour! So fresh feeling!
I love how your husband had the same reaction to the colour as mine. He likes it now though!
Gorgeous, gorgeous, gorgeous! I will have to start looking for an old dresser.
Love it! We have three vanities that need major help here.
I’ve seen this on Pinterest and loved, loved, loved it! I can’t get over the green and am so encouraged by your tutorial — maybe I really can do it in my master bath. Thanks for breaking it down for me.
Turning a dresser into a bathroom vanity is very popular these days. It provides a wonderful piece which you can set any room of your home apart.
No one else asked….WHERE did you get the quilt? I LOVE it! I also love the dresser/vanity!! I’m obsessed with all of your remodeling projects! I’m smack dab in the middle of starting a MAJOR house overhaul. We’ve gutted the house from the upstairs ceiling down to the main floor.(Seriously..I look straight up at the tin roof!) We have two bathrooms and a bedroom left. We currently reside in a 30ft camper! It’s a crazy life here in the camper with two teens, a preK, a Kindergartener, a pom, and a westie pup! But, this too, shall pass!! I’ll begin blogging about it as soon as work commences =) Oh, did I mention that I’ll soon have my older son home in 8 days? Not sure where we’ll put him……! Haha!
That is a major overhaul! That’s funny because my husband and his family of seven lived in a camper for a year while they were building their house. Even more surprising is that I never hear horror stories about it from any of the kids (thought it might be a different story if I asked his parents about it!).
Oh, and I got the quilt at The Company Store, they have great bedding. The one I bought was on final closeout, but they come out with new bedding each season.
Oh my goodness, I had the same dresser! It was from a bedroom suite my parents bought for me in the 60’s and it was a wild red-orange. It was actually really nice pecan furniture sold in some unfortunate colors: yellow, red-orange and white. My husband & I refinished my dresser 10 years ago for our guest room. Weren’t those plasticy daisey leaves on the drawers weird?
This post is a life saver for me! We are about to start remodeling and I urgently needed pics to show my uncle about gutting the dresser. Bless you!!
Fantastic job. It looks great. And love your tutorial. You have done a nice work. The color combination increase the pretty look of your vanity. Love to see step by step guidance from you for us. Thanks for sharing such a beautiful information with us.
I love this idea! Transforming an old dresser into a bathroom vanity is such a creative way to bring character to the space. Your step-by-step guide is really helpful, and I can’t wait to try it out in my own bathroom. Thanks for the inspiration!
I absolutely love this idea! Transforming a dresser into a bathroom vanity is such a creative way to add character to a bathroom. The step-by-step instructions were super helpful, and I can’t wait to try this in my own space. Thank you for the inspiration!
This is such a creative idea! I love how you transformed a simple dresser into a stylish bathroom vanity. The step-by-step guide makes it seem so doable. Can’t wait to try this in my own space! Thank you for the inspiration!
I absolutely love this idea! Transforming a dresser into a bathroom vanity adds such character and style. Your step-by-step guide makes it seem doable, and I can’t wait to try it in my own bathroom. Thanks for the inspiration!