
A Bedroom Ceiling (Un) Update
A few weeks ago I blogged about our wooden bedroom ceiling, and I finished that post by saying I was pretty sure I was going to stain it.
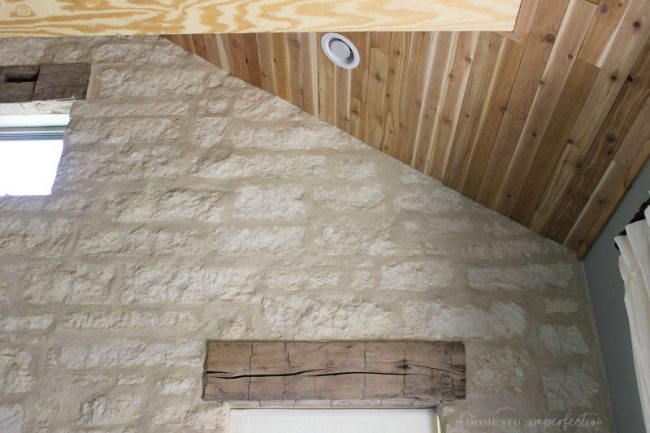
My issue with the ceiling was that it looked very fresh and new, not rustic and old like I had hoped. Adding to that feel was the fact that the wooden window headers are old and gray, and the two just didn’t look like they belonged in the same room.
Staining it seemed like the best solution. Nothing too dramatic, just something to add age. After some research and awesome reader suggestions, I decided to do a homemade stain out of apple cider vinegar and steel wool. It seemed like it would be easy to apply, cheap to make, and add just the right amount of color.
So I bought all the supplies, and then….I did nothing.
I just couldn’t convince myself that spending a day or more, 17 feet in the air, upside down, applying drippy liquid to a ceiling sounded like anything but torture.
Then one day my sister-in-law came over and unloaded the best idea ever. Instead of changing the ceiling, what if I changed the headers and made them lighter/less gray? It was such a great, EASY, solution…why did I not think of it before?! So one night I grabbed a stiff wire brush and tried to expose a fresh layer of wood on the header beams (which I did live on Instagram).
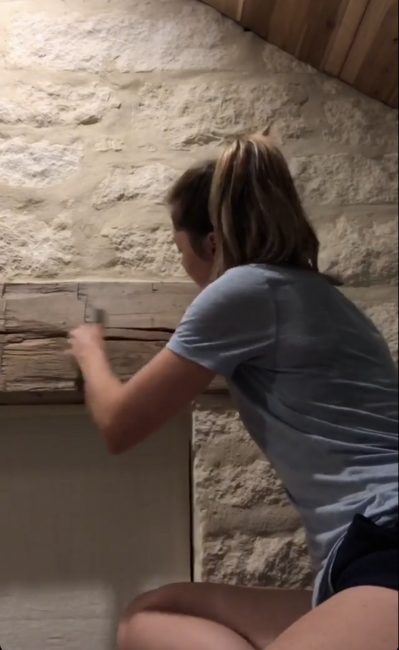
I’d love to tell you it worked perfectly and all is right with the world now, but it was a fail. All my brushing and scraping had zero effect. That doesn’t really make any sense to me, but I suppose the outcome could have been much worse.
So I decided I didn’t care if the wood tones matched and to stop thinking about the whole thing. It will slowly darken with age anyway, so a little patience will take care of the “too new” look. We still have quite a few wooden things to add to the room anyway (barn door, floor, bed, etc), and none of it is going to match. I’m calling it a good thing.
Sorry about that unimpressive non-update, but sometimes that just the way projects go. There ARE a few ceiling changes that happened though, so let’s talk about those before you decide this is the lamest blog post ever.
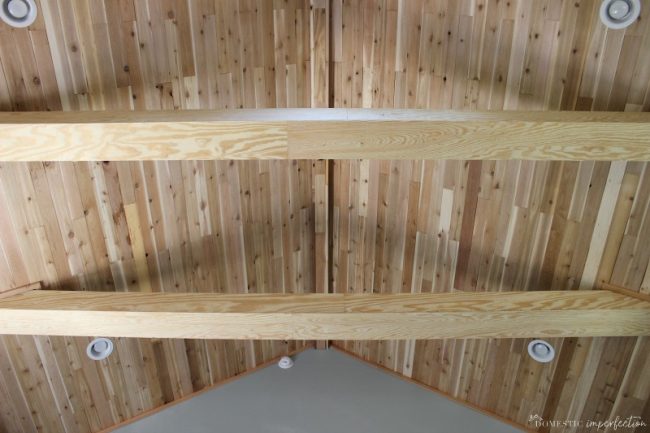
First, the beams are now white.
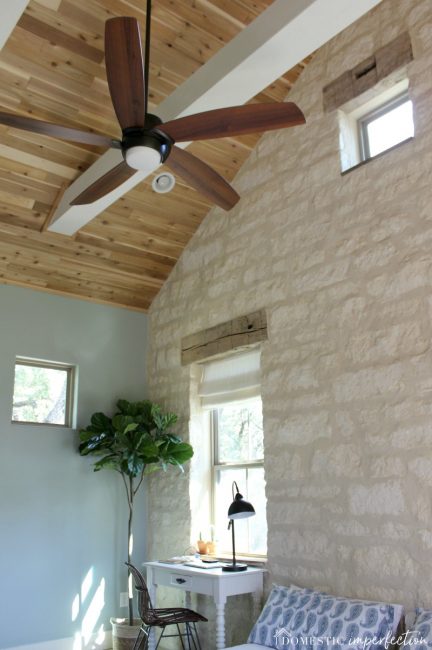
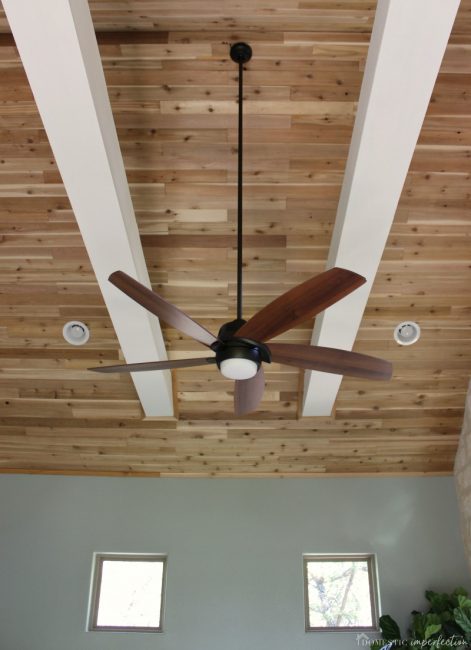
They look nice, and I like that they match all the trim in the room and really stand out amongst all the wood. Also, since the beams are just framing wrapped in cheap plywood they literally cost about $60. That being said, if I could go back in time and make them real antique wooden beams (like the window headers) I would 100% do that. No doubt. Hindsight’s the worst.
Next, we now have a ceiling fan! This is huge. We keep our house fairly warm (77 degrees) and the fan makes it feel downright cold in our room. I even used a blanket the other night. Man I’ve missed blankets.
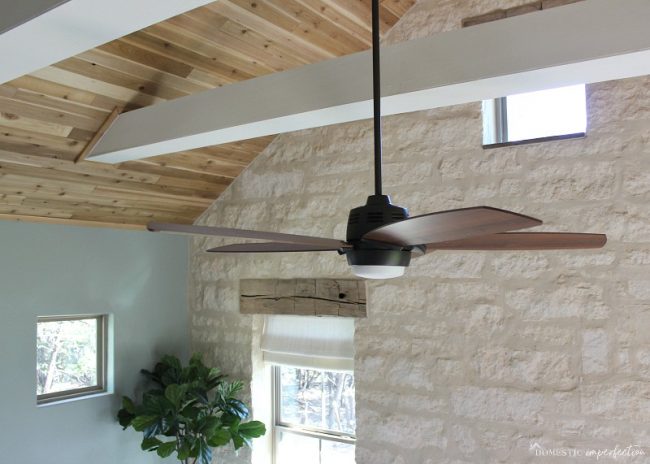
I scored this one new on eBay for $250, and it works really, really well. It moves a ton of air, has an LED light and remote, and it’s not ugly. Also, the wood tone doesn’t match any other wood in the room, which means I am totally nailing the mismatched look.
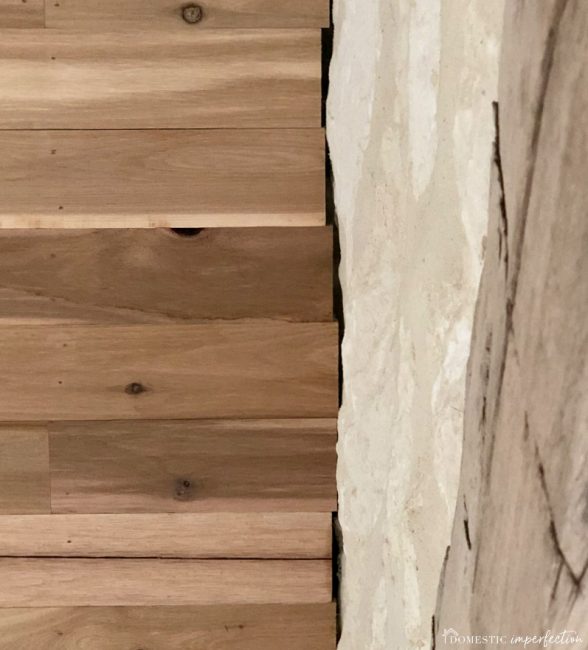
Last, we managed to fill the gap between the wood ceiling and the stone wall and have it not look ridiculous. Here is the before…
and the after –
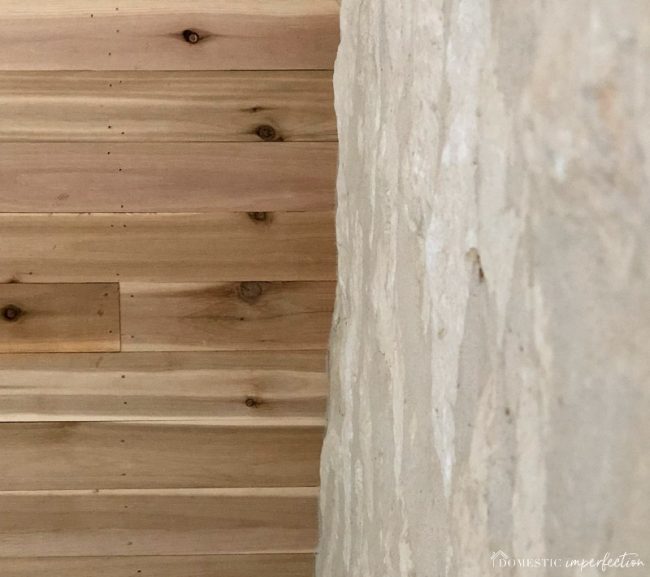
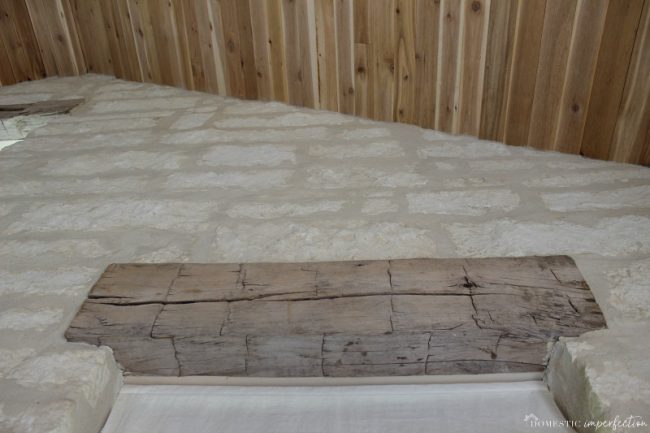
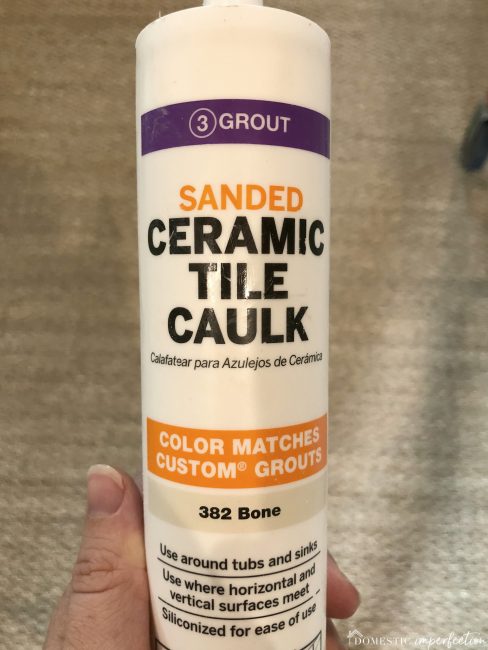
The stone wall isn’t straight enough to add trim (we tried), so I bought this sanded caulk in the color ‘bone’ instead. It went on surprisingly well, and since it’s sanded its almost an exact match to the mortar.
So those are all the ceiling updates, but many more bedroom updates are coming! Do y’all remember when I used Modsy to design the master bedroom earlier this year? As a reminder, here is the plan we came up with…
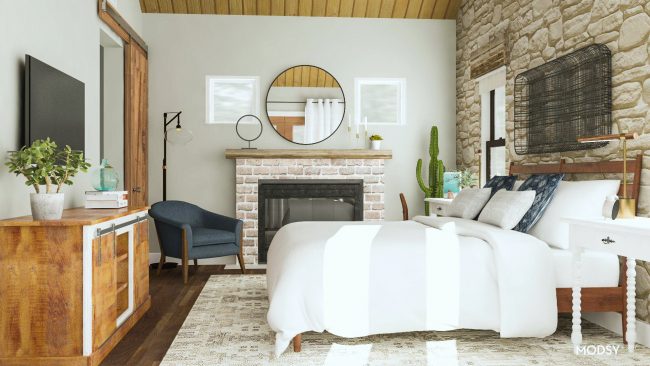
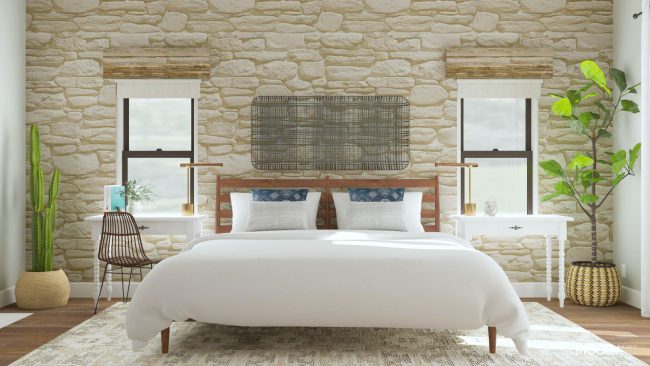
Doesn’t that look so dang good…not to mention lifelike?! I’m slowly working my way towards this goal, and if my very backordered bed ever comes in, then reveal will be up at the end of October! Well, reveal minus the fireplace and wood floor, because budgets are real.
I had to keep scrolling up to look at the pictures to see what you were obsessing over. I think it looks awesome. The white beams really help to tie it together.
We live in a log cabin with exposed log and chinking inside and out. So I know the wood on wood on wood on wood feeling. No one else thinks about it when visiting but when you see it day after day….
Really like the caulking – really pulled it together. Might have to look into that if we ever redo anything here.
I was going to just let it go and play it cool, but I thought looking crazy on the internet sounded like more fun, haha.
When I brought home the sanded caulk and told Adam that was my solution, he said “No way is that going work.” Then afterward he was like “Holy crap, I can’t believe how insanely well that turned out…..don’t get a big head about it.” Ha! It’s so nice when things work just like you hoped!
I loooove the caulk between the ceiling and the stone wall. It gives it the look that it’s always been there and was all installed at the same time
Also, I love the beams! I actually think the white beams kind of pull your eye up so you notice the ceilings. I’m not so sure it would if you had used wood beams (but what do I know…nothing. I know nothing. I can’t even get pictures hung in my house.) I know the color is different, but it just looks like you sanded the ceilings or that they just haven’t aged as quickly as the window headers. It actually looks really intentional and well put together. Almost like you are renovating an old farmhouse and are keeping the character while adding some modern touches.
“Almost like you are renovating an old farmhouse and are keeping the character while adding some modern touches.” That is the biggest compliment ever, and exactly the goal. Thank you! Also, I have completely bare walls as well, and we’ve been here over two years. The struggle is real.
The ceiling looks great, even if the wood tones don’t perfectly match. That’s the nature of wood. I am impressed by how well the sanded caulking did such a great job on hiding the gaps along the stone wall. Keep up the good work and I look forward to your next update!
Thank you! I can’t believe how well the caulk worked either.
Your caulk solution is pure genius!
As I was reading about your ceiling dilemma I recalled another blog discussing wood ceilings…you may enjoy the info: https://stylebyemilyhenderson.com/blog/mountain-fixer-upper-ceiling-blasting
There are methods to age wood that are not very cumbersome…but that probably should have been done before the wood went up (believe me this is exactly something I would do.) I think the ceiling adds interest. If your heart is set on it being a weathered gray …. https://www.familyhandyman.com/painting/how-to-age-wood/view-all/ has some great methods of aging wood. I am thinking paint sprayer. After testing on some leftover wood….so see if you can spray on and leave it to dry without actually having to touch the wood.
Good luck and I think you guys are amazing!
Amazing ceiling!
This is so beautiful! The white beams REALLY finished the look off (as well as the caulking – great idea!) The white beams break up the look of so much wood, and really make it seem like it’s not this vast sea of one colour wood vs the window beam wood. I like the mismatched wood look, I think it can add a lot of charm and is particularly well-suited to a farmhouse.
I think the outcome of your project was stunning. I can’t be more exciting seeing such a beautiful bedroom.
You provide very great services, and your work is excellent. But I also work for Remodeling (NA Design Builders), which is doing commercial remodeling . This is the comment just requested. If you are interested in receiving our services, you can contact us at; http://nadesignbuilders.com/
We’re well trained with all manufacturers and of all gate types such as metal gates, aluminum gates, wrought iron gates, and more. We specialize in both residential and commercial gate repair, gate maintenance, and gate installation. Automatic gate repair