
RV Remodel – Dark and Dated to Bright and Inviting!
It’s finally RV reveal time! Are you ready for some serious before and after pictures?! In case you haven’t been following along, here are all the posts about the RV remodel.
RV Remodel Posts
- Buying the RV
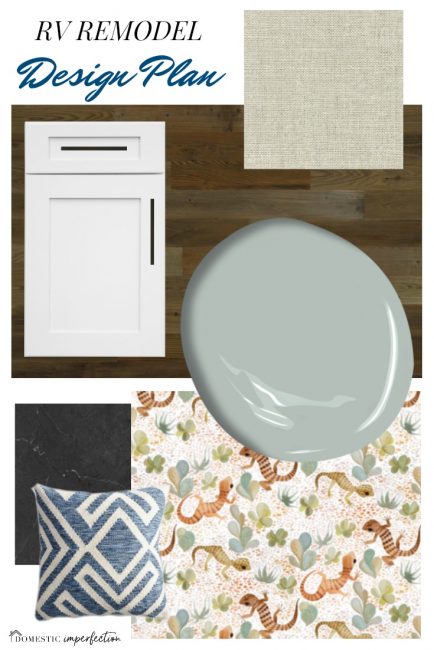
- RV remodel design plan
- Painting the cabinets
- Painting the walls
- Painting the countertops
- Rustic wood accent wall
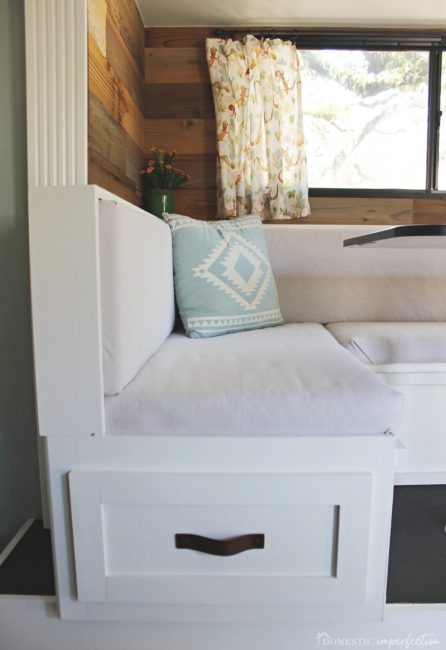
- Reupholstering the banquette

When Adam and I were RV shopping we had a list of must-haves. We wanted a pull behind camper that could sleep all six of us (without having to convert everything into a bed at night), a dining table that could seat all of us, something pretty light and (reasonably) short, and under 10K.
This camper fit all of that, plus more. In addition to all the features mentioned, it also came with a stunning brown color palette….. just layers and layers of beautiful brown, greige, taupe, camel, and burnt sienna. A complex yet soothing monochromatic look, something that only the best and most highly trained RV designers can pull off. Let’s look at some more pictures to truly appreciate the skill and detail put into the interior finish choices.
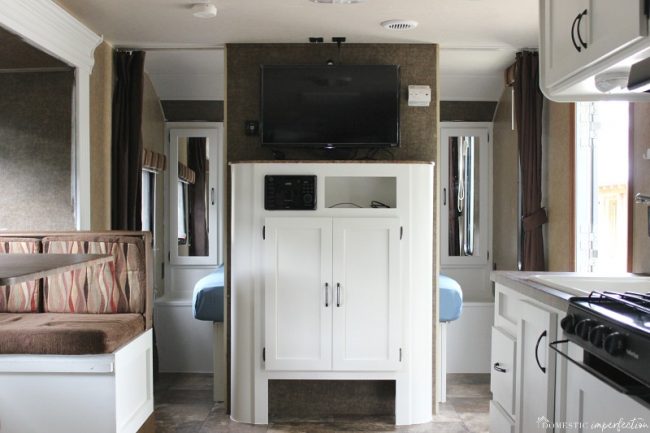
Before

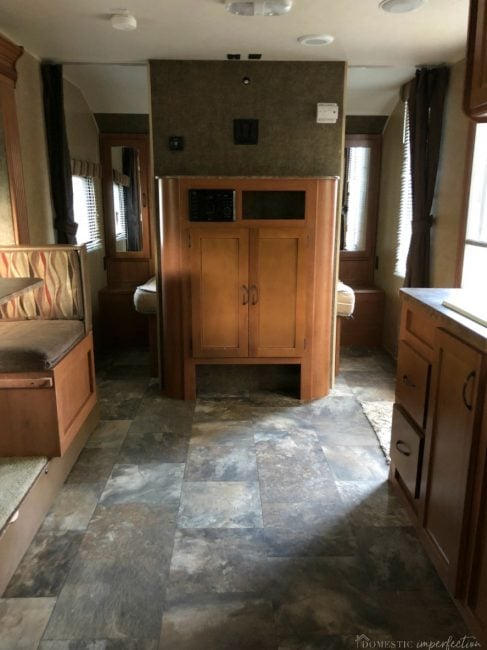
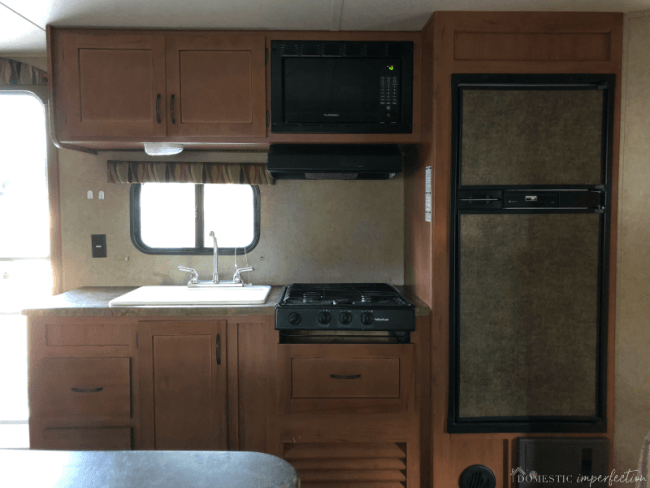
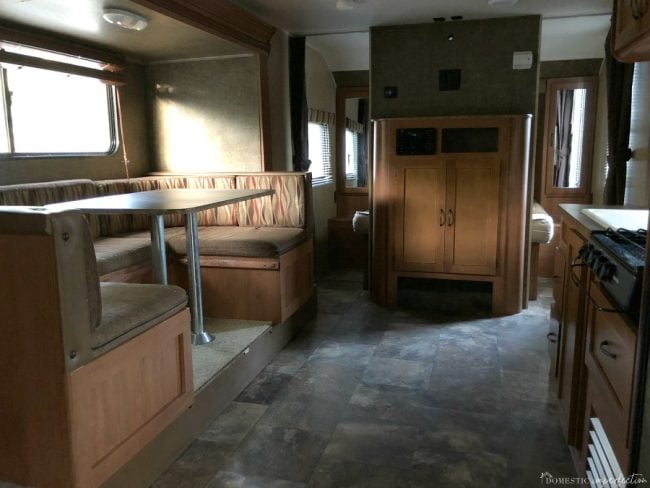
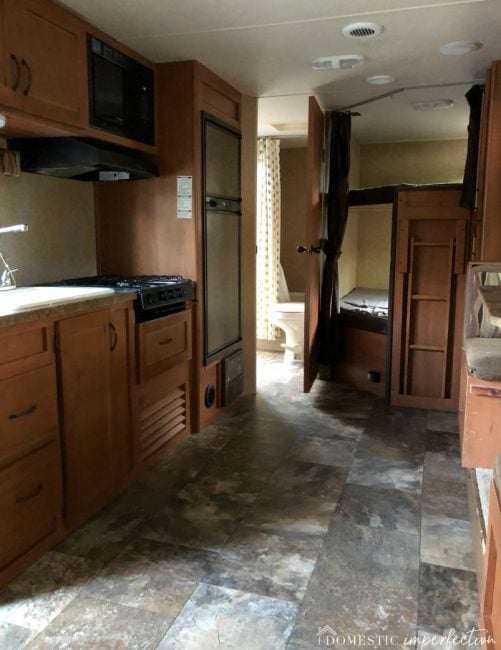
Gorgeous, right!?! Riiiight. I’m obviously being sarcastic because this thing was butt ugly. Adam and I didn’t plan on remodeling the RV we bought, but then we brought it home and started dreaming…. that’s just what we do.
So we spent the last eight months or so slowly remodeling it, mostly with paint and sweat equity. I tried to use products and supplies that we already owned in order to do this as cheaply as possible. Anyway, it’s finally finished and looks like a different trailer!
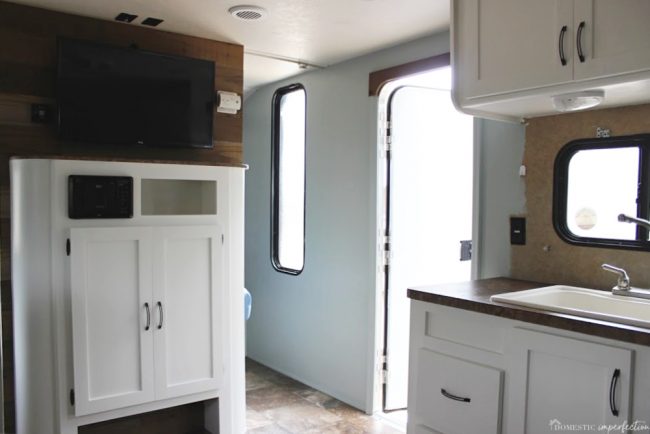
After


Okay, so let’s just do a quick run through of all the projects that went into this remodel.
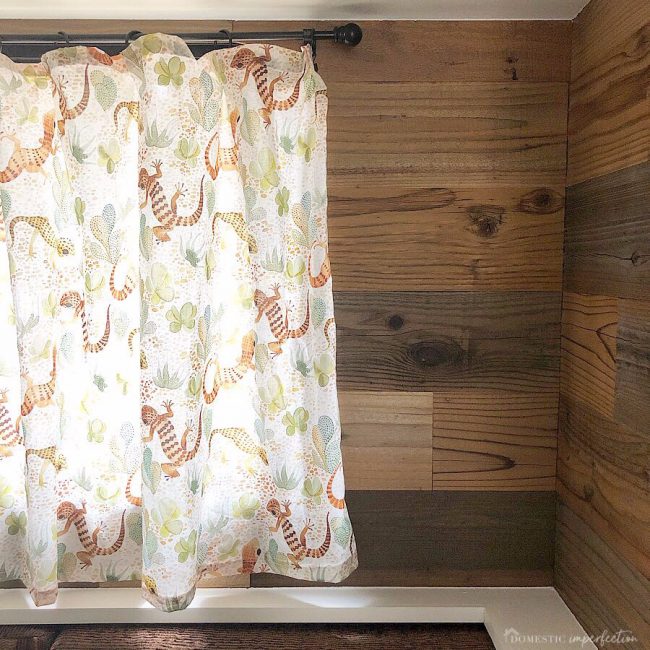
The first step was to come up with a plan. I started off with the curtain fabric (the geckos) as my inspiration and worked from there. I wanted the interior to be bright but cozy, and colorful without being over the top.
The first project was painting the cabinets, and it was definitely the hardest and most time-consuming part. Confession – midway through this project I was highly regretting starting this remodel, because it wasn’t going well (read more here). In the end it all worked out though, and the lighter color made such a huge difference (and cost nothing). Here it is with just the cabinets painted and everything else the same.
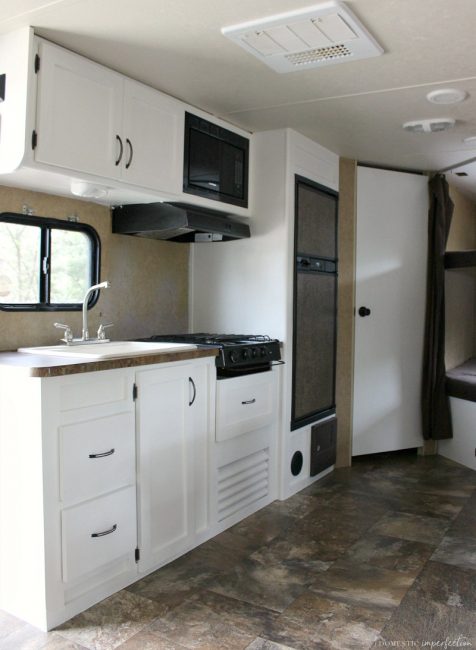
Next came the walls. I was convinced this would also be a huge pain, but it was actually incredibly easy (and also cost nothing). The color is Silvermist from Sherwin Williams, same color we used in a few rooms of our house.
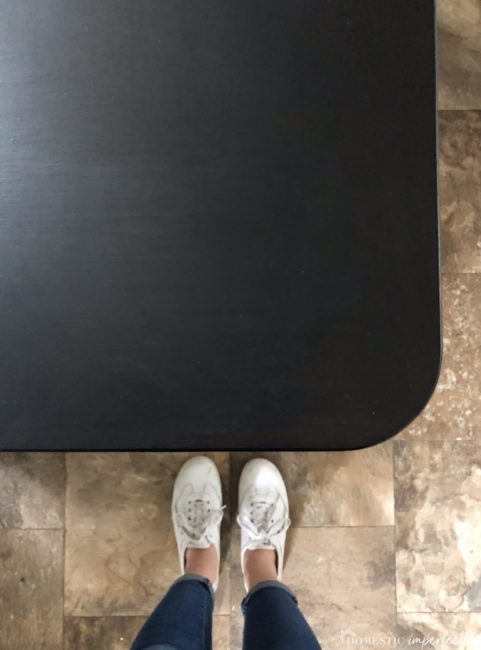
After that I painted the laminate countertops, taking them from a brown faux granite to plain black. For this I used chalkboard paint and sealer.
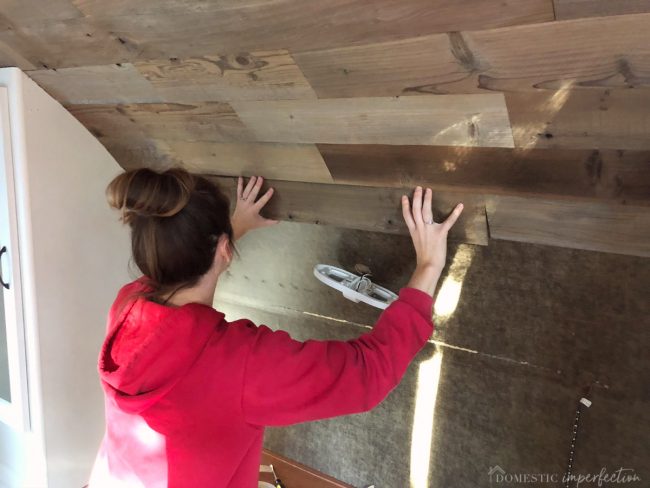
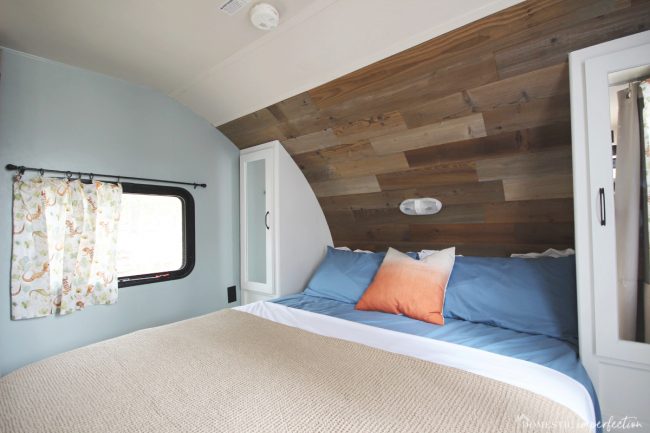
Then it was time for my very favorite part, the rustic wood accent walls. These planks are made by Stikwood and are real reclaimed wood, cut extra thin. To install it you just peel and stick…it’s super simple.
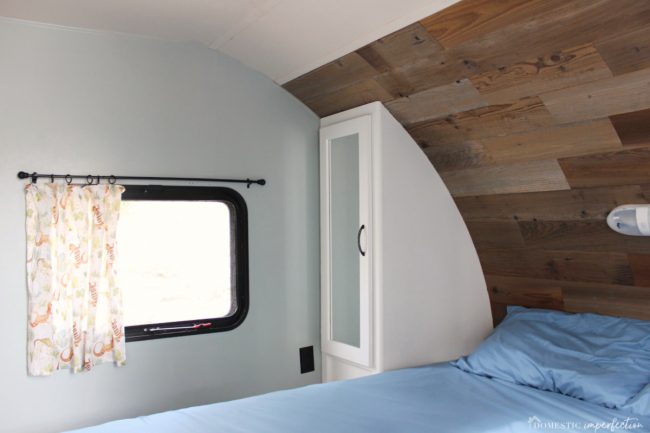
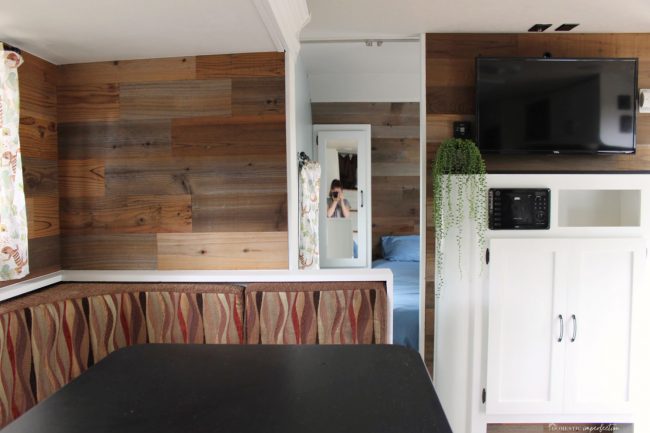
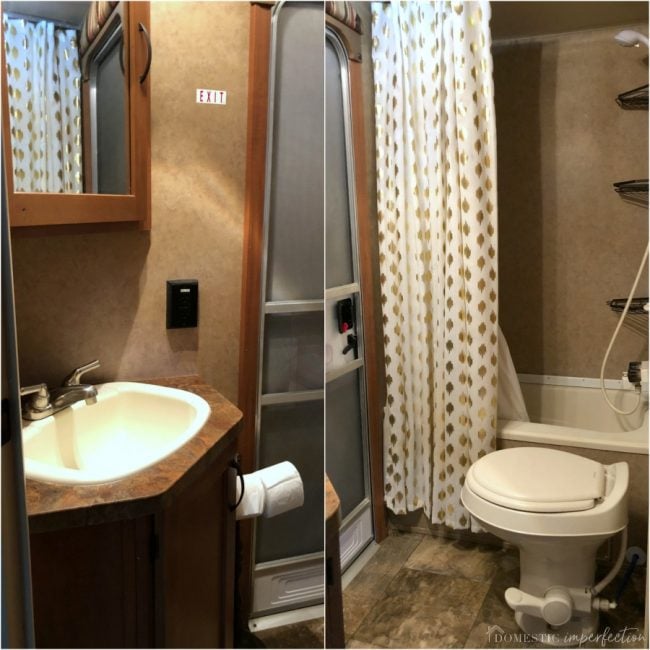
I also removed the blinds and replaced them with curtain rods and curtains, replaced the bedroom “doors” (curtains) with leftover ones we had lying around the house, and reupholstered the banquette.
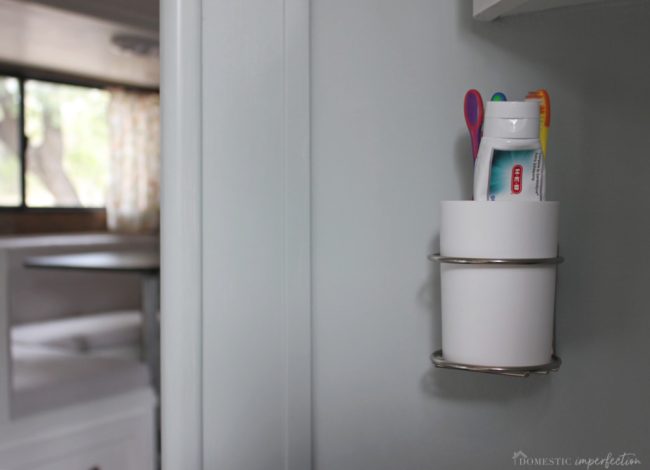
Lastly, I added some organization, storage, and decor.
Most of this was accomplished with Command strips/hooks. I’ve never really used them before, but I can see why they are so popular…they work great and can be installed in like five seconds. So now they hold our kitchen utensils, towels, toothbrushes, hats, picture frames…. need I go on? I used them everywhere.
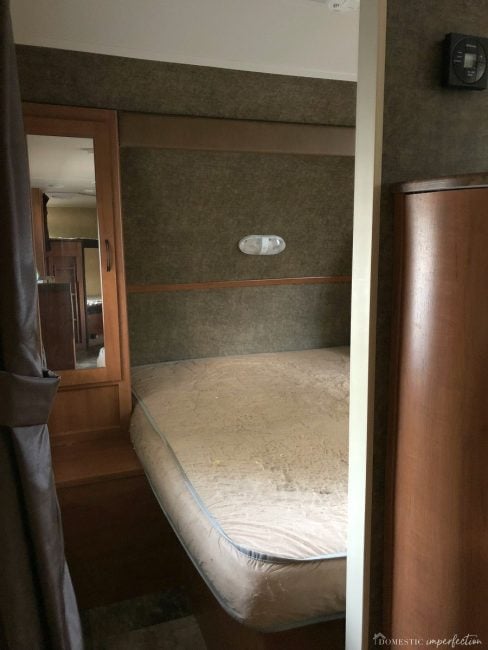
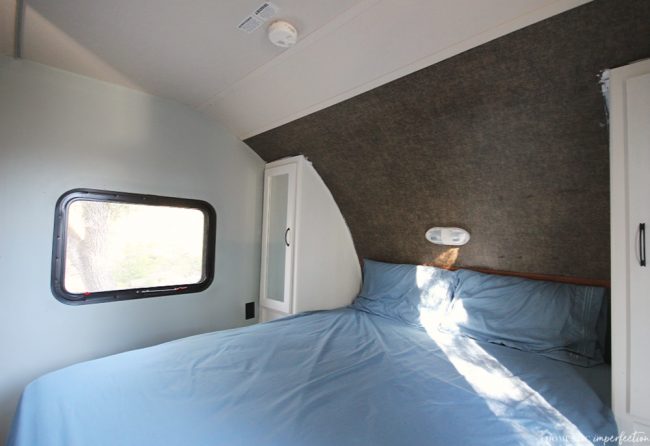
The bedroom got a new mattress and bedding, and it is very comfortable now. The mattress was the biggest chunk of money we spent in the RV ($322) but was completely worth it. The bedding was all really budget friendly (all items are linked at the bottom of this post), with the exception of the brown waffle weave blanket. It was sent to me by Magin Linen and is incredibly nice…. it has a great texture and more weight than your average linen blanket. I styled it in here, but it’s definitely going to end up in our master bedroom.
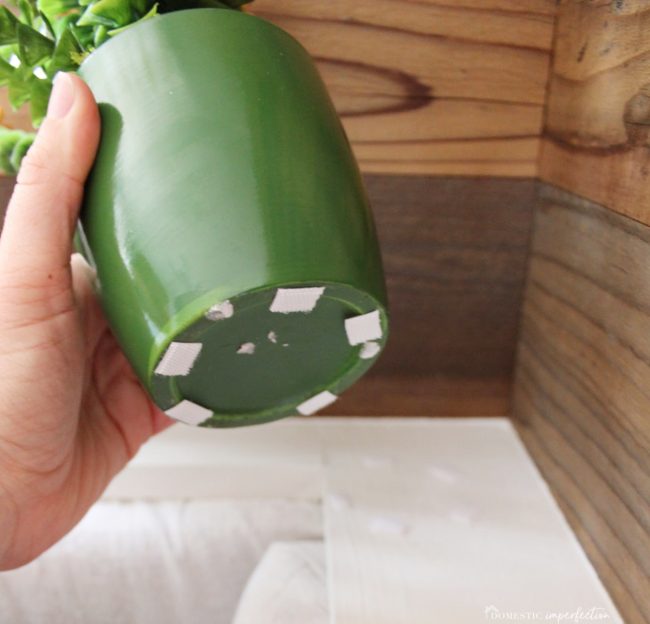
The faux plants are another one of my favorite things. I love using plants in decorating, but real ones would never make it in an RV. Nearly Natural sent me these to use in the remodel, and while I love them all, this String of Pearls plant is fantastic. It looks legit and hangs beautifully.
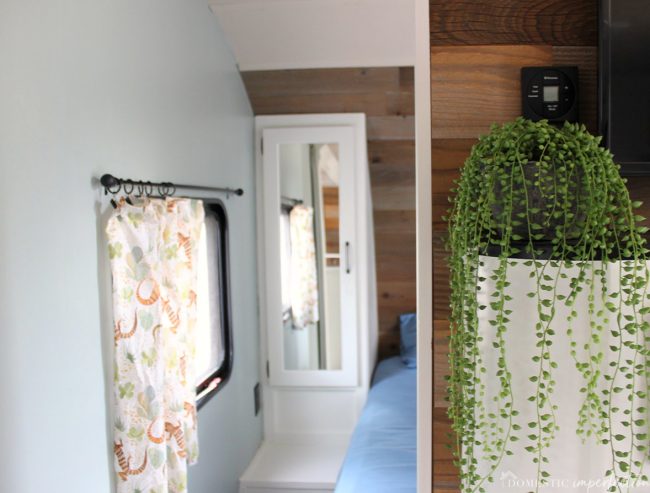
I obviously want them to stay put on the road, so I attached them to the shelves with velcro. They are really light to begin with, so hopefully it holds. (The pearl plant is getting this as well. That sucker isn’t going anywhere).
Anyway, here it is completely finished!


RV Remodel Source List and Cost Breakdown
- Cabinet color – SW Alabaster ($0)
- Wall Color – SW Silvermist ($0)
- Countertop color – black chalkboard paint ($11)
- Banquette foam – Home Depot ($50)
- banquette batting – Amazon ($20)
- Banquette fabric – dropcloth, Home Depot ($30)
- RV mattress – Overstock ($322)
- Television – Amazon ($139)
- Blue RV size sheets (short queen) – Amazon ($27)
- White duvet cover and shams (king) – Amazon ($28)
- Linen blanket – Magic Linen ($0, sponsored – $152 value)
- Orange ombre pillow – Homegoods ($0, already owned)
- Rustic wood walls – Stikwood, reclaimed sierra silver ($0, sponsored – $850 value)
- Curtains rods – Walmart ($18)
- Curtain rings – Amazon ($12)
- Curtain fabric – Spoonflower ($70)
- Bunk Sheets – Walmart ($40)
- Orange velvet throw pillows – Amazon ($45)
- Blue southwest throw pillows – Etsy ($0, already owned)
- Faux plants – Nearly Natural ($0, sponsored – $90 value)
- Leather drawer pulls – Amazon ($14)
- Wood trim – cedar, natural pecan stain ($15)
- bedroom door curtains – JCPenny ($0, already owned)
- Runner rug – Article ($0, already owned)
- Mirror – Walmart ($5)
- black frames – Walmart ($10)
- Hooks, etc – Command Strips ($30)
Total – $886
(Total including sponsored items – $1,978)
Honestly, Adam and I were surprised when I totaled this up. I felt like we did this really cheaply…mostly with paint we already had on hand. Things add up though, and we spent it slowly over eight months, so it makes sense. Also, the mattress and TV are like half the budget…those dang mattresses will get you every time. Obviously getting some items sponsored was a huge help (especially the Stikwood), and really took the final product up a notch!
I’m in love with the end result and have zero regrets. Not only is the RV beautiful and great for camping, but it is the ideal space for guests. We have people stay with us fairly often but don’t have guest room in our home, so this has been and will continue to serve as a comfortable, private space for family and friends to stay.
So that is a wrap on all things RV! Whew! I hope you enjoyed following along…now let’s move on to new projects, shall we?
It looks awsome… and even more when seeing the after pictures right next to all that brown! Congrats!! (And I truly think it’s really cheap at 800 bucks! You completely remodeled it!
Thank you!
Wow!!!! She’s a beauty. I didn’t even think of the added bonus of using it as a bonus/guest room space. I know this is a “home/DIY” blog, but would love to see a post on the family taking a trip in the RV!!!
We have taken I few trips in it during the remodel and are busy planning some for this summer. I can do a post on our trips and how the RV worked out, but if you want the nitty-gritty of using it you should follow on Instagram! (I use stories to show the day to day stuff).
WOW! All of that brown on brown sure was alluring, right? ;-) This is an incredible makeover! I’m not a fan of camping, but would reconsider if this was the camper! Enjoy going on adventures and making fun memories!!
Thank you! We are definitely ready for adventures (on a comfortable mattress and with air conditioning, haha)!
I love, love this!! Its so homey and cozy. You really did a superb job with this RV. Y’all will make so many memories in this beauty.
Thank you!
Love it!! You guys did a knock out job!
Don’t understand why Browns are so popular with rv manufacturers.
Thanks! I don’t get it either, even the brand new/nice ones are so dark and dated. I’m even a brown fan (I prefer it to gray) but you can’t just make every surface the same dang color.
Amazing!!! Makes me sad to think of all those brown RVs out there in the world. If they only knew what they could be they’d be lining up your driveway . . .
Your RV is beautiful! It’s amazing what some paint and brighter fabric can do to a space. Great job!
The original mattress is the stuff that nightmares are made of.
You did an amazing job on this! Such a dramatic and wonderful change! My sister and hubby traveled and lived in a motorhome for 15 years (still do short travels but now have house in Ohio) and she said over time they learned things. There is a gummy stuff that they use in museums to keep things from falling and moving and she said they used it and it was great!!! She said it worked far better than Velcro as much movement would make velcro pop and things fell. She also placed hooks on all cabinet doors and a special strap found at RV stores for refrigerator as they would also pop open in turns and it made a big difference. I hope you all make wonderful memories on your travels!!!!
Excellent job…love it…Millie.
The side by side before and afters are mind blowing! It makes me so hopeful for our little camper and what can be done about it… although first hubby has to decide if he’s keeping it or not since it leaked during rainy season and smells musty now. I think I would go for a pale greige cabinet color to hide dirt myself. Cramped spaces, desert (dirt) camping, and two little kids means a little extra touching of the surfaces!
This RV remodel is OUT OF THIS WORLD!
I’m speechless
You did a great job and you obviously have an eye for detail and style
This remodel is amazing! It’s so bright and airy now. Perfect for camping and traveling!!
You did a fantastic work with these changes!! It looks awesome!!
Amazing!! It’s so bright and welcoming! I’m curious if you used command hooks/strips for the curtain rods also. I need to get rid of out blinds but I’m nervous about screwing into the walls! Thank you!
I didn’t, I screwed them right into the walls. It worked fine, but if I had to do it again I would use small black command hooks instead.
It looks fantastic. Incredible makeover!! I really appreciate your work.
Excellent work. Had an interesting time reading this.
It looks marvelous. Welldone..!! You did a great job.
You did it so beautifully and in a perfect way.
What an incredible makeover. If I ever get another trailer (which I would love!) you’ve inspired me to make it beautiful! And I think if the people who sold you this RV could see it now, they’d want it back!!
Look awesome
Love it!!! My hubby and I are thinking of doing it half the year we are in Canada. Lots of the RVs area little dark so great paint and shiplap ideas. Thanks you rock!!!????
Looks amazing! On your dinette, did you pull the leather trim off or just cover it?
Hi! I love your reno! We have the 26DBH and we’re currently doing a renovation – using our quarantine time wisely! I was just wondering if you’ve had any issues with the paint peeling or bubbling along the panel seams? We don’t move our camper often but I’m wondering if that’s something to worry about? Any feedback would be great – also anything you would have changed? And an unsolicited tip for you – we hated the RV fridge so much so we changed it for a Magic Chef 10.1 cu. ft. Top Freezer – it fits perfectly in the space. You lose the ability to run off gas but unless you are boondocking that is never an issue. I wish I had known sooner because that RV fridge was such a thorn in our side – it was always turning off randomly even when plugged in! Happy travels!
Nice work, did you find any diffculty when you do RV
Good day very cool website!! Guy .. Beautiful .. Amazing .. I will bookmark your web site and take the feeds also…I’m satisfied to search out numerous useful info right here within the put up, we’d like work out more techniques on this regard, thanks for sharing. . . . . .
Looks beautiful. I want to redo my trailer
Thank you for your pics on the Stikwood in your bedroom. I purchased Stikwood for the same place in our RV and my hubby wasn’t sure about installing on the curved walls so that was helpful in continuing the design in our RV remodel. I also appreciate your honest feedback on your timeline, I’m still painting after a couple of weeks, and although everyone thinks I’m crazy…I can see what it will be including additional guest space as you mentioned. We have similar need for a space for out of town guests and this is a great bonus space for that, including quiet/private office space or reading nook for trying to get through the same chapter uninterrupted!
Gotta say, you did a Smashing job!! We are doing something like it ourselves!!
What a stunning transformation! I love how you turned a dark and dated RV into such a bright and inviting space. The color choices and decor are fantastic—definitely inspires me to tackle my own RV remodel!
What a stunning transformation! I love how you turned a dark and dated RV into such a bright and inviting space. The color choices and decor really make it feel cozy and modern. Can’t wait to see more of your projects!
I absolutely love the transformation! The bright color palette and modern finishes really breathe new life into the RV. It’s amazing how a few thoughtful changes can make such a big difference. I can’t wait to try some of these ideas on my own camper!
Wow, what an amazing transformation! The bright colors and modern touches really make the RV feel welcoming and spacious. I love the attention to detail in the decor! Can’t wait to try some of these ideas for my own space. Thanks for sharing!
I absolutely love this transformation! The colors and modern touches really bring the RV to life. It’s inspiring to see how a little creativity can turn a dated space into something so inviting. Can’t wait to see more of your projects!
Wow, what a transformation! The before and after photos are stunning, and I love how you’ve managed to create such a bright and inviting space. The choice of colors and decor really makes a difference. I’m feeling inspired to start my own RV remodel project!
Wow, what a transformation! I love how you managed to brighten up the space while keeping it cozy and inviting. The use of light colors and thoughtful decor really makes a difference. I can imagine how fun it must be to travel in such a beautifully remodeled RV!