
Paper Bag Floors; A Step by Step Tutorial
Welcome to the first post of my (seven-part) paper bag floor series! Here you will find more information than you ever wanted to know about installing paper flooring in your home. Let’s go ahead and jump right in, because I know you have questions.
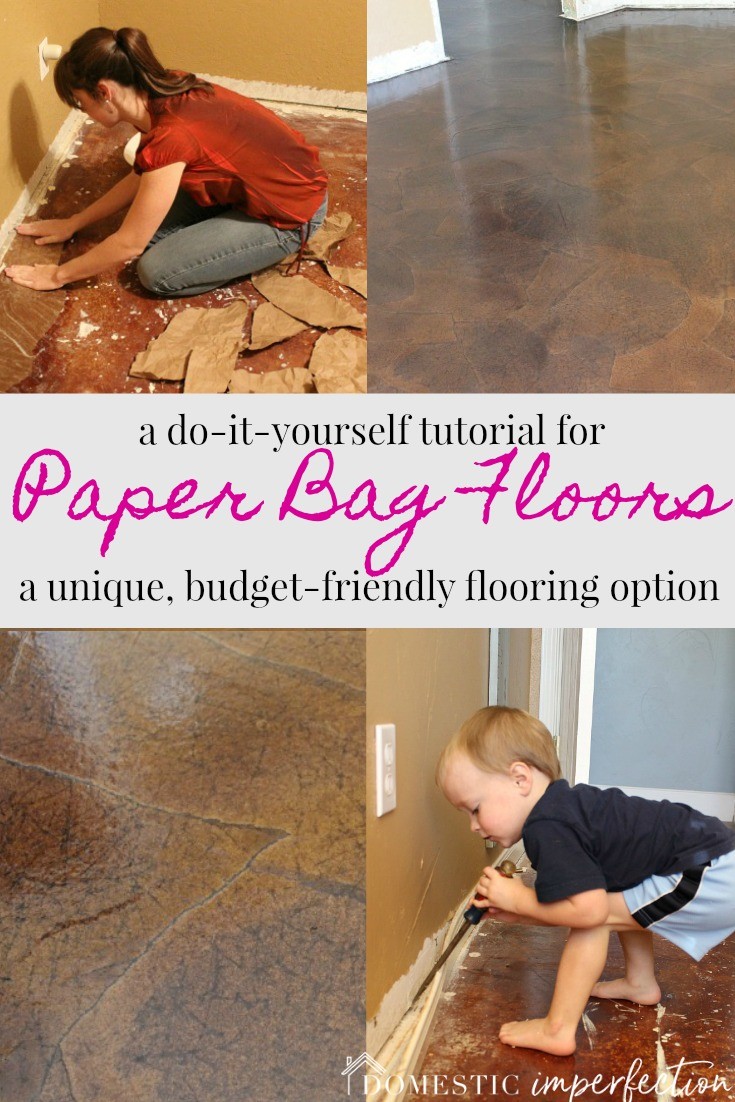
What is a paper bag floor?
- Paper bag flooring is a do-it-yourself flooring solution that is made out of paper, glue, stain (optional), and sealer.
- Originally it was made from the brown paper bags you would get from the grocery store, but these days most people use a roll of Kraft paper.
Why choose a paper flooring?
- The most popular reason is cost. Paper bag flooring is very inexpensive. I did my kids’ bedroom (10 x 12) for about $80, and I have enough supplies left over that doing my guest room will cost about $30. That’s dang cheap.
- The flexibility. There are so many ways you can go with this project…brown flooring, grey flooring, colored flooring, patterns, wallpaper flooring, etc. If you can dream it, you can make it. My final product turned out great and looks like leather.
How difficult is it to install?
- Not hard at all! This is a beginner project that anyone can do. That’s the good news. The bad news is that it is tedious and time-consuming, and you spend a whole lot of time hunched over.
- Time-wise, installing my brown paper floor took about a week.
Here is what my floor looked like after it was finished (and before baseboards and furniture were added back into the room).


I know…it’s pretty nice looking. Especially for just being paper!
How to install a paper bag floor
Materials needed
- Kraft Paper
- Elmers Glue (I used a gallon)
- Oil-based stain (I used a quart of “Provincial” by Minwax)
- You can achieve different looks with different stains, click here to see examples
- Water-based floor polyurethane
- I used this one by Rust-Oleum, but there are better options. Click here to read in-depth about other sealer options for your floor.
- Something to apply the stain and polyurethane (I used a 9′ Shur-Line “deck pad”)
Steps
1. Prep your space and your floor
The first thing I did was empty the boy’s room and rip out all the trim. We were planning on replacing the trim anyway, but even if you aren’t I would remove it and then replace it when the floor is complete, that would be much easier than trying to work around it. I wasn’t planning on starting the renovation that day, I just got a wild hair and started moving furniture and tearing stuff apart. Elijah got in on the fun, he actually removed most of the trim after I showed him how. How cool is that? His future wife is going to sing my praises, I’m sure of it.

Next I prepped the floors. I mixed up some concrete and patched the holes left from the carpet tacks, and then gently sanded.
*Prepping your floor correctly is very important*
I did my floor over concrete, but you can put paper bag flooring over pretty much anything…plywood subfloor, linoleum, even tile. Concrete is probably the least desirable floor to this over actually, due to possible moisture issues. No matter what type of floor you have, make sure you fill any cracks (literally every imperfection/unevenness, crack, etc will show through), decide if you should gently sand for smoothness/adhesion, and make sure it is as clean as it can possibly be.


*UPDATE – I have been told by readers that paper bag flooring will not work on a concrete floor that hasn’t previously been sealed. If you plan to paper over raw concrete then you must first seal it with either a coat of poly or a coat of floor paint.*
2. Rip your paper
What you want to do is rip the paper into natural-looking pieces, kinda like stones. Mine were about 12 inches or so in diameter. Don’t cut them, just rip…you don’t want them to be perfect or even close.

What I would recommend doing is after you rip a piece, ball it up and wrinkle the crud out of it, then flatten it out and move on to the next piece. You want to wrinkle them so that when you add stain the wrinkles will show through and give it that awesome textured “old leather” look, like this…

3. Mix your glue and start applying the paper to the floor
Then you are ready to mix your glue. For my paper bag floors, I did 50% water and 50% Elmers glue mixture. If you are doing this on a wood floor then I think a 3 to 1 water and glue ratio is the one you want. Don’t mix all your glue at once, gluing the paper to the floor will take longer than you think and you don’t want it to dry out.

I really thought in my head that I would be able to slap these puppies down and be done in a night. Truth is it took my husband and me five nights of both of us working to be complete. We just chatted, watched Netflix on the laptop, and had a jolly good time. That might be exaggerating a bit, mostly I just scolded him every five minutes for trying to glue a straight edge piece in the middle of the floor. He loved that, as you can imagine,
The easiest way I found to apply that paper is like so: Take your piece of paper and hold it over the bowl. Use your hands to scoop up some glue and spread it evenly over both sides. Then lay your paper down on the floor and smooth flat, working from the inside out to remove any bubbles. Keep in mind that the paper will shrink as it dries, so give each piece a decent amount of overlap. Don’t be stingy with the glue, you want them wet.


4. Apply stain
You could leave your floor this “natural” color if you want and skip the whole staining process, but I think the stain looks great and really gives it depth and character. Plus staining is the quickest part of this whole process (if you do it correctly). I applied the stain with a “mop”, actually I used this by Shur Line. It worked great and went on really quickly… I snuck this in while my kids were busy watching an episode of Dinosaur Train (so less than 30 minutes).

Make sure and “feather” the stain so that you don’t end up with any lines, it will dry just like you put it on. Also be aware that you will get a little bleed under the edges of the paper, like this…

I’m honestly not sure how you would avoid this, you are just going to have to embrace the imperfection.
5. Apply sealer
After I had finished staining I let it sit for two days before I added the first coat of poly, and even then it was slightly tacky. I added the polyurethane the same way I added the stain, but I was extra careful to make it a thin coat…at least I thought. When it was dried I came back and it looked like this…

About 50% of it had dried white. Crap. I wasn’t sure what to do. I didn’t know this when I started, but the “builders paper” that I used has two sides and they look different after they are on the floor. It looked as though the poly had dried white only on one side of the paper. I tried to sand it off on places, but that wasn’t working so I did something that I was sure was going to be a terrible idea…I stained over the poly.

It worked, and you couldn’t see where it used to be white and where it didn’t. So I “mopped” the stain over the whole floor again and let it dry for FOUR days this time. Even after four days it was still tacky and I couldn’t step on it to re-poly. So this time I worked backward…I started at the doorway and added a THIN layer with a small foam brush (by hand), let it dry, and then stepped on that to do the next section. I was terrified that after all that work it would dry white again, but it didn’t, not even a little. Phew.
After that, I added about ten more layers of poly with the mop. This didn’t take as long as you would think, it only needed to dry about an hour between coats and took about 20-30 minutes each coat. As an added bonus, the water-based poly has almost no smell at all, so your not going to need to air out your house or feel lightheaded while doing this. Now, you should let the final coat cure for about a week before you put anything on it, but I was so antsy to get the kids out of my bedroom that we put everything back the next day. We did get a few scratches, but I just added some poly over them and it looks fine. It looks better than fine actually, it looks freaking awesome.

")

So there you have it! It’s a bit shinier than I would have liked, but I do think it has dulled down a bit since I took these photos (about two weeks ago.)
This isn’t the end though, no no….I have six more posts about my paper flooring. You’ve got questions, I’ve got answers! Links to the other parts of this series –
I love this look! I love the price as well. I’m glad you posted your finished project and I love the “Hey Girl” blurbs…they were the best and really made me laugh out loud. :) I think I might try this in a small bathroom I have…do you think laying the paper around the toilet would work?
Yes, I have seen it done successfully in a bathroom before. Actually another reader commented after you that she has has it in her master bathroom for three years and it is still going strong!
I was wondering how this would work on a small kitchen, dinning room area. It is a very busy area, it goes to the back door. It would look sooooooooooo Cool if it would work..
Kay
Yes, I think it would be fine…just don’t skimp on the poly!
I wonder if a person could use an epoxy type sealer instead of poly? Maybe would cost more but may hold up better… Just a thought
That’s a great idea, I bet an epoxy sealer would be make the floor basically indestructible. It would smell terrible though…I just painted my shower with epoxy paint and hot dang, that stuff is potent!
Vermont Natural Coatings make a floor finish that is whey protein based, It is virually odor less and dries very quickly. It is very durable and low to no VOC;s It is working great at my house with 3 kids, a cat, and 2 dogs.
I wonder about the water-based poly, though. We used it when we refinished the center hall and kitchen of our house, and i’ve noticed that it 1) doesn’t hold up to chairs dragging across it and 2) it doesn’t hold up to acid-based spills (like orange juice, vinegar or dog pee). Seven years later, we have to refinish all the floors and use oil-based poly, even though it takes forever to dry and smells bad.
I’ve found the same thing. It’s not holding up badly by any means….but it could be doing better. In a few months I’m going to do a follow-up post and try out a few new sealers, hopefully I come up with something that works better (which might end up being oil based poly.)
Do you have any suggestions for a linoleum floor?
I’ve never done a whole linoleum floor, but I think you could follow this tutorial as long as you sanded the linoleum with rough sandpaper first (if you don’t it will peel right off, like a sticker.)
Carefull of the fumes of the stain and kitchen pilot light
do you think this would work in a family room? i am concerned about scratches in a high traffic area, your thoughts?
I was wondering if this could be done with construction paper to add more color?
I would think that would work just fine, but try it out in a closet or scrap piece of flooring first just to make sure.
30 years ago I did a bathroom in National Geographic pictures. I spent forever cutting out the pictures then put them on the walls with wallpaper paste. Then sealed it with Polly, I didn’t use stain. Makes me wonder if it is still there, or did someone paint over it?
you could use anything even magazine pictures or thin cloth
Thank you for this comment.. would have never thought of doing that especially the thin cloth.. I love that idea
use tissue paper instead with a light color behind to brighten it up even more.
I would be careful what type of construction paper you use, it would have to be archival quality / have UV colour fastness or I would think it would fade. I’ve seen so many construction paper projects loose their beauty because they were so easily bleached by the sun!
Once any kind of paper is glued to one surface then sealed under polyurethane it “should” be colorfast because it is sealed from the air, but it is actually the UV in sunlight that causes color to fade. Not sure if there is a UV polyurethane or not but if there is, that is what you’d want to use over any colored paper to be safer.
Do you think the two tones are caused by different sides of the paper. IE. If you were very careful to only keep one side up, do you think you would have the same tone throughout?
Do the wrinkles REALLY go away?
Thanks, Katie
Today I done my hallway and the paper is dried. But there are white areas that are showing threw. What do I do.
I would just remove the toilet to make it easier – not a big deal at all.
I`ve been a professional wallpaper hanger for 35 years and I have done similar jobs like this on walls. I never thought about doing old worn out floors. I have a couple suggestions for you to cut costs and make the job go easier. Vinyl over vinyl wallpaper paste is the same thing as Elmer`s glue. You can buy a gallon for about $30. you just add water to it to make it more like thick paint. I suggest using a 9 inch roller on an extension pole to save your back. Same thing for the stain and poly. Use a couple fans to speed up the drying time. I`m positive that I could do a 12 x 12 room in a couple days with 10 coats of poly on it. Just make sure that the paste, stain and poly are completely dry before moving to the next step. I have a floor that I`m going to do this on and I`ll take pictures of before, during and after. Great idea!!!
Would love to hear morej
I love this Idea, I have been in the flooring business for a number of years and love to see new ideas. One thing I would like to recommend is NOT using Elmers glue. defiantly not on a concrete floor. It will never hold even if the concrete is sealed. This is due to moisture. concrete absorbs moisture from below and will rise to the surface of the floor. it will also sweat with temperature change. I would recommend using an adhesive for vinyl flooring. In particular one made for felt-back vinyl. You can find this at any flooring and most hardware stores. Just follow the recommendations for application.
That said, on a wood sub-floor Titebond wood glue would be a good choice. It would be easier to work with Than felt-back Vinyl adhesive.
Mine is doing fine, almost a year later. Used Titebond on primed cement
I used 50/50 Elmer’s glue & water put over concrete floors, it did adhere to the concrete and it was there for 14 years plus, just covered with new flooring when we put house up for sale. I did however leave the paperbag flooring in the upstairs room just sanded lightly lauded down new paper where there were small tears and reapplied water based Polly and it looked brand new and everyone who viewed the home loved the floors. Over the years I have sent many people home with paper & instructions. I loved my paperbag floors. I did not use stain but when you Polly over it turns out beautiful.
Thanks for sharing this! I’m always happy to hear that it holds up long term. Adam is a little nervous about selling our house with paper floors. They look good, so that’s a plus, but if we put “paper bag” as a flooring type in the MLS will people think it’s too DIY? Or maybe they will be so curious that they we will have a ton of showings, haha. Who knows, but it’s encouraging to hear your experience!
Thanks, Ashley. I didn’t think about the water based stain soaking into the paper and water-logging it. It’s been a long time since I have done any wood working, finding this poly that works with oil based stains may be an answer for some other ideas that I’m thinking about.
I don’t know what your other projects are, but my favorite finish ever is polycrylic my minwax. For furniture and stuff I always use oil based stain and polycrylic…it’s a lot like polyurathane but it’a water based (so easy to work with) and doesn’t yellow. I really should have tried it on my floors…totally didn’t think about that till just now.
I was thinking this would look good in my sun room/porch, but it has cement floors that do get damp-ish when we have a moist year. I would think the water based Elmer’s would react to the dampness and I would have problems. Would the adhesive for vinyl flooring that, Tavis mentioned act. as a moisture barrier? Hubby also questioned mixing water based poly and oil based stain. Is a reason that oil based stain is used and not a water based one? I could use an oil based poly on the porch as it would air out easily. Anyone tried this?
I really don’t have an answer for the first question. Sorry, wish I could help but I would just be shooting in the dark. As for the oil based stain and water based poly, that is what the blog tutorial I followed suggested. I tried the water based satin anyway (on a scrap) and it soaked into the paper and then the paper started to rub away (in little balls) when I spread it. So I just did oil based. The water based poly is specially formulated to go over oil based stain…any old water based poly won’t work. I would think oil based poly would hold up much better though…I just didn’t want to do it inside.
The situation presented by your concrete floored sun porch raises a couple critical questions: first, is the floor a slab poured directly on the ground like a patio, or is it raised on a foundation like a traditional porch? Secondly, if it is on grade, does it have a moisture barrier underneath and good drainage? If the room is ground level and you cannot answer the moisture barrier/drainage questions, then I would not recommend this flooring technique. Moisture trapped under a clear finish will appear as white spots similar to water rings left by a glass or from hot pizza on a paper plate on your coffee table—these are both simply moisture being trapped directly beneath the wax surface, with a clear finish on a damp concrete floor, the same effect is likely.
Tavis’ solution by using a vinyl adhesive will act as a moisture barrier; however, you are asking a glue to do a job for which it wasn’t specifically designed. Yes, many vinyl adhesives (especially exterior grades) are designed to inhibit moisture, but… reducing does not equate preventing.
I would hate to see you invest precious time and effort into a project that would produce such beautiful results then risk the rewards to ruination by rain. You may consider a concrete stain finish that may be applied in layers and varied colors which produce a striking effect.
My floor is a concrete slab right on the ground. It started as an outdoor patio that was inclosed. I was afraid that the moisture would create the problems you describe, Paint Pro. I think the answer will be the concrete stain if we decide to do anything with it.
I there any kind of “glue” that you could use on peeling paint on a “lanai” (like a concrete porch up north)?
I used a stain on the lanai and it peeled, I had someone come up and pressure wash it, what a mess! He re-painted it and guess what it peeled again!
I need to “glue down” where the paint/stain is peeling then re-paint the entire area.
Any suggestions?
I papered my kitchen in a week and loved. We had Thanksgiving the weekend we finished with 12 family members. The floor stood up great!!!
When I started on the living room, the poly and paper would not adhesive. So we did the glue down, then I stained it and then polyed it. The problem I have now is when I washed the floor with clear water, the floor has turned cloudy. Do you know what I can do about it!
I don’t know what you can do about it, mine has the same problem in one corner. I’m going to be writing an update post in the next month and experimenting with a dew different sealers. I’m sorry you (and I) are having that problem, hoping to come up with a solution I can share.
As for your cloudy problem I may suggest going to a near homedepot or a shop that will rent a highspeed buffing machine. I work in nyc for a restoration company and we do wax and wood floors with multiple kinds of finishes and sealers. Granted I never saw a floor in the city that was poly but I would suggest that a very fine steel wool buffing pad and a highspeed (1200rpm) buffing machine would be able to remove the cloudyness you see and then could allways re poly the floor.. hope all works out for you such a awesome idea and would love to do it in my house
do you also use the vinyl floor glue on top of the paper or just stain and polyurethane over it?
Would you please come do mine :)
I would LOVE to see the finished product. We are NOT DIYers normally. {because I want things done correctly, lol} But we have a dining room, my office, and long hallway connecting them and possibly a kitchen and bathroom that all need floors. We’ve ripped up the carpet on all but the kitchen and it’s some kind of weird vinyl flooring. But now they all need to be redone. We were going to put down wood laminate, but I really LOVE the look of this flooring! Any more helpful ideas would be appreciated as well.
Jeff Ebert, I would love to see your finished product!! Sounds a lot easier!! I am a DIYER, WITH MY SPOUSE, but as we age, some things get a little more difficult to do on your hands and knees, if you know what I mean, getting up isn’t that easy either!!!!
would love to see if you did it!!!
Will you you use oil based or water based poly?
I’m not sure. My plan is to paper bag a sheet of plywood and try out a few different types of finish before doing the floors.
Do you think that would work with card board boxes
I have to agree with Jeff. This is a great concept, and the wallpaper paste is the only way to go. The only thing I would add is that a good squeegee will help with the smoothing process, and a 10″ FOAM roller is the only way to apply finish like this. I refinish wood floors regularly, and have tried every applicator imaginable. Foam rollers are the ONE way to avoid brush marks and control your material flow. If you are using an oil-base finish, and doing multiple coatings, you can wrap the roller up tightly with a grocery store “t-shirt” bag or plastic wrap and put it in the freezer. It will keep fresh for several days, and you’ll only need to let it warm up (still wrapped) a bit before re-using. I especially like the Minwax Super Fast-Drying Semi-Gloss Polyurethane For Floors at Home Depot (about $44/gallon). I’ve done over a dozen floors with it, with great results. Just follow label directions regarding re-coating.
Is it possible to do this, or something similar, on a wall, or as a shower surround?
So Far the Response I have got is that it probally wont hold up because of moist area
I did the paper bag thing on my bathroom walls, and it worked fine. I used wallpaper paste to adhere it to the walls which were painted sheet rock, then after they were thoroughly dry, I painted over it with a water based semi gloss latex paint. When I first applied the paint, the paper started to form bubbles under it, but as it dried, it sucked itself back down to the wall. It lasted for several years.
I have done several walls with this method. They have all turned out beautiful. My last project was a kitchen, where I used a almost olive green paper. The only thing I recommend is that if you have light colored walls paint them a darker shade first. It will affect the shade of the paper. It is truly beautiful.
ohhh…Jeff, I can’t wait to hear how that goes… I would love to do this in m studio kitchen area which is laminate with some small holes in it, and gets beat up wit painting and workshops… but can not stay closed for days on end :(
Thank you
Hey can you do this in a shower stall?
Hi. I am thinking of doing the walls in my travel trailer. In fact I am thinking of doing beaded board paneling on bottom and this treatment on upper to keep from being to dark inside. The walls are I believe vinyl. What would you recommend including any prepping.
I would like to ask u can this be done on bathroom floors that has no tile it is a rolled up I will try to spell I know it will be spelled wrong Lanoleum can I just go over top of that
Is there any way to do the floor with paper and make it look like a plank floor. And also to make it a darker color.pegbest
Here is a blog post by a lady that did just that… http://corninmycoffee-pot.blogspot.com/2012/02/faux-wood-floor-paper-decoupage-floor.html
There are ceramic floor coatings that are used to make sure that a hardwood floor doesn’t scratch. They are extremely hard when dry and can’t be sanded, but they would make an excellent hard finish for this. It is used by floor installers and has to be put on carefully. You cant have any dirt or sand or junk on the floor just the paper. Then you apply it, it takes 3 days to dry and it is hard as a rock. This would mean a floor that would last many years and not scratch, especially with multiple coats.
Is there a way to put this over ceramic tile?
Is there a tutorial for this? Would you follow all the steps up to the poly & use this sealer instead of the poly?
Try on walls it is great. Just don’t need polyurethane. U go with natural stain n it is beautiful.
I did this on concrete floor. I use gray paint then used the paper in random areas using wallpaper paste to put it down I dipped the paper wadded up in water and then slung it back out. when I was through, it looked like a stone floor.
Can you please email me pics and directions please
Can you please email me pics and directions please
What about gaps between the pieces of paper ?
There shouldn’t be any gaps the the paper, you overlap it when gluing it down. It shrinks as it dries though so you have to overlap it about an inch on all sides.
Looks fabulous, like ancient leather. I’ve done this on walls that had uneven textures and then faux finished over it, worked great. I may try this on a floor now, thanks for the inspiration.
I am truly impressed…who new how good paper could look, you will be putting floor stores out of buisness..and take stock in the paper …and elmers glue…thank you for the reality and your kids are always the best part….
I know, when I first read about this idea I thought it looked cheesy, but now I don’t think so at all :) And for whatever reason my kids think running on the new floor is the most hilarious thing ever!
This is the neatest thing! When I first saw “Paper Bag Floors” in the email newsletter, I was like “Huh?” but it looks great. Thanks! Oh, and I don’t get the shoe thing either. Barefooting is the way to go. :)
I’d have to agree with you…. “it looks freaking awesome” !!!!!!
Turned out great! But was very time comsuming, huh? BTW, being a grandma, I did cringe when I saw your son “working” while barefoot! Lucky he didn’t step on a nail! Better to be safe than sorry! Great project though and great blog!
Yes, it took much longer than I anticipated, mostly just because I had to ignore it while my kids were awake. And you are totally allowed to cringe, you (and my husband) are right about the shoe wearing. I just didn’t think of it. The nails were only in the baseboard though, and we carried them right outside after they were removed (if that makes it any better).
Do you know if this would work over linoleum? We live in an old house. I pulled up the carpet. The old floors are worn, no longer shiny. I do not want to scrape that stuff off. I know the sub floor is pine, but pine splinters into bare feet. What do you think? Thanks, Marilyn
Yes, I have seen this done over vinyl floors, here is a post about it http://lovelycraftyhome.com/2012/05/24/out-west-where-home-depot-is-still-my-home/
Like how it has that “leather” look. Great job! Keep us posted on the wear factor. Showed my husband the pic with Elijah pulling baseboards (that’s to cute!), his first thought…no shoes…nails…
Made me laugh when I saw the “Hey Girl” pics inbetween, love your sense of humor!!!
Ellie, saw a comment above you that stated this person put this floor in her master bathroom 3 years ago, and it’s still going strong.
This is crazy amazing! I never cease to be amazed at the things you do.
Ashley, this is really cool looking and what an economical way to go! We recently pulled up ancient orange tweed carpet in a 1950s trailer that we renovated at the beach. We had no money for floors either and had good luck just painting the plywood subfloor with grey porch and deck paint.
I’ve done that as well! When Adam was in the Army we rented half a trailer and it had the grossest carpet I’d ever seen. The landlord refused to replace or even clean it, so I ripped it all up and painted the plywood floor. Worked great!
A couple questions. How do you rent half a trailer? Do I need to do something about the seams in the plywood floor before putting this down?
Haha, the half trailer…yeah, it was bad. It was just a old mobile home and the landlord had added a wall in the middle so he could get a rental income out of his “vacation home”. It was one bedroom, one bathroom, and he threw some appliances in there and called it a day. When we ripped out the carpet and painted the plywood we didn’t do any prep because we didn’t care, but you could see all the seams. If you want it to look nice you would probably want to put some wood filler or spackling in the seams before painting.
We have a trailer and wanted to play with the paint on the floor we made it where we did like tiles..used the blue stripe tape and painted in the blocks two dif colors and then the solid black..for the kids room then used made a frame on the wall and used the magnetic paint let it dry and then used the chalkboard paint it was fun :)
It looks fantastic! Nice job.
I put a paper floor in my master bathroom 3 years ago. I love it so much I left it when we put wood in the rest of the house. We also finished a room upstairs and I put paper floor up there also. My bathroom was done like anoregoncottage.com and my upstairs like lovely crafty home. I have to say I personally like the look of the oregon cottage better than the lovely crafty home version. But that may be because my upstairs is 400 square feet, the wooden subfloor was in pretty bad shape, and they were a lot more work. Your floor looks beautiful. Linda
I hadn’t seen the one at An Oregon Cottage, that one is beautiful as well. I’m glad to hear that it is holding up, especially in a bathroom!
Laughing and speechless at the same time. I had never heard of doing this before, so if I was having a contest you just won! And I’m pinning it. And sending it to my son to see.
Bliss
I love it! I’m trying to convince the hubs that this is perfect for our staircases and hallway in our home. Do you think a light shade of stain would still give good results? Specifically something like Minwax Golden Oak- the staircase doesn’t have natural light and gets pretty dark so I want something to lighten the space up a little.
Yes, I think a light stain color would work just as well. I would test it on a scrap piece of brown paper before you start on the floors just to make sure you love it…I tried five different colors before I settled on the one I used. But I think this would be a great solution for stairs!
Help! I’ve just done my hallway and stairs, and stained them last night. This morning there’s several huge dark splotches, and they kind of have a “hazy”/dull look to them, whereas the other parts are shinier. Is this something to be expected, do you think? And will sealing them with the poly make them shiny, possibly? The color difference doesn’t look bad, I’m just worried about the dull finish on these parts versus the others. I haven’t read a tutorial yet that addressed that issue, so of course now I’m freakin’, thinking I just screwed up a week’s worth of work lol Thanks, in advance for all the help!
Did you use water or oil based stain?
Oil based- I actually bought all of my supplies from your links above ;) same color stain and everything
Good girl :) It’s hard to give advice without seeing pictures. I had dark spots too (leakage under the paper) but none of them were huge and there were a bunch, so I just left them. If you have big annoying ones you could always cut them out with an exacto knife, glue down some more paper and restain that area. A for the shininess, I would probably choose a small hidden spot and add a THIN layer of poly and see what it looks like. It might just fix the problem.
How did you navigate the stairs while you did this? I’d like to do this but stairs aren’t like a bedroom that you can vacate for a week…I’ve been wondering about doing one side then the other …like the road pavers do. Do either of you think that this would work (blending the two sides)?
Julie- I did every other stair, so we could still get up and down (just had to stretch those legs, lol!) and didn’t have to worry about blending issues. Took a few extra days, but it worked out in the end.
I will add, though, that paper bag flooring sadly didn’t work for us. It looks awesome! And we had so many compliments on it! But, then we got a dog… a big dog… a now 75-lb, active 6 month old puppy. Yeah. For us, the paper bag floor was about as durable as you might expect paper to be (even with a lot of floor sealer on it). On one stair, the dog’s nail ripped up the paper a little bit and then my toddler helped pull it up, so that stair is missing 80% of it’s paper. It’s custom ;) I have to vaccum my stairs a lot, too, and I’ve noticed that on some the paper is coming up in the corners, due to the vaccum hose sucking it up a little. My husband and I have decided we won’t bother fixing it (because it would be a weekly maintenance/touch up thing) and we’re debating what flooring options we want now. I don’t regret going it at all- it does look awesome! And I’m totally ok with spending so little to find out something didn’t work for us. Just wish there was a way to make it virtually indestructible, since I have a crew of little demolition men ;)
Amy, thanks so much for sharing this! I keep getting questions about pets, but since we don’t have any I’m not sure how to answer them. This helps a ton.
One side then the other would work, or you could do every other step. You might avoid a line that way.
Hi Ashley!! I was wondering if you have heard of a way to make it bronze, gold, pewter, and or silver? I have been trying to find construction paper in those colors… but can’t. They must make some, right?? Thank you for your input!! :)
You could try wrapping paper or scrapbook paper maybe…or perhaps you could mix some sort of watered downed metallic paint and “whitewash” it onto the paper floors before sealing. These are all just guesses and you’ll want to test them out first, but they could work!
Hey Ashley, Love this look! Bet it would also look cool on a wall, using a tinted color of stain (blue, red, green). Love that you let Elijah help and I’m sure (knowing how much you care for your children) that you made sure to clear the floor of nails or anything that could harm him. Love to go barefoot as well! Love that every time I read your blog it makes me smile……
Love Love Love Love Love Love Love! The floor looks fabulous! This is going straight to the man…I know he will veto immediately, but I’m just planting a seed. If I give it about 6 months, the idea will become his and these floors will become mine!
lol, I love it…you know your man well!
well done!!
I can’t believe how long it took for the floor to dry, but it turned out beautiful. When you factor in the cost of the entire room it’s definitely worth the time invested.
Forgot to mention, I have always done everything barefooted
I agree. I go barefoot as much as possible now. I’m even getting into running and hiking barefoot. It’s wonderful.
Learn more about the benefits of going barefoot at Barefoot in Colorado Springs or Barefoot Living Society on Facebook.
i would love to do this in my basement. Occasionally my basement gets wet when it rains heavy. Will this still work?
I’m not sure. I read on a blog somewhere that a woman did it in her bathroom and it has made it through the toilet overflowing twice, so maybe. But I would hate to do all that work for it just to get destroyed the first time it rains heavily. So I don’t know…sorry!
awesome! i love it! i just wish that i had a space that i could do this in!
Wow, it looks great! I’m glad it worked out so well. Didn’t something similar happen with the penny counter top, where you used polycrylic when it dried unevenly? I’m glad you were able fix the problem fairly easily. Good thing you are adventurous!
Actually the penny countertop was the epoxy drying uneven, but same idea. It’s always something isn’t it?
Yes, it’s always something! Chalk it all up to experience, hey? :)
I did this in my kitchen on the walls to give it the old world european look. I put a coat of thinned paint followed by a colored glaze and some brush work and it looks so fabulous, its not just for floors!!You did give me an idea for a small floor I have been thinking of doing tho, thanks!!!
I did this to my kitchen cabinets. I was tired of painting them and wanted a rustic look. They turned out great!
I am in shock over here. That looks AMAZING. I am super jealous. I wish had a room I could do this in. Do you think it would work over ceramic tile in a bathroom?
If you want to use this over ceramic tile in the bathroom, you can use the same technique but with paper but do not wrap it with your finger like older leather beacuse will be very difficult to clean, looks like texture and you need in a bathroom plane or flat texture.
Wow…just wow. That seemed like a ton of work but the results were so worth it!
Dang girl, my back hurts just looking at you on the floor! But WOW what a makeover LOVE LOVE LOVE!
This is SO cool. Oh my goodness. What an awesome way to achieve natural looking floors without having to invest in something like hardwood! Thanks so much for this tutorial, I am absolutely bookmarking!!!
Hey girl… did you know that is probably the most awesome flooring tutorial I’ve ever seen?
I’m floored…haha…
This is seriously one of the coolest things ever! Pinning and adding this to my “one day” dream list for our home!!
Found you through Pinterest. These floors are amazing! REALLY wish I had the guts to do this. Can’t wait to check out the rest of your blog =D
Wow…incredible…imagine, paper on floors. Sounds very strange, but boy does it ever work!! I’m pinning this…I love it!!!
Debbie :)
Thanks for the pin Debbie!
How do you clean the floor can you mop it .
Yes, you can just mop wit water it. I used once this technique in my steps to the second floor and it was awsome
that is frickin’ awesome :)
I love this! I am going to do this in my basement. Thanks for the post.
Great job who would of thought this as a floor my ? do you think this can be done on stairs and did you just cover the back of the paper with the glue or did you put the glue on the floor first i did see the paper in your hand which way is better please let me know thanks so much for taking the time to read this Donna from Ma.
Yes, I think this is a great solution for stairs! I covered both the front and the back of the paper with glue and then laid it down and smoothed it out.
I love this flooring do you think it would work on counter tops?
I have heard of this done on both furniture and countertops. It would work…though I’m not sure I would use it as my main kitchen workspace. I think bathroom countertops would be great though.
I think the color difference in where the paper showed white against where it didn’t (after the re-staining) is fabulous. Adds depth and flow. Really nice job!
Love this idea!! do u think it would work with actual paper bags from the store?
Yes, I think that is where it started, then people just switched to using rolled paper when it got harder to find paper bags. Just make sure to put the printed side against the floor and you’ll be good to go!
yap it should work
The floors look amazing. I have done two floors so far. Once over linoleum and on concrete as well. I find that no matter how long you leave the stain it remains tacky. I just put on an old pair of sock to walk over it when applying the polyurethane. This summer we plan on doing our master bedroom also.
DID you polyurethane the concrete floors first then use the glue mixture?
You did a great job. I love it. And as said before, the price is right! Thanks for taking the time to do the tute.
So which side of the paper do we not use then that caused the white?? love, love, love! And fyi, I’m always barefoot!
I couldn’t even tell you, the sides look nearly identical. I’ve heard this Kraft paper doesn’t have two sides and works better… http://www.amazon.com/gp/product/B001AZ9RJY/ref=as_li_qf_sp_asin_il_tl?ie=UTF8&camp=1789&creative=9325&creativeASIN=B001AZ9RJY&linkCode=as2&tag=domestiimperf-20
Wow! I’d been thinking about this for months… you’ve pushed me over the edge! :) You’re somewhat right… it looks WICKED AWESOME! I cannot wait to try it this summer when school is out and I’m bored out of my mind… the thing is… I’m doing the kitchen. Small space… but there’s appliances involved. After reading this… I’m! Doing! It! :)
Hubby and I are looking to buy a home soon. We have looked at a few and those that we can afford all need new flooring. I probably wouldn’t do an entire house like this, but would absolutely do several rooms like this. I’m always looking for inexpensive ways to update a home and this is a keeper. Thank you so much for sharing this with us. On second thought, maybe I would do an entire house with floors like this and then use area rugs to give the rooms their own character. And use different colored stains to keep the rooms separate, but still cohesive. Yes, that’s what I would do.
This is like decopoge! You make sure that you have your paper well glued before you lay it down.
Ashley….I did my kitchen counters similar to this and they have lasted 4 years and are still beautiful. My concern with the floor though is would it scratch easy when walking on it, like dog toenails, people in high heels etc. Let me know your thoughts.
You did an awesome job!!!
Donna
I’ve got dogs as well and have the same question. What about accidents they make? Would it hold up to it?
I have also done my countertops but the poly had not held up. Its bubbled and come off in several places. I did 8 coats of a water-based poly. I absolutely love the look but hate that the finish is coming off which means the paper is also tearing and coming up. Any help or advice would be great. I’ve considered epoxy but that would be extremely messy or require completely redoing teh counter with an edge like Ashley did with penny bartop.
First, I have to say that I have been so undecided on whether to do this kind of floor style in my new shop or planked plywood. Gosh, I love the way this looks!
But, my favorite part of this post is your take on the “Hey Girl” quotes! ROFL!! I love YOURS the best! I may have to make my own sign using that one. It SO fits me too!
How awesome is that?! Love it!! You always have such neat ideas. Love the “hey girl” pics too! Thanks!
Hi Ashley, I found you on Hometalk and wanted to come over and tell you that I absolutely love this floor. I’m scheming out ideas for my basement re-do (probably far in the future project) and I think I may have found just the what to do with the floors! Way helpful tutorial with lots of details and Hey Girl! humor. Great post!! – Amy
This is AWESOME!!!!
XO
Kristin
What are the chances that this would work over linoleum?
I have seen this done successfully over linoleum! Here is a link to a post about it… http://lovelycraftyhome.com/2012/05/24/out-west-where-home-depot-is-still-my-home/
I love the way your floor came out! I’m recovering from surgery now, but I’m making a list of things to do when I’m well. This is going on the list! Thanks for sharing!
Oh my word!!!! This is absolutely gorgeous! I love, love, love it! Little Bit from http://www.DecorateWithaLittleBit.com
I have seen this done in a magazine well over 10 years ago and have wanted to do this for a long time. I just don’t have a floor to do it on in my house. That’s not to say I won’t ever have a floor to do…we do have a rental house that I may be able to do this on.
Wow – great work! Love it and all of the tones in the finished stage!
YES on the “hey girls!” and HECK YES on the whole tutorial. This is KILLER, my friend. I am in love with the whole thing.
This is the coolest things I’ve seen! So unique and unexpected…totally love the look!! You did a great job!!
Selene @ restorationbeauty.com
This post has my eyes as big as saucers and my jaw on the floor! I would have never thought to do this to a floor and it looks absolutely stunning!!! I love how it looks! I have to show this one to the hubby!! How do you think it would do in a bathroom? Julia @ http://www.juliakendrick.coom
Great job–it looks amazing! I would never have thought to do this…. I may just try it! Thank you!
That is very beautiful, I would love to do this in my basement but how do you know which side of the paper turns the poly white?
Thanks
I couldn’t even tell you, the sides look nearly identical. I’ve heard this Kraft paper doesn’t have two sides and works better… http://www.amazon.com/gp/product/B001AZ9RJY/ref=as_li_qf_sp_asin_il_tl?ie=UTF8&camp=1789&creative=9325&creativeASIN=B001AZ9RJY&linkCode=as2&tag=domestiimperf-20
This is fantastic! You so sound like me in taking on so many projects at once. And having this project take way longer than you planned, is also something I end up with on quite a regular basis. But the results… so worth it!!!!
By the way, I have stained concrete floors in my basement, and this looks so much like that it’s kinda eerie! Again, major props for this awesome project!!
That floor looks awesome. I can’t wait to try it ou for myself. Thank You
You gotta know that I just LOVE this!!! I like this even more than the “penny floor”. I must say that y’all did an awesome job.
In 1968 or so, a church memnber hosted a garage sale at her home. She had applied this same process to her kitchen floor and it looked great and lasted years.! This idea has been around a loooonnnngggg time.
This is really wonderful! I love all of the texture and color variance. It looks like it was quite a bit of work, but it really is beautiful! It sounds like it’s really durable, too, so that is perfect for a boy’s room. I’ll be pinning!
You did an amazing job!! I have a 4 year old son and 3 year old grandson that will be assisting me :o) I was thinking about using scrapbook paper (river rock look) instead of the paper-bag. I wouldn’t crumple it, not sure of all the details, just thinking about different paper. What do you think?
Try it on a spare piece of wood, try all the papers and see which ones you like
I did this to my floors but instead of staining it I added some liquid brown rit dye(1 capfull to 2 cups glue and water(distilled). This was easier than staining and removed one whole step. I used a piece of cardboard to test my pieces on til I got the recipe I wanted. I’m sure red rit dye could be used as well as other colors. I will be doing my bedroom next and will experiment with a border.
Your floors turned out great!
Love this idea and love the idea for a border! Now thinking about doing the kitchen walls. GREAT JOB!
I would love to see pictures (if you have them) of how yours turned out with the dye & border :) [email protected]
How did the color work out using the RIT dye? Seems like that would be much easier.
Two thumbs up. Great job.
My wife discovered this and I’m contemplating it for a basement kids room. Since it’s a kids room, I’m actually contemplating putting down the paper and letting them paint/draw/whatever all over it then doing the poly. A few questions for whoever might know:
How hard is it to rip up when I need to get rid of the kids’ art in favor of something more traditional at sale time?
How durable is it? Kids room with a play area for a 3 year old and a dog who walks around there. Also my treadmill is in the corner.
Can you vacuum it or is the a sweep only floor?
I’m not sure how easy it would be to get up, we are planning to leave ours (even when it’s time to sell) so I didn’t really consider it. For being a floor made of paper it is actually really durable, though I guess anything with 12 coats of poly would be durable, haha. But the beauty is that even if it scuffs of scratches, you just sand a bit with fine sandpaper and add more poly. I have had comments on other places I shared this saying that people have had this as a floor in their house for 20 years! As far as cleaning I have vaccumed, swept, and damp mopped the floor with no problem.
WOW! It looks great! You are so talented!
I have spent the past two weeks on this very project! I began by pulling up our old carpet and discovered that under the carpet was chipboard and not plywood. I hadn’t come across anyone who has tried this project on top of chipboard so I was hesitant but I went for it anyways and it turned out great! I too had several spots where the stain left dark splotches that to me resembeld an ugly grease stain. I couldn’t embrace them so I took some more of my crumpled up brown paper and reglued pieces over the areas I didn’t like and then stained my new “patch jobs”. Problem solved!!
Hurray for you for hanging in there! I think it looks awesome! GREAT job, Ashley!
Thanks so much Roeshel!
ps. your ‘hey girl’ memes crack me up!
I did this treatment to line the inside of my sons’ dresser drawers. I would never have thought of using it on the floor! Neato!
Am I understanding correctly that by putting the poly on a little at a time it saved the whole “turning white” business? Or should you just pay attention to what side of the paper you place facing up?
It’s hard to say exactly. I would thnk that putting on a super thin first coat of poly would solve it, but I already had a coat on so I can’t be sure. And putting the same side of paper up would be nearly impossible cause they really do look exactly the same. I have read that if you buy “Kraft” paper rather than the “builder” paper it isn’t two sided. Here is the link the the Kraft paper http://www.amazon.com/gp/product/B001AZ9RJY/ref=as_li_qf_sp_asin_il_tl?ie=UTF8&camp=1789&creative=9325&creativeASIN=B001AZ9RJY&linkCode=as2&tag=domestiimperf-20
The whiteness is most likely caused by too thick of a cost of glue drying too quickly. Don’t rush. Make sure there are no drafts or fans used. This is an old theatre technique. And as a scenic artist I made the mistake of rushing too many times
I also have read that if you are using a semi-gloss or satin poly that the shine inhibitors can cause cloudiness if not mixed properly and frequently. What kind of finish did the poly have?
I used semi… perhaps I’ll try doing it in gloss when I reseal it.
I wish I could pay a pic for you. What should I do now?
I used Kraft paper and they’re is deff a difference on either side. Then I had to go get more and a whole area looks lighter than the rest. I put a circle on each piece top mark which way is down. Now not sure what to do about the different shades. So obvious.
I saw this done to a wall and it was beautiful.
Love the floors and have been contemplating do the treatment to several rooms. My question is what do you do for a room that may lead into a different flooring type and maybe a little higher. Hope that makes sense. I would like to do my office that has a concrete base but the hallway outside the door has tile so there is about 1/2 inch difference. Thanks
This room has the exact same thing going on, the hallway that leads up to it has a wood floor that sits 1/4 or 1/2 an inch higher. I have’t gotten around to it yet, but I plan on adding a quarter round piece of trim (like this, thought it will need to be trimmed to the right height http://www.homedepot.com/p/Woodgrain-Millwork-WM-106-11-16-in-x-11-16-in-Pine-Quarter-Round-Moulding-PNE0106/100321565#.UU9iJhxQHIc ) and staining it the same color to blend the two floors a bit.
Wow, it looks like a lot of work but the end result is absolutely stellar. That and your cute little helper. Too adorable. :D Thanks for sharing.
p
It looks wonderful! Every time I see a paper floor project, I totally want to do it. I had a problem with poly drying white on a dresser I painted recently. So aggravating!
I did this to my son’s floor probably 15 years ago. I love it still….so glad it is still hanging around! I have cowboys that I live with, so we put an image of a saddle with wings on the floor in random places! So cute for the little cowboy’s room! He is now grown, but his Dad is moving his office in there….still looks GREAT!!!! It has lost a bit of the shine, I’m sure where the overlaps have been, but maybe a new coat of poly before we move the office in would perk it right up! I love bare feet, little boys(I had four!), and husbands who try to get in digs! lol!
That’s such good news….15 years is a long time for a paper floor to hold up!
This floor is awesome!! I want to try this in my bedroom. Do you think (I truely don’t no anything about poly or stain, etc.. thats why God invented husbands!) that the stain could be added to the poly, as long as it was mixed really well and then applied as one step instead of two?
Hmmmm…probably. I mean, I don’t see why not but I’m going to guarantee success either. I’ve read about people adding RIT dye to the poly and having it work. But just so you know, doing the stain separately was the easiest part of the whole process…it’s the gluing paper that will kill you :)
No no no no!
Mixing anything with your poly is a recipe for disaster…. Poly is finicky enough on its own.
What is the sound like? Is it loud & “echo-ey” like laminate flooring, or concrete? Or does the paper kind of muffle sounds?
A little of both? It’s not as echo-y as concrete but I wouldn’t call it non echo-y either.
This technique works well on walls, floors and even ceilings — and will stick to just about any kind of material. I did this more than 20 years ago, and it’s nice to see that it still has the WOW factor!
This looks fabulous! I did a PB floor in my daughter’s room, but didn’t stain it. May have to go back and fix that. Hmmm. But I do have a hint to combat the shininess and slipperyness (?) Behr makes some stuff that you mix with your top coat or paint to help prevent slips on their porch paint. I painted my studio floor and loved it, except it was a bit slippery for a while. When I painted the bathroom floor, I added in the Behr stuff (I figured bathrooms are slippery enough as it is), and it worked great! It is just like a very fine sand that you stir into your paint or clear coat. Might want to give it a try to knock down the gloss. :)
I’ve never heard of such a thing! Does it feel rough at all, or just…not slick? Thanks for the heads up!
I was worried about that too. That’s why I tried it in my teeny weeny 5×8 bathroom first, figured I could sand it down if it was a total fail LOL. It doesn’t feel rough at all, but it didfeel a tiny bit textured at first. The first few days I could tell the difference in my socks but not bare feet. Now I don’t notice it at all. I didn’t add as much as they suggested since I did it in the clear coat and not the paint. So far I am happy with it. If you are looking for it, it is in a little bag next to the porch paints at HD. I think a bag is about $5-6, so you could do a test board for only a little investment.
It’s looks Great!! I done this same technique in my home about 15 years ago, only I done it on the walls in my kitchen. I loved this look so much I did it again a couple years ago in out new home, only in the laundry room this time. Like you mentioned I made balls all crushed up then smoothed out. When I applied it I didn’t worry that some of the edges didn’t glue flat down, once the poly was on it gives a nice crisp finish. Just beautiful!!! You did an awesome job!!!
We are doing this in our dining room right now and the paper isn’t sticking flat everywhere. Will the poly make it stick up or will it lay flat one we have a coat or two on it?
Do you mean that it has wrinkles or bubbles? This is the one problem I actually didn’t have, so I can’t really give you any advice from experience. The paper does shrink as it dries, so if you give it a day in two it might even out a little. I don’t think putting poly over it will make it any flatter, but if you have some really big wrinkles you could always cut them out and add a new piece of paper over them. Sorry I’m not more help…did you read through the comments on Lovely Crafty Home? There is TON of information there.
I am originally from Kentucky….so I totally get the barefoot thing! I would love to do this in my den and hallway (which are the main walk through areas of the house). My problem is pets and how to keep them from walking on the floors and how I can manover around the house if it takes that long to dry.I am currently painting the concrete floors in my office (which I can completely close off), and yet when I opened the door to put on the first coat of poly….yes there were little kitty prints all over the paint (dang kittys are so clever in sneaking in places). Lucky for her the prints wiped off with a paper towel and I did notice a few of their hairs are now saved forever in the poly coats.
Ashley,
IT’S AWESOME!!!! I have wanted to do this on the wall for many years. I KNEW it would work but my hubby said NO WAY! I can’t wait to show this to him. I am going to skip the staining process to keep it lighter brown. What are your thoughts on paper bags from the grocery?? That’s what I had thought I would use. Again it looks GREAT!!!
Lisa :)
Thanks Lisa! I think paper bags would be great, just make sure and put the printed side down. And how can your hubs say no to a practically free floor where you do all the work?
Hey Ashley! I recently found your website by doing a search for DIY counter top makeovers and found the penny countertop (which I LOVE btw) I am currently working on a project similar to the paper bag flooring except I am putting it up on my walls. I found a forum about the brown bagging wall treatment by doing a search on how to cover paneling…anyway….I have started the project and notice that when the paper dries over night, some of the paper lifts up. I have been using zinnser wall sizing to “glue” the lifted pieces back down, but I was wondering if this happened when you did it for the floors? Based on the forum I saw this in, the gal said she left the walls “oh naturale” so that is kind what I had in mind. I am think that maybe if I poly the walls this would help those loose spots, so that I wouldn’t necessarily have to go back and stick each little corner that has lifted back down. Any ideas, or suggestions?
I actually didn’t have any corners lift on me when they dried. I was SURE I would get some so I SOAKED my paper, seriously pressed it down, and smoothed it out.
So you were planning on not sealing the wall at all? I would think you would need some sort of sealer or else the paper will just soak up any humidity in your house and eventually fall off. My guess would be that if the corners aren’t big lifts you could paint on some poly and they would be okay. Then if they are not you could go back after the fact and use poly to glue down the corners, but that may not be needed. Hope that helps!
I love the look and would love to try it in our soon to be converted garage. We are going to convert the garage and I will be using it as a home business. Rather than apply the glue to both sides of the paper, do you think you could just use a paint brush and brush a good coat of glue to a small section of the floor (say about a 3′ square at a time), place your paper down, then brush a coat of glue over the completed section? Thanks.
It might, but I would recommend you dip the paper in water for a bit to soften it and allow the glue to soak in. Also, air pockets might be a factor. I do a lot of paper mache and you have to saturate the paper to get really good strength and adhesion.
I’m sure that would work just fine, though it would probably take longer. Also, you will need to use your hands to smooth out any bubbles on the wet piece.
I’m ready to begin but realized that I didn’t know which side of paper to put down so that it doesn’t turn out with white fog……do u know which side to use??
No, I don’t. Sorry, I know that’s not the answer you were hoping for. I didn’t even realize it was two sided until after I stained and polyed it. If you bought the Kraft paper its not two sided…if you bought the builders paper, well, I wouldn’t really worry about it. I really think it clouded over because my first coat of poly was way too thick and that is where you are going to have to be careful.
Do you think this type of paper would work?
http://pacon.com/product/bulletin-board-paper/fadeless-designs-48-x-12-weathered-wood/
I’m not sure about this one. I’m guessing you would want to lay it down in long strips (instead if ripping into smaller pieces) so that it looked like an old wood floor. It would probably work but you would have to be really careful (and probably use a partner) to lay it down so that you don’t get any bubbles.
http://www.amazon.com/Rainbow-Kraft-Roll-White-PAC66001/dp/B000F8TBS4
would this work too?
I think this one would work great!
Hi, I love this idea and just have one question. Did you have to match up the edges to each other? I know you said you overlapped some but doesn’t that make it so you can see and feel the overlap underfoot? Bare foot of course :)
I do a lot of fabric work where I have to match the edges up exactly so that’s why I ask. I’d post a pic but don’t see where I can do that.
Thanks!
Di
I didn’t match up any edges, every edge has about an inch overlap. The paper shrinks as it dries so overlapping is a must. You can see it plainly (I don’t really notice when I walk on it), but since everything is overlapped so much it doesn’t look weird, it kinda just looks textured.
Hi,
Thanks for sharing the tutorial and pictures. I have been researching to do this myself. This is so far my favorite look!
Can you mop and bleach these floors just like you would any other?? I love this… I want to try it in my kitchen!!
Hi there! BIG emergency!!!
Finished gluing down the paper a couple days ago. Look ok, a little wrinkly. Read somewhere they would disappear. Applied the first coat of poly last night and they are worse than ever!! Also after the poly was applied, the paper now had a lot of dark splotches on it! I didn’t use stain, just brown kraft paper. Now it looks horrible! My husbands saying he doesn’t think the splotches or the wrinkles are going anywhere:(. Any suggestions? Should I sand? Or what???! Any info would be greatly appreciated!!!
Hi Ashley
This looks awesome!
2 questions:
Could I do this with a light color, non brown color? I am thinking turquoise…. or robins egg blue?
Also, could I do this on a sub floor of a mobile home? it is some kind of mdf..
Thanks
Julie
I’m pretty sure both would work just fine! I might try it out on a scrap piece of MDF first to get your formula right though.
How would a white colored stain work? Maybe look like white washed..? Looking for a brighter look. Love your floor, it rocks.
I was wondering if anyone has used different colors of stain I really like this idea but have just had my kitchen painted a blue gray, with white chair rail done. I would love a mingled look with browns, little grey mixed in so would blend in with what I already have done to my walls?? any ideas? Thanks
I’m inspired to try this on a counter top.
We just did this the other night on a concrete floor and are on our 4th coat of poly but our edges are starting to come up just a bit. Any suggestions for how to keep it from coming up and ruining our floor? We thought maybe about putting silicone around the edges to hold them.
I actually don’t have an answer to this. We took off our trim before we did the floors, so when we put up the new trim it holds everything down. You might try e-mailing some of the other bloggers that have done this (I linked to them in the post), they might have more insight. Sorry!
Use quarter round to go over the floor and adheres to the well.
I recently started my floor. I am having a problem with large wrinkles once the floor dried. Will they go down a little after staining and putting on the poly? Do you think I should cut them out or patch them?
No, staining and poly-ing won’t fix your wrinkles. Not the answer you wanted, I know. I think cutting them out and adding new paper on top would be the best solution…it should be pretty easy with an Xacto knife or something similar.
Hello! I love this idea. I would love to re-do our utility, kitchen, and both bathrooms which have ceramic tile on them. Can I do this over the tile? (I don’t mind the “tile lines” showing, it gives it a neat look). These are high-traffic areas, considering it’s myself, sweet “hey girl” hubby, and our 5 boys. Thanks!!
If you don’t mind the lines then I say go for it. Actually, try it on a little section first just to make sure, but I don’t see a reason it wouldn’t work. Just make sure to let it cure completely before you let everyone walk on it. So like a week, which I know is hard if not nearly impossible. The good news that it is easy to do touch up when needed!
We have a laminate wood floor. Should the laminate have a light sanding before starting this project?
Sent you an e-mail!
I love the paper bag flooring!! I made sure to share on Facebook. I have a house to sell and carpet is just too expensive (even the cheapest), so I am going to do this for the living room, hall and 3 bedrooms. Thanks for such an ingenious and inexpensive idea!!
Thanks for sharing Alma! This is a great solution instead of carpet…it’s going to take you forever to do, but it will look great and be cheap for sure :)
Looks great. Personally though I dislike polyurethane. I have never understood sealing wood and other natural surfaces with liquid plastic. I wonder if there is a natural alternative?
I found some non-toxic natural based floor sealers here: http://www.earthpaint.net/
Your floor looks beautiful! I did this to my walls a few years ago. Instead of glue I used poly-acrylic. I crumpled up the paper and dipped it in the poly-acrylic and spread it on the walls. It stuck great and I didn’t have to put anything else on it. Just let it dry. Of course I didn’t stain it, but it looked great. The color had variations from light to dark. It looked like worn leather. Everyone that sees it loves it. I may have to try it on my floor. I wonder if it would work to put it over existing vinyl.
Great tutorial. I am a fellow paper floor lover…….here is my floor on you tube http://youtu.be/IDoVCl94uLU or you can google “we love paper flooring”. I just wanted to add that the builder’s paper that I used had a definite difference in the 2 sides…..one side was darker than the other and I put the darker side face down for a more uniform look. I also used a credit card to smooth out the paper on the floor and that worked great so I didn’t have any wrinkles or excess glue. I ended up doing three bedrooms, one hallway and entranceway….we absolutely love our floors. I love how you added the male perspective into your tutorial. I chucked when reading about wearing the same clothes for 3 days ……I could really relate to that as well………LOL.
Oops, typo……..I “chuckled” when reading about wearing the same clothes for 3 days. Anyhow, thanks for a great tutorial Ashley.
Your floors look great! I love how you can take this technique and make it totally your own, our floors look pretty different. I plan on doing our guest room at some point but have to admit that just thinking about starting over makes me cringe a little :) Nice work doing so many rooms!
how long to do let the paper dry for?
Nice job, Ashley. I used to do shabby chic furniture and I once used this technique with tissue paper. My husband and I saw the penny treatment on the Congress Hotel floor in Tuscon. We loved it! We have converted our two car garage into a bar. We were going to do the penny thing.
I just showed him this and we both want to try it.
One question. Any reason why you went with a clear latex acrylic rather than an oil based polyurethane? I would think the poly would make for a harder surface. I know poly does yellow over time and the latex doesn’t. Just curious?
Our bar/garage still opens like a garage so it will get a fair amount of sun (we are in AZ) and whatever weather blows in – lol.
Keep up the good work. I am off to find your penny countertops.
Maria aka Barefoot Mama!
I used that water based stuff because when I researched other websites about it each one said that oil based didn’t work, and in the comments section people were saying the same thing. I can’t remember exactly why…I think it ruined that paper or made it super blotchy…something along those lines. I decided not to push my luck :)
I was going to leave you a link to my penny countertop post, but I see that you already found it!
Holy crap! I heard of the paper bag floor a while ago but thought to myself “ya like I would ever do THAT!” but I am stunned at how gorgeous your floor is! maybe it’s the stain step that makes it stand out more to me. I LOVE this, fantastic job!
OMG I am so impressed!
Thanks Anne! When I first heard about it I thought it sounded cheesy and a little ghetto, but it really does look stunning!
Looks great!! Have seen it done on walls as well.
Note to others—unless you have an unlimited amount of time and patience–a smaller room is the way to go. I decided to do this to my (800 sq ft) basement. HOLY MOLY. Maybe it is just me, but it is taking forever. I spent 6+ hours just putting paper in the hallway. (One more small area and another hallway to go!)
My cement floor was BAD–I’m using RIT dyed water base poly as my adhesive–more expensive but it sticks well and I am getting the staining and first coat done in one step. I’ve used FOUR gallons of poly so far and am still papering. (Again, 800 sq ft)
Thanks for the great idea.
I did use the Home Depot paper and have not had a problem with the sides.
Did you sand and seal the concrete floor first? And did you do the glue step?
No. I scraped and cleaned the floor (I had glue, tile adhesive, vinyl float…all over–the floor was bad) just to get a smooth surface) and I didn’t use the Elmer’s glue at all. I stained the poly and dipped paper directly into it. I did a few coats of tinted (with RIT dye) to even out the color and a few coats of clear poly on top. The floor is great, almost a year later. It took forever but was worth it. I did fill in holes and cracks with a cement patch. Smaller holes, I just dripped some poly into and let dry before I papered over.
wow that was a really good job. well done. i own a pub and was thinking of changing floor tiles as i am refurbishing but it gonna cost me a fortune. Can you put paper flooring on top of tiles please ? thanks
Yes you can, but you will still be able to see (very clearly) all the lines.
I’m considering doing this in my entire house about 1200 sq.ft. What do you think? Will this be too overwhelming to look at?
Charlene, I have paper flooring in 3 bedrooms, a hallway and an entranceway. The only rooms that I haven’t papered are the kitchen, living room and bathrooms. I cannot express enough how much we love the paper floor……and I plan on doing the living room as well. Here is what ours looks like or you can go to YouTube and search We love paper flooring…..here is a link……..http://youtu.be/IDoVCl94uLU
Our house is about the same size as yours and I decided to use a different finish in one of the bedrooms just to create a little bit of variety……I used a satin finish instead of semi gloss and it changes the entire look of the floor. If you purchase your paper at Home Depot, it has two distinct sides and putting all of the lighter side down will also create a different look than putting all of the darker side down first. So if you want to, you can create unique looks for each room.
I agree, I don’t think it would be overwhelming at all. It will take you quite awhile to do though!
Hey there! I love this idea for my home and have a couple questions. I have a 2600 sq ft “frank Lloyd wright” style home with almost all painted cement floors. They were painted a dark brownish red like some of his homes have. When we bought, we were thinking we would strip the floors and stain them. This has the same feel to it and would save a lot of money. I have multiple levels throughout the house so I can do it in sections. 1st question is, how is it sticking to your cement floors and how long has it been since you’ve done it? 2nd question….I have 2 outside patios that are painted the same as the inside and I would like to do those as well. I live in Florida so there’s a lot of humidity, other than using outdoor stain and sealer, have you heard anything about how this would do outside in humidity? Last question….my husband wants me to figure out how to remove it, so if I do a section and he doesn’t like it, that we won’t be stuck since we won’t lay flooring over this. Have you seen anything about removing it? Thank you so much, this looks great!! -lesly
Sorry for the duplicate..1st one didn’t look like it took! Lol oops!
1) they are sticking perfectly, I did it about 5 months ago. The edges did curl a little, but we added the trim back on which sealed it down. 2) I have NO experience with this, but I don’t think it would hold up well in outdoor weather. I could be wrong, and if you do try and it doesn’t work then it didn’t cost you much. 3) I also don’t know anything about removing it, but I read in a comment somewhere that you remove it just like you would wallpaper and it isn’t hard.
Good luck!
Hey! This looks great and I’d love to do it in my home. Couple questions….I have a 2600 sq ft “frank Lloyd wright” style home with multiple levels. Almost all the floors are cement painted dark brownish red, which he did in some of his homes. When we bought we planned to strip the floors and stain them, which would be labor intensive and expensive. Tis is a great alternative. 1st question – you said people were not having luck with cement floors, how long ago did you do this and how is it holding up? 2nd question – I have 2 outside patios that are painted cement like inside, have you seen anything about how it does outside in humidity? I’m assuming I would need to use outdoor stain and sealer, but otherwise…??? 3rd question – have you seen anything about removing it? My husband, who knows my projects are never as easy as I claim they will be…haha….wants a “out” if it doesn’t look the way he wants….have you seen anything about how to remove it? Thanks this is awesome!!!
Aloha! This ideas is so awesome that my husband & I are going to try it out at our back house. Thank you sooooo much for sharing this fantastic idea!!!
I absolutely LOVE this technique. I used this on a wall behind my stove about 30 years ago in an apartment I lived in. It was very durable and looked awesome. Everyone was shocked when I told them it was paper bags. :)
Hi there! Awesome job. I was just wondering if you think its possible to do this with different colored paper? Like construction paper…. I would love a mosaic paper floor……. what do you think?
I love this i found you on pinterest. I am going to pitch it to the hubz and see what he says. I found several papers on Amazon is table cover the same as what you used? It’s a 300×48″ Roll i believe. thanks fOr sharing this.
I’m not sure what you mean by table cover, but 300 by 48 sounds about right. I think as long as it is “kraft” paper you should be good!
The floor looks great!! Just FYI. When I redid my old wood floors the suggestion for the poly was to put two coats of glossy poly on, followed by a coat of satin. They looked fabulous! Instead of being shiny, they glowed. I also waxed them, but that makes them very slippery.
I am in love with this idea. I was hoping to do this with white paper. I am trying to restore my retro pink bathroom and looking for a cheap flooring solution. Do you think white paper would work? Would I need to do multiple levels of paper to avoid translucency? It’s a small bathroom so this would be a quick project (6’x7′)
Thanks!
This would be quick and easy in that small of a bathroom. I think white paper would work, not sure about the translucency…it depends on the type of paper and current flooring. But since it’s so small it wouldn’t be a big deal to just keep adding layers till you’re happy!
what type of floor did u have underneath?
I did this on concrete, but I have seen it done on all types of flooring…plywood, linoleum, tile…
If you were doing this on top of linoleum, would you need to adjust any of your steps? I have linoleum glued to concrete, and if I can avoid having to pull it up, I would be one happy lady!
I’ve read blog posts where people papered right over linoleum, but in my experimenting (which you can read about here) I didn’t have much luck with linoleum. I *think* that if you sand it with some really rough sandpaper before you begin it would work pretty well though.
Now that you have completed this project, what would you have done differently? Any ideas to speed up the process? I love the look but if a project takes me too long, I tend to abandon it so I need the fastest, most effective process there is.
I plan on doing my guest bedroom floor the same way and I have to tell you, I’m kinda dreading it. It’s super time consuming. It actually wouldn’t have taken me nearly as long, but I have two”helpful” toddlers to try and work around. Anyway, I’m not sure how you could really speed it up… maybe use bigger pieces of torn paper. You could skip staining it, but the stain and poly were quick and easy compared to gluing down the paper. I would just recruit help, that would be the best.
I am seriously considering doing this on all my downstairs flooring and then up the stairs. I am curious about the wear, and thinking spar poly even in a million coats…wondering how it mops to keep it clean with spills and dogs. Any input would be more than welcome!
I don’t have pets, so I can’t tell you how it would hold up to claws and whatnot. But it is easy to clean with a damp rag or swiffer, no problems. My biggest piece if advice is to let it cure FULLY (like a week) before you put all your furniture back in and let people and pets start to abuse it. It put everything back the day after because it felt 100% dry (and I was impatient), and it scratched and chipped and I need to do another coat or two of poly because of it.
One year ago I did the floor using paper from Ikea, cream colored, came on a roll for kids to color on and use in crafts. I did not crunch it up, just applied torn and flat, using the poly as the glue on both sides, no brush, rubber gloves on hands and wipe on. Over lapped if it looked like it needed it in any areas. Four coats of latex poly, one in am and one before bed. I did put a few notes on a sheet in one corner of the room for the fun of it. ONE FLAW: toe nail polish on my toes left little red line here and there.
I am speechless! Beautiful. Do you think I could do it on furniture?
Yup, you can do this on furniture! I haven’t done it personally, but I’ve had plenty of readers tell me they have successfully done this on tabletops and whatnot.
What color of stain did you use?
I am so excited to try this in my bedroom. If is goes well and I like it, I’m pretty sure many more rooms in my house will have this flooring!
so how durable is this floor ?? i see u said u put this in young boys room, so how well does it stand up to them and there playing, cars, legos, etc… it looks great !!!!!
It is holding up really well actually. I do have some spots that need more poly because I didn’t wait the full week for it to cure before putting everything back in, but that’s it.
To avoid the Bleeding problem, I have seen another tutorial where they roll the glue mixture out in sections with a roller, lay the paper pieces down and roll another layer of glue over them. Roll glue, lay down piece, roller over it, lay next piece, etc..
The edges are all stuck down and to each other, no bleeding. I want to do this as well and I a so grateful for everyone sharing their successes and their problems. It will help e a lot when I get ready. Hopefully before Christmas.
This is a great idea. I wonder if it can be done in stages? I have an area of just under 300 sq. ft. and I can fit things into half the building, but have no place to remove those things to.
I was right in the middle of one of my paper flooring projects when I had a death in the family and had to leave town for 3 weeks. I didn’t have any issue at all with returning to the project but you have to remember what ratio of water to glue that you used as this will make the paper lighter or darker in color depending on that ratio. I did not stain my floors so this may not matter if you are going to stain them. What is so awesome about these floors is that you can be so flexible while creating ….I was originally going to put thresholds between the hallway paper floor and each of the 3 bedrooms that I had papered but decided just to go back and paper the entranceways to each room and it looks great and blends in well with the previously papered room.
I just want to say I LOVE you! Not in a weird stalker way, in a ‘I totally do the same stuff’ kinda way (Not as awesome though). The penny counter top and, now, this paper bag flooring is on my MUST do list and my husband has you to thank! ( He wont really ;) ) THANK YOU for the awesomness that is this blog! Once I have finished my 30 or so (slight exaggeration there) other projects , who am I kidding? I am not gonna wait, I am doing this.!!
Yes, start it now…31 projects going at once never killed anyone, haha. Tell you husband you’re welcome :)
I used the builders paper and waiting for it to dry. I have my stain and poly but thinking of doing something different. Wondering if you have heard of anyone doing the same. Want to poly first and then stain and poly again. Thinking that this might prevent the edges from soaking up more stain and I have a lot of tiny parts that are coming up. Would have to go back over with glue and let it dry costing another day. Hoping that this would skip a step or two if I am gonna have to cover up the white and re glue before applying stain.
I did the stain over poly (not on purpose) and I don’t recommend it. It might work for keeping things from bleeding, but stain over poly does not dry. Mine was still wet after four days of “drying”. If saving time is what you want then I would do another layer of glue over a layer of poly.
Thanks. Have a spot where I started laying the paper down at night and then finished in the morning. It has a different color to it that is easy noticeable now that its dry. But maybe thats because I did it and there is nothing in the room to draw attention away. used a measuring bucket to get the same water/glue ratio. Maybe putting a layer of glue on before stain will help even out the color without trying to do it with the stain. I tend to second guess myself so I try to find the most “fail safe” way to do things.
Gotta say this sounds exactly what I would do. Start projects randomly, gripe at hubby for not doing it “right” how many projects can I do and they are all imperfect lol! Looking forward to reading the rest of your blog. :)
Hi have started this project of covering my stairs with the paper bag effect and I have a bleed is there something I can do to cover up or get rid of or not? I have stained and applied polyurethane . ?? thankyou helen
I had bleed too and ended up just leaving it. The only solution I can think of would be to cut out the bad parts with an exacto knife and add more paper, stain, and poly.
Ashley, you may have saved my life! Our basement flooded this past spring and no money to replace carpets (of COURSE, insurance didn’t cover it….). A friend of mine did this over his plywood floor. I was dubious about concrete. You have convinced me its possible! My question is this, do you think we’d be in the old folks home before we finished a pretty darn big basement? Many thanks!
Dang insurance! My only advice for papering a large area is to turn it into a party. The actual papering part is what sucks up all your time and a whole lot of extra hands would make quick work of it. Plus I bet people would be willing to come help just to satisfy their curiosity!
Those “Hey Girl” photos are amazing. And I’ve heard of paper bag floors before, but never quite understood it until now. Way to be descriptive, but also entertaining! I read every word. :-) (And the finished look is dynamite by the way, and well worth the effort!)
I love this! I used this idea years ago to make boxes that looked like old leather. I also took a beat up cowboy hat and covered it, IT LOOKED LIKE A REAL LEATHER HAT. Now you have given me a new idea to use this on. I used paper bags from the grocery store and that made the cost even less. Thanks for the great idea!
Did you have any bubbling after it dried? Our paper went down without bubbles, dried without, and the stain dried without, now that I polyed it it has bubbles :/
Oh no! I never had any bubbles. Has the poly dried completely yet? Are they little bubbles in the poly or big bubbles under the paper?
The poly wasn’t dried when I asked you about the bubbles. We went to dance and came back to the dry poly and the bubbles were gone!! Thank goodness because I was quite heart broken when the popped up!
I’ve done this many times on walls before but not floors yet. Looks great!…We call it cigar leaf or elephant skin…You can also use tissue paper that is used for gifts, (cheap at the dollar store) always tear off straight edges of all papers, wrinkle and roll it on overlapping edges with the appropriate paint color or clear poly (or tinted) for stained translucent look…Color stays thicker near wrinkles and gives a cracked look… rather than using glue, the clear or the paint bonds just like glue and saves that step….Roll it on then lay paper on it while wet and roll again…I find foam rollers work great…Tissue is very fragile don’t try to move it or roll too much…if it messes up just scrape it off or roll another piece over it. Any paper that’s not too thick can be used for patterned finishes with clear or tinted for antiqued look. *Another trick for additional depth is after its dry, you can lightly skim an accent color over wrinkles with a metal or plastic trowel. If done right the color catches only or mostly the wrinkles.
I was just wondering about cleaning the floor when all is done. Wanting to know how easy it is to keep up , if it’s easy to Mop. Thanks Tammy
It’s easy to maintain. I sweep it and hand mop it with a water/vinegar mix. I has gotten peed on quite a few times and it just sits on top until I find it and clean it up, no damage. It does have some scratches and places that need repair from the kids dragging their cribs around. No damage to the paper, but it does need more poly.
Ashley, I have a question when you lay the paper down do you glue both sides ir just one side? I plan on doing the master bedroom next week. thanks!
I glued both sides.
can you use paper bags…
I was wondering if it would work on a basement floor that tends to sweat on hot humid summer days? Sometimes badly.
Any water base product will eventually fail if exposed to moisture for too long. I would not do it on the basement floor if it were me. I was recently working w a product on a restaurant floor called “Tuf-Top Duraplate 289”. They custom mix the color and I did a 3 color marbling effect…it is water base but its the toughest floor paint I have ever used.
We don’t have basements here in Texas so I’m not familiar with basement sweat…but I would think that it would probably be a bad idea. To me it seems like it would eventually just peel up or get moldy, since the moisture would be coming from the underside and not the sealed top.
I was wondering how this would would on a basement floor that tends to sweat a lot on hot humid days?
This is great! would paper mache work inplace of the elmers glue?.. Since you’re sealing it with stain AND acrylic on top..
I have no idea. I would think so for the reason you stated…but really, I’m just guessing. You could always try it out in a corner or closet and see how it does.
Hi, did you try this with paper mache glue and did it work? Many thanks – I LOVE this idea and want to start on my bathroom right now. Also, I am struggling to find polyurethane online in France …
How much for you to come do this on my Kitchen and Bathroom floor.?I do not have that much patience.
This is amazing! I love it! So want to do this in my kitchen. I hate the linoleum. Can this be done over the linoleum?
Yes, you can do this right over the linoleum, here is a post where she did just that http://lovelycraftyhome.com/2012/05/24/out-west-where-home-depot-is-still-my-home/. Just know that whatever lines are in the linoleum will show through on the paper floor.
First off I’m going to say is I’ve been in tha construction business for 15 years. And I’ve never seen such a weird, crazy, cheap floor like this that looks like a million bucks girl. It looks absolutely freaking amazing. It actually looks like stained concrete and I love it. Btw I just had to put all new plywood down in my kitchen in my trailer. And ofcourse flooring is so dang expensive I haven’t had tha money to finish it up. So I’ve had a plywood floor for several months now. But now thanks to your idea I’m going to put this down in my kitchen. Hell I might even go as far as putting it in my living room and down my hallway so I can replace my nasty looking dark green carpet. So thank you for posting this freaking awesome flooring idea.
Way cool!! Wonder how this would work in a home kitchen?
My basement floors are painted with a grey oil paint now. Do you thing this process would work on that kind of finish?
Mine bubbled up when I put the poly on. You have any ideas for that?
Wait for it to dry, it should mostly smooth out.
What do you mean by feathering the stain? BTW floor looks great!
I just mean not to leave any hard edges. The stain soaks into the paper pretty quickly so you should pull it out from the center so that it’s more of an ombre effect rather than a straight line. Does that even make sense? I know you’re going to cover it all up, but any stain lines you leave will show a lit in the final product.
So, I didn’t find your blog until after we laid the paper. Using the same kind, I’m worried that the hazy whiteness will appear because all the other blogs that had this project listed, never described the difference in the two sides. Supposing that the cloudiness does appear, do you recommend filling in your foot steps and staining over the poly?! Would you use the same exact steps with the same materials?
Thanks!
Hmmm, tough question. I think I would, but I don’t really know what else I could have done. It was mostly just a pain because stain over poly doesn’t really dry…but I was slow and careful and in the end it turned out great. You may not even get the cloudiness at all, I don’t know what caused it and I haven’t heard if it happening to anyone else. I would just make sure that your first coat of poly is REALLY thin. My other 10 coats I wasn’t overly careful with the thinness and those were fine. I think that first coat just a little fickle.
WOW! PAPER BAG FLOORING!!!!!!!!!!!!!! I have never heard about this before and absolutely LOVE the idea. My problem is, I am an artist and I love design. However, I am totally inept when doing this myself…….in other words, I am good for nothing when it comes to putting my ideas into action. I usually hire a talented handyman to make my dreams come true.
Guess what my question is? Are you possibly interested in doing my floors, of course with my help? This would be a project DIY or HGTV would love to air. You could get the recognition you deserve, and I would have a FANTASTIC floor.
At the moment, I have 12 x 12 old terrezzo flooring (211 sq feet) which was white at one time, and the grout is no black and gross! I spend my days rescuing special needs dogs. I have 5 now. They are my children and my life. Now I just need a new floor I can love……..just like yours! I live in Woodland Hills, California 91364
Francesca 818-992-1200
Hope to hear from you soon and God Bless.
[email protected]
No, you are not inept, you can totally do this! It is tedious and takes awhile, but it isn’t difficult. You can even do it right over the tile floors, though the lines in the tile will show through. I don’t have any pets so I can’t guarantee it will hold up to toenails and whatnot. I also have a post coming up in the next week about redoing grout if you would rather do that, my grout is (was) black and gross too. I can’t come help you, but really, you don’t need me.
WOW! PAPER BAG FLOORING!!!!!!!!!!!!!! I have never heard about this before and absolutely LOVE the idea. My problem is, I am an artist and I love design. However, I am totally inept when doing things myself…….in other words, I am good for nothing when it comes to putting my ideas into action. I usually hire a talented handyman to make my dreams come true.
Guess what my question is? Are you possibly interested in doing my floors, of course with my help? This would be a project DIY or HGTV would love to air. You could get the recognition you deserve, and I would have a FANTASTIC floor.
At the moment, I have 12 x 12 old terrezzo flooring (211 sq feet) which was white at one time, and the grout is no black and gross! I spend my days rescuing special needs dogs. I have 5 now. They are my children and my life. Now I just need a new floor I can love……..just like yours! I live in Woodland Hills, California 91364
Francesca 818-992-1200
Hope to hear from you soon and God Bless.
[email protected]
ps. When I went to post my commet, I got a message: Duplicate question?????? I have never written to you before.
Now what?
I was wondering after you do it, if you don’t like it or get tired of it, can you just cover it or have to rip it up?
I’m not really sure. I’d imagine you could just leave the paper if you were having carpet installed. You MIGHT be able to leave it for floating wood floors, but that’s just a guess. I had one reader comment that it wasn’t difficult to remove, you just remove it like you would wallpaper.
How do you keep it clean. we have a high traffic house,pets included.. but small ones, so I am not sure toe nails would tear it.. is this pretty tough though.. I am more worried about my adult children. they are rougher then the dogs sometimes.. LOL. so how do you clean it.. damp mop.. or can you really Mop it good.. I like clean
I don’t have pets so I can’t comment on the toenails ripping the paper, but I can say that my boys have drug their bed across the room and while it did put a giant long scratch it, nothing ripped or tore. I was impressed. As for cleaning it, I mop it with a water vinegar mix. I do it by hand just because it is a small room and it doesn’t take me long, but I would say you could mop it. I wouldn’t dump a bucket of water on it or anything, but it’s pretty durable. Just be careful not to let and moisture seep under the paper (like on the edges of the room).
I love it, it looks great. Your fearless, I would be afraid that it would come out awful!
Hi Ashley,
Any suggestions on doing this over an old hard wood floor??
Thanks in advance
LeighAnn
Just found you through Deanna on FB. Someone had used this technique on a piece of furniture and Deanna provided a link to your floor tutorial. AMAZING and very impressive. The floor is gorgeous!!
I was wondering if someone has tryed it with White paper and then a gray stain. I was looking at the gray laminate wood flooring but I love the paper bag flooring idea to. If any one has please let me know.
Thanks
Trace
I haven’t done this, but it seems to me it would work just fine. I would try it out on a sample board or something first to make sure it looks like you want it too.
Hi brillant lady,
Just wondering if any one responded to the question regarding using white paper? If so, what kind of white paper should be used, can you mixed stains (camels and greys and maybe a little teal?) Also, can paint be used instead of stain, sort of like poured paint over concrete………just a thought.
I would love to hear from you……..your ideas a magnificient!!!!!!!!!
God Bless,
Francesca
I’ve been working on my paper bag floor in a bedroom on wood subfloor. Some of it is going great, but some of it is shrinking so much I have what can only be described as waves of paper. I’m not ready to begin staining or using poly because I realize this can’t be right. It’s moving almost 2 inches once the glue dries. Anyone have any ideas why? For now, all I can think of is to cut parts out and try again. Any help would be appreciated!
I want to do the same thing. Did you do anything to seal the wood subfloor?? If not the wood might be soaking up extra moisture. Please let me know if this helps or what you do to fix it. I am hoping to start my floor this weekend
I did not seal the floor. I wonder if that would help.Dang, I’d hate to have to start over! It’s weird though, some areas hardly moved at all. I’ll post again if I figure this mess out!
Hey there.. i had a question.. i’ve tried this technique in a closet for very uneven walls and i couldn’t stop the paper from crinkling up.. how did you manage to get such a flat look? i’m considering trying this again for the top of a piece of furniture.. beautiful!!
I’ve had quite a few readers ask the same question, but I didn’t have that issue at all. I did mine over concrete, soaked the paper, and smoothed each piece out very thoroughly. Anything that was slightly wrinkly flattened as it dried (and shrunk). I would think that a flat piece of furniture would be much easier to do than uneven walls and it’s likely you won’t have the same problem.
May I ask why it’s called Paper Bag flooring when you did it with a brown paper roll?
I think it started back in the 70’s when people did this treatment on their walls and actually used paper bags. Then the name just stuck, even though the process changed a bit.
you can put this on walls also
Hi. I love this idea. I built my house and moved in 18 months ago. I have not been able to afford to pay for floor covering in the bedrooms so I’ve been living with smelly 2nd hand carpet. Blah! This is such an amazing idea.
This is absolutely gorgeous! I’m sure I can’t anything that hasn’t been said before in this awesome thread of comments, but what an inspiration this project is!!! Thank you for sharing this!
This is AMAZING!! Please don’t take this page down for any reason!!! lol… I’m def gonna try this!
Do you think it would work on formica countertop?
Do you think this would work on a cement floor that has been painted and not chipping?
I love this idea! who’da thunk? Paper bags for flooring! And its beautiful when finished. And girl, you are
hilarious! I very much enjoyed your tutorial! They should put you on tv with your DIY projects.I’d so watch! Thanks for sharing this with us :)
How well does it wear? Have you done any repair to it?
I’m wondering the same thing as I have a husband in a wheelchair and a dog. And I was thinking about it in my entrance so would get some traffic. Thoughts?
I’m honestly not sure. I would think it would be fine as long as you add plenty of poly, but once again…it’s just a guess. If it’s not a big area then you wouldn’t be out much time or money if it doesn’t hold up.
This is awesome! Thank you so much! I love the way you narrate too.
Do you think this would work on old tile floor?
Love this idea, and want to try it on my kitchen countertops. They were faux painted about 5 years ago, but quickly yellowed with Min-Wax Polyurethane. I am thinking that the Rustoleum Floor Polyurethane might be a better choice. Did it yellow? Or maybe it’s impossible to tell with the paper bags? I’ve hated Min-Wax ever for the last 5 years, and really don’t want to use their products again. But SURELY, there is something that will offer a good strong finish and not yellow out?
I love this and it looks great, a friend of mine has a rental property and new carpet with every new renter gets expensive, I bet he would let me try this :) my question is if we do not like it was is the best way to remove it when it needs to be redone or if he doesnt like it after all?
I am LOVING this…You are a woman after my own heart….Just brilliant!!!
Can one use regular paper bags, or do you have to use a paper roll from the store? I prefer to recycle whenever possible
Yes, using paper bags is how this whole thing started back in the day!
I did my first torn paper floor about 10 years ago. I used red rosin paper from Home Depot. It still looks good! I have patched it a couple of times. I did a variety of blue papers in my bathroom a couple of years later. I use a squeegee to smooth it out and a 2″trowel to tuck the paper under the edge of the toilet (didn’t want to risk getting a piece of the wax ring on the floor) and under the baseboard. I love them !! I also crumpled the paper then rubbed it on the rough dub flooring to create stone like veining.
Yours looks great! Keep going!!
Have you used this method on linoleum ? I have a room with linoleum floors I’d like to change.
I just ruined my carpet. As in had to pull it up so my daughter wouldn’t have an asthma attack. So I’m considering doing this to the room. There is a lot of carpet glue left. Seems kinda silly to me to spend weeks removing it only to put more glue down. Any reason I would need to? Also just a bit of black residue from the carpet pad is in a few places, is that likely to
Show thru? Doesn’t seem like it to me but thought I better ask. Thanks!
The main reason this fails on concrete is because concrete wicks moisture & the paper absorbs it. The glue dissolves in the moisture & turns white again (under the sealer) & the paper will start to mold. You can prevent these problems by using a good latex primer on the concrete after you fill, sand & clean the concrete. Kilz2 works, or Kilz Max if you have stains on the concrete that might seep through the paper. Just paint it on like you would a wall, let dry for 24 hours, then lay your flooring. I sell flooring & teach people how to install it themselves & I always recommend using a latex primer any time you install a glue-down flooring, even for glue-down carpet.
How does this work on countertops?!
I love this! I’m going to try it on my attic floor – it’s one big room with a chimney in the center. Does the overlapping of the paper create an uneven texture? Is it a bit bumpy where the pieces overlap? Thanks!
As a kid, I did something similar using pieces of masking tape and brown shoe polish over old vases and anything I wanted to make look like it had an old leather-like finish. I never thought of doing something like this with my flooring. I’m so happy you posted this as I’ve been trying to come up with an economical way to do the floors in my condo. I think this is the perfect solution!!
Hi:
I have two young boys and two dogs. I would LOVE to do this in our kitchen and family room. Both rooms get TONS of traffic. How does the floor hold up to this? any suggestions for making it “rip-proof”?
this is awesome!
Terry
Thanks Terry! I don’t have any pets so I can’t comment on claws and whatnot, but I haven’t had any ripping. What I have had is some flaking/chipping of the poly, but I just add some over the top and it looks good as new. I could have avoided most of this if I would have let the poly fully cure before (a week) we started using it (I know, thats a really long time not to use your main living areas).
What does it feel like walking barefooted on a floor like this? And how do you clean it (regular mopping)? It looks awesome! :)
It feels…great. Not hard like tile (though not soft either) and not too cold. Probably similar to our wood floor temperature-wise. I just damp mop mine with warm water, sometimes I add a little vinegar.
I love your finished floor. I have one suggestion to the next person who does it. Use the same Minwax Polyethelyne but buy a satin finish instead of gloss. It won’t have that big shine then. I grew up in a decorating store mixing paint, selling supplies, measuring for carpet…I never saw anything like this!
Polyurethane is not exactly the most ecologically friendly material. It would be more responsible to save up for a wooden floor. Wood is regenerative and environmentally friendly!
I hope your concrete is dry – cause this would be terrible on a slab that has any kind of moisture pressure behind it. If you’re dry, well – cheap and cool.
Yes, our concrete is dry and doesn’t sweat at all. I agree, I don’t think it would last long on a slab that collected moisture.
Hi Ashley! First, let me just say that you are an awesome person for being so creative, and especially for sharing the Love by showing us how we can complete projects like this_I rent an old cottage with uneven floors, and very very old puke-green, cracked and broken vinyl flooring in the kitchen! Can I fill cracks with something and do the paper flooring over the vinyl?
thank you so much for all your help and sharing!
Thank you Barbra, you’re too kind! I have seen this done successfully over vinyl/linoleum floors, though I don’t know what to recommend for the crack filler. Bondo maybe?
Thanks for your reply, Ashley–I am gonna do this!!!!!!
Ohh so pretty!!! Wonder what it would look like with the white kraft paper??????
I think it would look awesome!
This question is for anyone for whom the paper flooring didn’t work…what do you do with it if it doesn’t come out as expected. Does the paper scrape up? Can you lay conventional flooring over it? The look is phenomenal but I’m scared by the comments that mentioned it not working. Any tips you could give regarding recourse would be appreciated.
WOW WOW WOW I was very impressed! What a wonderful job. Looks fantastic! I was amazed of how much it looked like my ceramic floors. My son put ceramic floors down for me 5 yrs ago. It was his first project, and he did a fantastic job. I’m showing him your project so that the next time he has to do a floor job he can do this instead of ceramic. I have never heard of paper floors. My first thought was what a waste! Was I ever wrong.
This looks a lot like my kitchen floor, which was done with laminate tiles. WAAYY more expensive than this project, I must say! Thanks for sharing, and for the cute “Hey Girl” pics!
How would this work in a bathroom, it is not very big and is not used very often, the washer/dryer is in there and those get used a couple of times a week, but I love this idea
I live on the coast of Oregon. Humidity is an issue here. Has anyone had difficulties with drying, etc., because of this? I’m ready to go, just would like a confirmation that someone else living on the coast has done this.
These floors look awesome! I have a converted garage for a family/office space that I would like to rip out old Berber carpet from. This area will be mostly a “dog” area, for grooming and puppy holding pen, etc. Any idea how this would hold up to multiple dog paws? I have 5 Standard Poodles and plan to have a litter born and housed in this room next year.
I would LOVE to do this on my kitchen floor… it’s a small galley kitchen, so it’s not a lot of space to cover, just lots to maneuver around. I’m wondering if this could be done on stairs as well? My kitchen on one end leads to three steps and a small landing by our side door for outside. Thoughts??
Yes, I’ve seen this done on stairs a few times! Here are some links…
http://lovelycraftyhome.com/2011/03/22/brown-paper-walnut-stain-mocha-love/
http://lovelycraftyhome.com/2011/03/14/brown-paper-packages/
http://www.tarynbrooke.com/2012/06/23/project-paper-bag-floor-stairs/
http://www.joyfolieblog.com/2011/11/diy-wednesday-paper-bag-floor-finish.html
We rent our house, and the dining room (asbestos) tile is lifting up. I want to do this to in my dining room, but I want think I will do this to large pieces of wood and adhere the wood to the floor that way we don’t have to mess with the asbestos tile and my dining room is in the center of my house, I can’t barricade it for days. Do you have any suggestions for a thin but durable wood that I could put this on? I’m sorry, I tried to read all the comments but this is a popular blog *L*.
PS I am forever barefoot.
Would this work if you have animals in the house? especially if they pee in the house ?? If so im ripping up my carpet and doing this instead of vinyl or wood floors.
I don’t have any animals, but I can tell you that my boys have peed on it quite a few times. Every time it has mopped up perfectly, the liquid just sits right on top of the floor waiting for you to find it :)
My sister just sent me this link on Facebook as she knows I have done many, many walls like this in my life – even for other people. My family room has this now on the accent wall and it always gets rave reviews. I can say I have covered over vinyl wallpaper such as in a manufactured home and it worked well. It did NOT work well in a motorhome – I tried it twice using two different application products and because of the extreme summer and winter, and the motorhome being outside, it all peeled. I will say this is one project I never tire of, other than crinkling the paper (which I crinkle each piece twice to get more wrinkles). It’s a great project for the grandkids to sit in front of the TV and watch movies and rip paper and ball it up. Your floor looks fabulous and I’m sitting here figuring which floor is gonna get this affect!
do you know if this would work on a thick textured wall?
Do you think this would work on a thickly textured wall
Sorry for the repost I forget to click notify me of follow up comments by email.
Do you think a black or grey stain would give it a “stone ” flooring look?
Freaking Fabulous!!! First of all I want to compliment your post…it is excellently written, well thought out and as a writer I was so thankful that your piece was so well written that I was totally involved in the process and not getting caught up in bad writing!!!! Thank You!!! Second, how freaking awesome you let the kids help you…my best memories are all the times I DID things with my Grandpop, Uncles and Dad….Finally, I am STEALING this Big Time!!! Excellent!!!
Is it cold on your little one’s feet?
Do you think this would work over a tile floor somehow?
That’s a big thing you started over there! It looks so gorgeous and reminds me of an fallen-leaves-autumn-floor! i wonder how it looks now! i didn’t read other post of your blog but i think I keep on reading other post to find the answer :)
sweet greetings from germany!
Kepp on blogging :)
Awesome tutorial, here’s another take on it with no stain and paper bags from the grocery store, we did this in our art studio.
http://eroseboutique.com/alternative-flooring-ideas-paper-mache/
I was trying to just read all the comments to see if my question is answered but there are so many that I just decided to ask. When you are gluing down the paper do you soak it in the glue mixture or put the glue down on the floor and then put the paper down? It looks like the paper is really wet in the pictures. By the way I love this look for a floor or wall. Might be one of my projects during summer break next year.
Basically, what you’ve done is to apply a technique called “decoupage” to an entire floor. It’s a wonderful technique for refinishing furniture, but you’ve taken it to an entirely different level. Well done!
Fabulous..That Is so cool..I love how it turned out!!!you did a great job & your lil helper too…
Wow, that’s a great job! And what a beautiful look!
That’s just the sort of thing my mom would do; we once painted some truly ugly, mismatched, ancient linoleum floors… white first than sponged on coppery brown and sage green. After two coats poly, it looked very nice; kind of marble-y, but basically you never noticed the floor that much at all. Which was a huge improvement… those ugly floors were an eyesore!
So thanks for sharing this, I’ll be sure to keep it in mind!
I am so glad you posted this comment, Elizabeth! I was wondering how to fix the ugly, cracked green vinyl (I think it’s vinyl?) kitchen floor in my rental home. Could you provide a bit more info on what type of paint and other materials you used to accomplish the feat? thanks for any help you can share…
Hello Barbara Jean!
Yes, our floor was cracked, too, with some pieces plum missing and only the knobbly gluey base left. Very ugly.
Mom used paints she’d gotten at Sherwin Williams wrongly-mixed pile, which were sort of all over the place. To do it correctly, you’d want to use Alkoid base paint, I understand.
Then we just slapped white paint down over everything, chipped, cracked or missing. (Clean of course)
Let dry.
Then we went through as a pair and sponged the other two colors on at the same time, switching positions with each other to do everything in reach while working toward the door. At first we sponged on too heavily, it looks nicer if you move quickly and unevenly with your sponge. Also, the less deeply you dip the sponge, the better the spatter look when you apply.
Putting the two colors on together melded them a bit, and it looked very natural. I think we tried to put the brown down first and the sage over top.
After it dried, we put on a coat of polyurethane, but it was oil base, and we soon discovered (to my horror!!!) that it yellows on paint. NOOOOO!!!! But it was too late then, so we put on another coat of poly, (water base) and it was several years before I quite wanting to cry when I looked at the Yellowed Marble look on our floors. It was SUCH a beautiful, pristine, white marble look before! I adored the way it turned out first.
2 coats were all it received, because the rest of the family was returning and we needed to get the furniture back in the house before the weather turned. After a few years it was beginning to show wear in the travel areas, so I’d reccommend a few more coats, and maybe a couple extra on the high traffic areas. (You could tell that the poly had warn down since the brown and sage spots were lightening up and it was looking more white in places. It still looked nice to someone unfamiliar with its origin! ;-) )
Hope this helps! I’d totally recommend giving it a try, the marble effect was a breeze to take care of, hid dirt like a charm, as well as totally disguised the many native imperfections in the flooring! ;-)
I’d love to hear if you do this, and how it turns out!
Have a great day!
Elizabeth
Elizabeth, Thank you so much for your helpful reply! I will indeed let you know how it turns out–I am going to refinish the kitchen and the bathroom floors–using the paper bag method and/or the paint method–half to ruminate on which one to do on which floor…….Thanks again!!! Happy Trails :)
Barbara Jean
Very nice!! Inspiring too :) Plotting for the next house I own.
Cool! Looks like I’m not the only one to work barefoot or in flip flops. Haha….I remodeled my bathroom, pulling up four layers of old flooring and replacing a couple of walls with just flip flops and sometimes nothing at all on my feet.
I wonder how plain white paper would look instead of brown…as another choice in materials.
:)
Just thinking out loud here but would this work with say old album covers or copies of album covers?
Do you think it’s durable enough for a garage floor ?
Can this project actually be done with recycled paper bags with the same success? I am all about recycling, so for me, using a new roll of paper, in addition to all the urethane and everything kind of defeats the purpose on this project…. thanks for sharing though, it looks beautiful
If I’m not mistaken don’t poly’s come in different finishes?? Like semigloss?? For others, or next time maybe?? : )
I LOVE the way that this looks! I am thinking about it for my mud room that we are redoing. However, I’m sure that the floor is very smooth and therefore would be slippery when wet. Any thoughts on a way to add some grit or texture to the floor without runining the look of it?
Hello… this is the most amazing idea I ever seen!
Do you think I can apply this on a wall using an other kind of papper?
Congrats!!! ( sorry about my english is just for survival)
i want to try this!!
Anyone know if you could use water based stain & poly on that instead for less toxicity? We used some when refinishing a desk, and it was fabulous stuff. Low fumes, faster drying time, made for a harder finish & better for the environment.
I used an oil based stain (tried water based but it didn’t work well on the paper) and a water based poly for floors. The water based poly is designed to go over oil based stain and worked great. There is a link to the type I used in the post (I’m on my phone).
Thanks Ashley for the info. I had a feeling the water based stain might have issue with the paper. I’ve never seen water based poly that is meant to go over oil based stain though, only to go with water based stain. Which kind exactly did you use?
I used this one… http://www.homedepot.com/p/t/202521762?catalogId=10053&langId=-1&keyword=parks+floor&storeId=10051&N=5yc1v&R=202521762#.UnUcbfktqC5
This looks so amazing! Thank you for sharing!
Ashley,
I did my floor like yours… on concrete with oil based stain. After 3 days from applying the stain, I noticed it has some areas with bubbles… some are about 2″ wide. Do you know what may have caused this? What can I do about it? I think I read somewhere about poking it with a pin to flatten it and just poly over it. Also, it feels dry after 3 days of staining… should I wait a full 4 before applying poly and can I go ahead get started on that? Thanks for your help!!
I don’t know what would have caused bubbles like that, but I would pop them & add some more glue before you poly to hold them down. The glue shouldn’t effect the color of the stain. And if the stain feels dry go ahead and poly it. I only waited so long because mine was still sticky (because I messed up and had to stain over my first coat of poly.) Good luck!
Ashley,
Thank you for the quick response. All I can think of what may have caused it to bubble is possibly the concrete patch…. It SEEMS those are the areas that have bubbles. If I stick a pin in the bubbles, how would I get the glue underneath the paper? Do you mean spread glue on the outside of it?
Yeah, I thinking that if you just soak it pretty well with glue it should soak through and glue itself back to the concrete. If that doesn’t work you could always cut the bubble out and glue down new paper.
Did you have any problems with air bubbles forming under the paper? I tried everything I could to get rid of them but they would just keep coming back. Any Suggestions?
I actually didn’t have any problems with bubbles, but I have had other readers email me and say the same thing. Is the paper going down flat and developing bubbles AFTER it dries, or are you having a hard time gluing down the paper without getting bubbles?
You go girl! I love your savvy article. Inspiring topic and giddy humor. I am so ready to tear these nasty old green carpets out of my house! Thanks for sharing this affordable option. You are a rockstar Mom!
Thanks Talulah, good luck with your floor! I’d be excited to tear out old green carpet too!
I wonfer if anyome has started stairs using this technique
..
Yes, I’ve seen this done on stairs a few times! Here are some links…
http://lovelycraftyhome.com/2011/03/22/brown-paper-walnut-stain-mocha-love/
http://lovelycraftyhome.com/2011/03/14/brown-paper-packages/
http://www.tarynbrooke.com/2012/06/23/project-paper-bag-floor-stairs/
http://www.joyfolieblog.com/2011/11/diy-wednesday-paper-bag-floor-finish.html
do you think this could be done on a kitchen floor and be water tight?
I do! Mine isn’t in the kitchen, but I can tell you that my boys have peed on their floor quite a few times and it’s never caused any damage…it just sits on top till I find it and clean it up. You would have to be careful with water going to the edges and getting under the paper though.
is there something you can put down to make it warmer on the feet before putting the paper bags down and doing the floor as it is in the basement so it would be cold on the feet i have carpet but hate it cause i have 2 cats and 1 dog and would like to rip carpet up and do the paper bag floor.
this was a great idea!
I did this to my master bedroom. Everything went well until I got to the doorway and spilled some stain. I wasn’t able to get it up fast enough and now it is a lot darker than the rest of the room. I don’t mind the difference in color, but want to know if I can stain over the other stained area to blend them. I can’t have the first 3 feet of the room looking completely different. Any suggestions?? I’m desperate to get this completed! Thanks so much :-)
Oh no, that’s terrible! I’ve spilled stain before too, it’s no fun at all. If I were you I would add another layer of stain to the rest of the room. It may not ever blend completely, but it should at least make it tolerable. Let me know how it turns out!
I did the 2nd coat of stain and it looks better already! I’ll post pics as soon as it’s dry enough to get in there. Planning to start the poly on Saturday. The room looks huge! I’m so excited. I’ll wait a week after the poly is applied to move back in. This has been so fun! The transformation is amazing. Thanks so much for posting. :-)
Yay, so glad you were able to rescue it! Looking forward to pictures!
How about 2 coats of the stain? I spilled some and couldn’t get it evened out.
I wonder if anyone has tried this adding a bit ofcolored paper or patterened paper to add a little pattern or something. Do you think that would work?
I think that would be awesome and would work just fine!
I too bought contractors paper that looks different on each side. You say it seemed the poly dried white on one side of the paper. Which side? The lighter or darker side? I would like to avoid this if possible. Also did it take you absolutely to tear and wrinkle the paper? I have been frustrated with the amount of time I have spent and I am not done yet.
I couldn’t even tell you which side. I didn’t pay a lick of attention to the different sides until after that poly incident. I really don’t know if the cloudy-ness had anything to do with that though, it may just have been that I put the poly on too thick in some places. I was just speculating based in what it looked like. As far as ripping and wrinkling the paper, it probably took us a couple of hours. We did it while watching TV for a few nights. Gluing the paper down is what is really time consuming. If I were to do it again I would rip larger pieces in hope it wouldn’t take me as long to glue them down. I hope your floor goes smoothly and I’m sorry I’m not more help!
I am in the middle of doing this to my basement concrete floor. I’ve done all the prep work and am gluing the paper down tomorrow (and for as long as it takes). I want to try bar topper over the stain instead of Polyurethane. I will test it, but has anyone tried it?
Thanks so much for posting this tutorial!
Did you finish your floor yet? I’d love to hear how the bar topper worked.
I can’t wait to do this I’m my kitchen and bath! !!!
This is AWESOME. Do you think it could work on a heated concrete slab in a basement?
Honestly, I have no idea. It would go on just fine, but I don’t know if it would hold up…or even be safe. I don’t have a basement or heated floors, so I’m really shooting in the dark. Sorry!
looks beautiful! youre hysterical.did this on a wall once….used bags from the grocery store…rolls of paper definitely woulda been much easier!.. a dehumidifier will cut down the drying time..i painted the carpet in my kitchen with porch & floor paint & after 3 days of total tacky remembered I had a dehumidifier..next day dry!i taped it off to look like a basketweave pattern.painted like bricks..still looks awesome. kinda different bc its still squishy like carpet but hard like paint so the carpet shampooer really cleans it the best 1x mo but otherwise vacuum like a carpet on low(its like that low,industrial cheap carpet..was gonna rip it up & paint the horrible yellow linoleum squares that came w the house that I covered up yrs before WITH that carpet but the carpet was smooth & level wheras the linoleum had corners missing & was just bad…I figured if I didn’t like the way it came out THEN I could rip up the carpet..wish I knew how to send pics cuz I would = } anyway…your floor looks beautiful & the “hey girl” things were hysterical! you go girl!
Oh my goodness!! This is OVER THE TOP AWESOME!! I adore this idea!! And man, it looks exactly like slate stone floors. You did an amazing job!! I hope you show us pictures of what the room looks like with your furniture & things placed in & ontop of it. I’d love to see it that way too. I wonder if you can get this look by doing it ontop of vinyl floors? This has to be the very best #DIY project I have ever seen. I’m so glad I saw this shared on facebook to view. I haft to follow your blog because I bet you will wow us readers with more great projects. Thanks! I’d love to try this idea :)
Thanks Julie! I will definitely post when I get the room back on order. Even though I papered the floors almost a year ago, the room still isn’t put together. Functional for the boys, but a mess. The floor looks great though! I have seen this done successfully over vinyl floors too, so I say go for it!
LOVE LOVE LOVE This idea, and the price!!! So am doing this!! Can’t wait!!
I love it! Do you think its going to work over stone tile floor? I am so tired of my tile floor… Pls let me know…
I haven’t done this myself but I have had readers say they successfully papered over tile floors. You will still be able to see all the lines in the tile and grout…though that might look kinda cool.
Can you use old grocery bags instead of buying the brown paper?
Yes, you sure can…that is actually how the technique started (back int the 70’s I think).
You are mightily blessed with a sweet man! Keep encouraging her sir! It does make a difference! You will always have her heart!
I am blessed with a great man! He is always so supportive…even when I tell him an idea and he looks at me like I’m crazy!
This is incredible! Where did you get the idea for this?
This is the coolest floor I’ve ever seen!! I didn’t get a chance to read all the posts but was wondering if putting this in a kitchen and/or bathroom would work? I’d LOVE LOVE LOVE it if it could be around water!! Any suggestions???
I do! My boys have peed on their floor quite a few times and it’s never caused any damage, the “water” just sits on top till I find it and clean it up. You would have to be careful with water going to the edges and getting under the paper though.
Word to the wise, I just finished staining my living room and hallway. I went with a mahogany color. Love the darker color. However, did not realize it was going to take so long to dry. I worked from the living room, down the hallway to the bedroom. Thinking it would dry overnight. Now I’m going to have to walk on it. Hoping you wil not be able to see where after I poly it. If you are doing a large area that requires you to be secluded in a room, make sure you find another place to stay for a few days. The odor is pretty strong also, so make sure you have proper ventilation.
okay “wow” this is cool, never thought of this, I am looking for cheap way to cover our concrete floors, I am very impressed, has any tired with a lighter stain to the paper for a lighter color
You can leave the paper unstained if you want a lighter look. If you want stain just try them out on scrap paper before committing to anything…I tried five colors before I found one I liked!
How would you go about changing the floor later if you or someone else decided to? Just sand it?
I’ve been told you can remove it the same way you would remove wallpaper.
Great Job. Thanks for the info. Will try this on a bathroom reno Im working on.
I did the paper treatment on a post in my dining room, but used mod pog, and crinkled my paper into water, then applied the Mod Pog, then lightly sanded wth another piece of kraft paper (it is like fine grit sandpaper) and poly over that. It made it look like leather wrapped beam/post.
I am now thinking of doing this on the floors in my remodeled bathroom over infloor heating.
I love this Idea, I was wondering if I could just use plain old paper bags, I have a ton of them. Thanks.
Yes, that would work perfect and is a great use for old bags!
Do you think this would be ok over concrete radiant heated floors?
I have no idea and am not really sure where to look for that answer. Sorry, I wish I could help!
This looks great. I’m thinking of doing all my floors like this
Quick question – I may be overlooking the obvious but why Oil – based stain? Asking because I have leftover water-based stain I’d like to use :)
I tried water based stain on some samples (because I thought the same thing) and it didn’t go on well. It soaked the paper and when you went to spread it the paper rubbed away in little pulpy balls.
I was wondering about how you take care of it. stains and all.. Can you Mop it .. or just whipe it up..I have a heavy traffic house, and pets.. more worried about my adult kids though they are rougher then the dogs even.. What do you think
I really like this idea, and the end result is really nice. As an aside, I have to let you know that the 3 times you used “ghetto” as an adjective synonymous with low class, trashy, poor, etc. in the comments section made me cringe so hard. It’s really an offensive term you might want to reconsider using. http://www.blackcommentator.com/132/132_guest_ghetto.html
I certainly didn’t mean to offend anyone and I’m sorry that I did. I will reconsider using the word, though “ghetto” means a poor area…it can be ANY person or race. I was in no way thinking of blacks when I wrote that…I was actually thinking more “redneck”. (That’s probably offensive too though). Anyway, thank you for pointing that out to me.
I knew you didn’t mean it maliciously. You were very graceful in responding to my comment. I hesitated to say anything because I know not everyone is receptive to such criticism. Thank you for being so receptive.
Of course, that’s how we learn :)
Can you put anything down on the concrete to make it warmer underneath before putting the paper bag flooring down as im planning on doing it in my basement and would think it would be a bit cold on the feet.
I don’t know of anything. The paper floors aren’t crazy cold though…they aren’t warm, but much less cold then the tile floors in my home.
Hi, I love these floors! But I do have a question. I followed your instructions even the brands I used were exact. The floor looks great! We had a small leak from our new sink, wiped it up right away, but there seems to be a white haze where it was wet. Any suggestions? Is there anything else that we can seal it with?
I don’t have any suggestions yet. My floor has a few areas that turned hazy and are now flaking up (just the poly, not the paper) so I am on the hunt for a new sealer. I plan to write and an update post next and let everyone know what I find!
Hi! I recently put in a paper bag floor in a brand new bathroom, it looks great! I followed your instructions exactly, even the same brands. We had a small leak from our new sink, wiped it up right away, but there is a white haze where it was wet. Any suggestions? Is there anything else that we can seal it with? Thanks!
Amazing! This just may work for me! I love your pics of the hubs. Mine is the same way — wishing I could just FINISH something before starting a new project! HA HA! Thanks for making me feel like I’m not the only one! My blog is just starting but I don’t think it will ever be as professional as yours!
Love all the details of this tutorial and the finished project. Great Job!
You’re not the only one…I LOVE starting new projects. Finishing them is so much harder! And you never know about the blog, I certainly never thought mine would turn into anything.
I would like to say tanks for the idea. I needed an easy and cheap way to redo my floors in this place. The flooring turned out super amazing. I did not use stain and did tear my pieces a little more rounded. It almost looks like stone or slate. It’s very cool looking. Thanks again for the idea. I would like to add your link in my website. I’m going to describe it on my site and such. Just want to tell my folks where I got the awesome idea, if that’s okay? Thanks again.
Yes, of course that’s okay! So glad your floor turned out great…can you come leave a link to your post when it’s up so I can see it?
AMAZING! How are they holding up with kids? Scratching?
The paper is holding up perfectly, no issues there at all…the poly is scratching/flaking pretty badly though (I just noticed since I have been working on the walls in there all week). I plan to try out a few more sealers and reseal it in the next few months (and post all about it!)
Is it possible to do this on an old vinyl kitchen floor? I don’t want to rip it all up but need to do something to cover it!
Yes! I haven’t done this but another blogger has …. http://lovelycraftyhome.com/2012/05/24/out-west-where-home-depot-is-still-my-home/
How many days did it take all together
I was just wondering since you posted this a while ago, how has it held up? Did you have to do anything to fix anything as time went by….I’m thinking of doing this from my front door back through the hall and dining room. (maybe even the kitchen so it all matched)….
I plan on writing a “one year later” update post on the floors in the next month or so because the are not holding up perfectly. Actually, the PAPER is perfect – no problems there – it’s the sealer I’m having a bit of trouble with. Recently we have started working in my boys room again (slow much?) and I noticed that in one corner it looked kinda whiteish. I went at it with my fingernail and it started flaking up. It’s not doing it in most places, but because of that corner I’m going to have to re-seal it. It also has quite a few scratches (nothing that went down to the paper) that I want to fix. My family is really rough on it and I’m honestly impressed with the durability – I just have to find a better sealer. I’ll make sure to keep y’all well informed!
Hi, I just wanted to say that your floor turned out great and what a cool idea! Your hard work really paid off, great job!
Great idea to personalize and ” make the room your own”! After all the work (and the recovery period), you must feel like you are a part of the decor. Other personalized ideas at http://custom-tiles.com for wall tile and floor tile using your choice of art and photographs.
Thanks for a great article!
wow, this looks awesome, I have a room that is calling out to be done, looks like a summer project for me, thanks for sharing
Will this work on a garage floor?
If you are using it to actually park cars I don’t think it would hold up well. That’s just a guess though.
I know an Interior Designer who glued brown paper bags to her bedroom wall at the head of her bed and then painted it red. It was gorgeous! It looked just like red leather! It was a focus wall. You could do it in any room of the house. Just rip up paper bags and glue them up one by one and then paint the wall. I don’t think I would have ever had the guts to do this but after seeing it I would! Of course her entire house was gorgeous.
I so hare our master bathroom floor. The previous owner used three different types of marble in a 6 x 7 space. It is the last room of the house to get redone since no one else sees it. I am so doing this floor. Thanks so much for the share!!
Thanks for the great tutorial and inspiration!!! I have completed two rooms & I LOVE the floors. However, they are slippery. The flooring guy who refinished my daughter’s hardwoods said it was due to so many coats of poly. Anyone else have this problem & how did you fix it? I found some anti slip poly by Bona on Amazon but it is ~$100/gallon. I used Varathane satin from Lowes.
Some things I did wrong & right….By the 2nd room, I mixed a large batch of glue in a lidded 5 gallon bucket. Just stir & ladle as needed. This saved time & helped keep the glue/water ratio consistent. I crumpled & dunked the paper in a bowl of glue. I tend to over do this step because the paper would shrink & tear in the wrinkled areas as it dried. Concrete would show through, requiring patching. After the glue dried the floor was pretty rough & bumpy. I used a putty knife to knock down high spots & find loose edges where I didn’t do a good job smoothing the paper. I ended up with bare concrete in a few spots which too required patching. I figured it was best to find the loose spots with a putty knife than later tear the floor moving a piece of furniture over it. I also found there is a HUGE difference in dry time for poly & glue (I didn’t stain) based on temperature & humidity. August floor dried quickly in hot humid Arkansas. The 2nd floor took about 3 X longer to dry once the weather cooled down. I’m anxious to start another room once the weather warms back up!
How well does it hold up with dogs.. does it scratch easily?
I don’t have dogs, but it does scratch. Nothing that ripped the paper but to keep it looking perfect you might have to put a new coat of poly on it every year or two.
Do I have to remove the tile floor and work on the concert? Or can I do it over the tile ?
I’ve had readers tell me they’ve successfully done this over tile. I would rough it up a bit first (like I did on one concrete) just to be on the safe side. Also, the grout lines in your tile will show through the finished floor.
Did you have to leave the stain on or wipe it off? It looks so dark when applied, but then not dark when it dried. Also you said about the scratches. Would this not work for people with pets? And last question, is there a paper that you can get that doesn’t have the 2 sides?
I didn’t wipe any of the stain off, just mopped it on and let it dry. As for pets, you can still do it but you may have to put a new layer of poly on it every year or so to keep it looking perfect. For the paper without two sides, here is the link http://www.amazon.com/gp/product/B001AZ9RJY/ref=as_li_qf_sp_asin_il_tl?ie=UTF8&camp=1789&creative=9325&creativeASIN=B001AZ9RJY&linkCode=as2&tag=domestiimperf-20
We have a very old home we are renting out and eventually wanting to sell. It has the original hardwood floors which have been badly neglected over the decades. They have deep scratches, groves and chips all throughout the main floor. The cheapest quote we got to have them refinished was $10,000 and wouldn’t be able to sand down enough for many of the groves. Plus, the floor is too uneven and has large enough spacing between some boards that you can see down to the basement and there is a lot of creaking. Any idea if this technique would be a great option for this type of high traffic and warped area? Any special considerations when working with that type of floor to make it look even? Worried that the loose/creaking boards would cause damage to the top layer after some walking on.
Honestly, I don’t really feel qualified to answer this…I would hate to give you wrong advice. If it meant saving $10,000 I would personally give it a try. I to even it out and cover the gaps I would lay down a thin layer of plywood first, then paper bag over that.
I just opened this site because it looked like an interesting idea. Unfortunately, the first thing that struck me was that the little toddler was using a screwdriver in close proximity to an electric outlet. Please, don’t say he knows better or is careful. Those types of accidents happen so so quickly. Why take a chance?
Those types of accidents can happen quickly, no disagreement there. There probably isn’t anything I can tell you that will convince you that letting him help wasn’t a terrible idea, but just know that I didn’t just let him take off on his own… I was sitting about a foot away from him encouraging and talking to him the whole time. If he decided to jam the screwdriver into the outlet I would have stopped him.
I’ve done this on my walls and looks awesome
Do you think this will work in a grooming area the floor will be getting wet often… But I LOVE the look of this an the cheap part is a plus!!!!!!
I generally wouldn’t recommend this for any place that gets a lot of moisture. That being said, there have been more than a few liquid spills on my floor and no damage was done. So if by wet you mean a couple drops here and there, you might try this, but if it’s more than that I might look for another option.
We are in the process of buying a new, probably foreclosed home here in Southeast Tennessee and I WILL find a room to do Paper Bag Flooring …. just because. I like to say “did it ourselves” . I love the outcome and all the most helpful comments on your blog. I will post this to my Facebook page https://www.facebook.com/Greatrowing so I can find it again and most likely you will get plenty “likes”. Keep up the good work and many happy days ahead. Look forward to your next blog post. Thanks
That’s the main reason I wanted to try this…just because I was curious. It turned out better than I thought it would!
Thanks for sharing!
Can’t wait to try this!
What is the surface like when finished? Is it slippery? I have dogs and they are scared of the rooms that have Pergo in them because it is so slippery. What about when the floor is wet? I have a basement with concrete floors that would look great with paperbag floors.
It’s medium slippery. If you are in your bare feet or shoes it fine, but my boys “ice skate” on it when they are wearing just socks.
So I am re doing my Bathroom and I was thinking that maybe I could try this on the walls inside the shower as well what are your thoughts on this and If i use the water base wouldn’t it wash away with each mop or cleaning Just wondering . I have 6 Children and a disabled mother in law that i care for not to mention My Husband Being a mechanic . I love the look just wondering if it would hold up In these areas
Haha! That’s my exact question! Did you get a response? Looking…
My husband lays tile for a living, he owns his own business. He does showers allot, so I thought I’d respond to your question. I don’t think it would work “IN” the shower but on the walls I think you’d do fine. I think on a “flat” ceiling it would be pretty awesome too. Lots of work but if you have the time you can pace yourself. Good Luck!! XO Dina
Thanks for taking the time to answer their question Dina! This post gets a ton of questions and sometimes they get away from me.
I don’t think it would hold up well at all in any area that gets moisture (like unfinished basements, porches, or showers.) I did recently paint the tiles in my shower and it is holding up great, not sure if that would help your situation at all. https://wildfireinteriors.com/2013/11/how-to-refinish-outdated-tile/
Could I go over linoleum with this? Or pull it up and apply to the flooring underneath? These floors are gorgeous!
You can go right over the linoleum, another blogger did this and wrote a post about it here…. http://lovelycraftyhome.com/2012/05/24/out-west-where-home-depot-is-still-my-home/
Oh, thank you for this!!! :-) We have an old house and ugly flooring. We just might replace it all with this! :-D
Hi! Thanks for the tutorial/anti-tutorial. I really think it looks fantastic. I’m curious whether this technique, or something similar, would work on a wall, or as a shower surround? Thoughts?
Yup, this technique is very popular for walls…plus you wouldn’t need to add so much poly. For the shower, I don’t think it would hold up well at all in any area that gets moisture (like unfinished basements, porches, or showers.)
Thanks. It’s mainly the shower surround that I’d like to replace. I’ll look for another technique. If you have any suggestions, I’d love to hear them!
I have an idea for shower surrounds, but it would be more work: Make panels. Cut thin plywood sheets (luan) into the sizes you need, with holes for plumbing. Cover one side, then poly all sides (including edges) very well. Once dry, you can attach them with something like liquid nails (http://www.liquidnails.com/products/construction-adhesive-LN715), and caulk with whatever color you like. I don’t know for sure, but it sounds doable. Most of the wood-look surfaces available are paper or cardboard, covered in lots of poly…
I have never heard of this technique before. Amazing results. Thank you so much for the great tutorial. My mind is swirling with ideas for this technique.
Wow cool effect…… this could be done in a car, on a dash, steering wheel or?
Hello. Yes,I did many time over dash and furniture, so try and you will enjoy.
Do you think the floor would be slick, I know after doing tables they are like glass. Just wondering wanting to do my kitchen.
It’s not slick unless you just wearing socks. Another reader commented (can’t find it now) and said you can buy an additive at Home Depot that will make it not slick. I wish I had a name or link for you, but if you ask an employee I bet you can find it.
Hey I did my bedroom and I have air bubbles all over the floor I was so upset after all the hard work I did that is when it hit that water and oil dont mix!!!!! The water based poly did not adhere to the oil based stain. So I used rit dye and added it to the poly make sure you mix it up good after a couple of coats I got the desired color then clear coated several times turned out better than using the stain
No, oil and water don’t mix, but I used the water based poly anyway because it is made specifically to go over oil based stain, and in the tutorial I followed she used and recommended it. That being said, mine is starting to flake up in places and I’m going to going to be trying out new sealers soon.
Is there some way to make this work outside patio? Ugly gray concrete. A patio with a roof but open to all elements? Please answer back!
Honestly, I don’t think it would hold up well at all. I think with the moisture, heat, and cold it would peel right up. That’s not based on anything but a feeling though.
I used to stain concrete floors for a living. We used a “sacrificial” coat of mop on floor wax on top of the sealer. This way, if there were any scratches, it would be on the wax. Just reapply the wax every so often to hide the scratches. If you use a matte floor wax, it will help dull down a floor that you feel is too shiny.
That is a GREAT idea, thanks for letting me know. The sealer I put on is flaking a bit and I plan to redo it, I think I’ll add the wax as well. Is there a certain brand or type you recommend over another?
Thank you! I love this! We have laminate flooring and we don’t like it. This is perfect!
How is the traction on this floor. Is it very slippery when wet? How do you clean it? Do you just treat it like linoleum? Or, Hardwood?
It not slippery unless your only wearing socks. For cleaning I just damp mop it with a vinegar/water mixture.
Okay, I’ve done that like once…usually I just spot clean it with baby wipes.
do you put the glue on both sides of the paper?
Yes, I saturated the paper before laying it down.
This is awesome and definitely something I want to try in both bathrooms! Thanks for sharing the idea. This may be wishful thinking but is there some way I would be able to make this work if I added a heated flooring system? Maybe adding a layer of something(?) to serve as a barrier between the heating system and paper bags???
I wish I could help, but I have no idea how this and a heated floor would go together. I would hate to give you bad (aka unsafe) advice.
Oh wow. This looks amazing… *glances around the house* …that is such a small space compared to the 18×22… and it took you so long to do it. Lol. I don’t have the time to even rip and lay the sheets… let alone control enough over my kid to get him to not traipse all over the product-in-work. Man that looks amazing. Absolutely amazing. :D
How durable is this floor? How long would it last?
What do you think about doing this in a retail business? I love the look and would love to do this inside my indoor flea market/antique mall but I am worried about the traffic.. any ideas would be appreciated. Thanks in advance.
I did a similar fix using chip board which I lightly sanded and added polyurethane with lite sanding between. I didn6 coats, it wears like a stone, boots, hard wearing, then every couple years lite sand and 2 coats last time I used high gloss everyone is very impressed
Love this! My concrete subfloor has stain on it from building the house. Do we have to remove that color before starting this project? Also – can you feel the texture on the floor? ThAnk you!
Our concrete was stained too (and polished) and we didn’t remove anything (just gave it a light sanding). You can’t feel the crinkled texture on the floor, it’s smooth. You can feel where the paper end and overlaps though, but it’s subtle.
I like the look, but this was presented as a way to create a recycled floor “paper bag flooring”….I would have to purchase the same materials I would have used to finish my floor any other way. I think I’m going to do cork, but! This did give me a great idea for an art piece :D
I would like to do this in my craft room with sheet music. I love it. I am also a DIYer. I get myself into more trouble with my hubby cuz I want to tear into everything. Thanks for sharing.
Can you use this on a dining/kitchen floor?
I love it!
Anybody working on concrete, who is worried about moisture can get a decent sealer at most DIY stores, Just do yourself a favor, and put a coat of primer over top, to make sure the glue stays put. I swear by Killz, but there are lots of options, depending on your budget/time frame.Also, anything you can buy for this project (glue, primer, stain, poly) can be purchased in bulk, for big rooms. If they make a pint, they make a bucket. If you don’t see it in the store, ask someone. If the store doesn’t sell it, e-mail the manufacturer. They’ll tell you where you can get it, or sell it to you themselves (usually cheaper). Thanks for the great idea. I see a new project coming soon!
I would love to do rustic white wood flooring, im wondering what this would look like if you painted this white and then went over it with stain and polyed over the top
Ashley …love this idea ! I am currently staining the cement floor in my son’s room and planned on doing paper comic book area rugs….wasn’t sure if it would work..but now I know it will ! luv luv luv your wit and “hey girl” posts…..and I too am barefoot..with safety glasses on…lololol
I would like to do my basement floors. I would like to know what kind of stain, adhesive and sealer to use. I have a dog and need it to be resistant to scratches. Any help would be very appreciated.
I have a 3 season sunroom off my kitchen. The floor is concret and I’d love to do the bag application. Since it will get very cold in this room in the winter is this something I can do or do I need a different application process?
I can’t give you a definite yes or no (I live in south Texas), but I would *think* that as long as it’s not exposed to moisture it would be okay.
I was just wondering if you would do the same thing on a tiled floor. I am in a mobile and the floor is old and just curious if you could do sections an let dry completely with all steps and then move on to another section that is our entrance and exit we use to get in home. I would love to do this in there it would look so awesome. and then Possibly doing my cupboards with it need some kinda change would help me like it better here. Only been here 2 months. Thanks
How creative! You did a great job! And I love that it was so budget-friendly! I am sharing this on blog’s FB page for my DIYers! BTW… my husband got a kick out of Adam’s comments and loved that you posted them. I’m pretty sure I’ve heard almost those same comments! ;)
Looks great! I was thinking of doing this in the basement which is going to be the kids playroom. However, it’s a 30×50 area… Do you think it would take me a ridiculous amount of time gluing the paper own?
Yes, I do think it would take a ridiculous amount of time. But I think if you turned it into a group effort if would do quickly and be kinda fun. People will do a lot of work for some pizza a beer :)
Hello! This looks great! I want to try it on the concrete floors in my basement. ‘
I have one concern though. My kids love to pull up the area rugs down there and roller blade! Lol
Hey, it is a huge room – I can’t blame them! Haha Anyway, do you think it is durable enough?
Thanks!
I love it, indoor rollerblading! I think this is durable enough…kinda. My youngest sons crib is on wheels and my boys are constantly rolling it back and forth. You can tell where the wheels are because it wears away the poly. You would have to add poly too it every so often…or you could use a different type of sealer. I wonder how easy it would be to add something like this… http://www.duraseal.com/products/sports-floor/
Thinking about using a white paper and grayish stain for a stone look in my bathroom. Do you think that would work? Or any suggestions for a paper to use?
Love how your floor turned out. I was wondering if when you tore the paper and wadded the heck out of it, then straightened it back out, if it would be beneficial to stain it at that point. And allow it to dry thoroughly to keep it from bleeding under, when you applied the stain, after gluing it down, I must say job well done even with your mishaps while working on it.
Thanks Alice! I think staining first would keep it from bleeding, but I also think doing it that way would take forever. It only took me about 20 minutes to stain the whole floor, I bet doing it before gluing it down would take a few hours at least. I think an easier way to keep it from bleeding would have been to mop another layer of glue on top after it was all down, sealing any open edges.
So, I’m a huge fan of Mod Podge and they recently came out with an “outdoor” formula that is supposed to be even more durable, especially because it is supposed to work well with any porous contact surface. What would your thoughts be on using that instead of Elmers? (http://www.plaidonline.com/mod-podge-finishes-and-formulas/92/product.htm) I’d probably not put a stain over the paper, especially if I used construction paper. Thanks!
I think it would work great, if not better than Elmers. It would be pricier, but I don’t remember Mod Podge being crazy expensive or anything.
WOW! Where do you get all that energy? I did a wall in our bathroom, and had to paint over it. It was supposed to look like leather, but looked a mess!
This is neat. On walls a actual paper grocery bag looks like leather.
Looks awesome. i saw some great floors over at this place.
I love this idea but wondering if it would hold up at the cabin in the cold temperatures?
I can’t give you a definite yes or no ( I live in south Texas), but I would *think* that as long as it’s not exposed to moisture it would be okay.
Hi Ashley,
This is soo fun! but I have a problem – I started in a store room in case I had problems and boy I’m glad I did, I am doing this on a newer cement floor. The gluing went well and looks great when it dried. I bought the same stain you used because I loved the color. I applied the stain on one section and noticed right awy I have large “pools” of stain on a lot of the floor. I know you said there could be some bleeding and that would be okay, but these are big blobs and is a little more that some imperfections. As I said I have only done this in a store room so I have time to correct my errors before i start on large basement. Any suggestions or comments on what I might have done wrong or what I should try. I may end up not using stain but I really liked the look of yours. Thanks for any help
I’m glad you started in the store room too! When you glued down the paper did you soak it really well? After I placed each piece on the floor I dipped my hands in the glue and smoothed them over the paper, sealing the edges. Obviously I still had a some leakage, but not much. Thats really all I can think of, unless you are having some sort of weird reaction to the new cement.
Also, I have to tell you, that even though the paper on my floor is holding up perfectly, the sealer has started to flake in a few places. I plan on writing an update post on this really soon, but I just wanted to let you know since you are working on this now. I plan on papering a piece of plywood and trying a bunch of different sealers to see if there is one that works better. You may experiment with oil based poly if you get to that step before I do. It may just be me though, other people (including the tutorials I followed) don’t seem to be having the same issue.
Wow. This looks incredible. I’d love to know how well it holds up over time, spills from kids etc.
I’m planning a “one year later” post next month so I’ll get into all the details then! Basically it holds up great to kids and spills, BUT the sealer is flaking in a a few places so I’m on the hunt for something else to recommend.
The white spots were because you were using a water based poly over pull based strain and didn’t allow the stain to complete cure…
wow this is amazing. I am considering doing this in my kitchen. Will probably end up doing epoxy though as I am doing the powder room floor with pennies so this way I don’t have any joins as the powder room is just off the kitchen. Might also end up continuing though the mud room. All 3 area are as you guess high traffic. Any suggestions are welcome before I get started. Also all floors will be prep down to plywood. I always look for original ways to decorate. Can’t wait to get started.
I think epoxy would be a GREAT sealer. We did a penny countertop in our kitchen with epoxy and that stuff is indestructible.
Do you think you could do this over VCT. I have been looking for a cheap alternative flooring but it would be quite a chore to get all the glue up from the VCT that is down right now to make it smooth.
Is VCT the commercial tile? I definitely think this would work over that., I’d just give it a quick sanding beforehand.
So I don’t understand why it turned white? Can you explain? Please
I would, but I have no idea either.
Any idea how it would look/work if colored paper was used (rather than the natural color)?
I haven’t tried anything else, but I would think you could use any type of paper you wanted. Just try it out in a corner or first and make sure it sticks (and that you like it)
In regards to the issue of “White Spots” or “Haziness” that some of you are experiencing the term “efflorescence” is most likely your culprit. Masonry and Tile guys know this term all to well and even though you are using wood products and glues the concrete “substrate” (subfloor/base) will affect the finished product regardless of the floor covering on top. My rule of thumb is Square and Prepare the substrate first for fewer problems later.
In regards to efflorescence think of concrete as a sponge because just like any stone based product it has pores. Those pores can “wick” or “bleed” any type of moisture or liquid into or out of the concrete depending on the ambient temperature and humidity as well as the viscosity and adhesion of the liquid in question. Also concrete slabs or substrates are created via chemical reaction. Even though contractors do their best to maintain consistency in pouring substrates they can not control how every inch of concrete sets. Thus some sections may have a more porous makeup while others may have higher concentrations of the natural salts and calcium in the masonry. This in turn will cause sections of any concrete substrate to have the potential to effloresce.
In regards to wood substrates it not really efflorescence but a chemical reaction with liquids and glue. Specifically both Plywood and OSB are both wood based products. Wood has pores of course and both products are made via laminating processes. Both processes involve glue and high temperature/pressure to make a single sheet of sub flooring. Just like concrete the chemical bonding process isn’t exact. Thus some areas of the wood substrate will “wick” or “bleed” more than others. So your bonding glues may stick or absorb differently across the substrate.
What’s the solution?
There is no such thing as a perfect substrate or perfect floor. It’s just perfected imperfection.
Give me a floor I’ve laid that someone said looked great. And I’ll tell you every spot I wasn’t satisfied with when installing.
I am wondering how this has held up over time. Has it been a year or two years later? How is it holding up and what kind of touch ups-if nay have you had to do?
It has been about a year since I did this and I am working on a “one year later” post to update everyone (will be out next month). Basically though, the paper is holing up perfectly but the sealer is flaking off in places. I’m experimenting with other sealers to see which works the best. I’m planning on paper bagging more rooms in my home, so I am pleased with it!
Could you use other types of paper? Say wrapping paper? It would be have a design? Jw
I haven’t tried it, but I would think you could use any type of paper you wanted. Just try it out in a corner or first and make sure it sticks.
I’m starting tomorrow on my paper bag floor in my “yoga room”! I’m so excited. Thanks for the great tutorial.
Hi everyone, just wondering if you would be able to do this straight over lino or not? I have the subfloor and then only one layer of lino
would also like to know if this works for stairs?
I am so excited about this tutorial. We are building our own house over the next few years ad will be doing it in phases. I am starting with a small cabin shell that is 16×40. My house will be western theme and I have decided t do paper bag floors throughout the house and the kitchen countertops to have the leather look. I am going to take and have all of my children color a picture on a few of the pieces and put them in the closets so that we have some of their art work trapped in the house. Considering their ages I think it will be awesome to come back and look in 20 years. We will also behaving a paper ball fight with our children to wrinkle the paper before we lay it down. Why not have fun with it, too
I am thinking about doing this with newspaper. Do you think that it would be thick enough?
Thanks!
Joni
Would this work on plywood? I don’t have a cement slab, but I love how this looks and I would love to give it a shot if it would work. I have disgusting old carpets in my home I want to get rid of.
Would you recommend this for say a high traffic area? How do you think it would hole up compared to linoleum or tile squares? Thanks for sharing, I love it.
Wondering if it would work as a wall texture…with maybe a sponge to apply the paint…it looks awesome
es muy buena idea pero no entiendo bien de que tipo de poliuretano es, si se trata de algo como si fuese una pintura para piso me encantaria poder tener mas informacion porque trataria de ponerlo en practica, me encanto
Did 3 bedrooms and 2 baths end of 2013. I used concrete sealer to lay down the paper on the primed concrete floor (for consistency in color). Stained then polyurethane. They turned out great!!!!
Was the concrete sealer the polyurethane and what do you mean by primed the concrete floor? Thank you
Patched all cracks and holes.
Kilz for consistent color.
Laid paper with water soluble concrete sealer. Wet floor w/sealer, laid paper, painted coat of sealer on top, Used flat plastic tool to remove air bubbles.
We did put repeated coats of sealer, but felt it wouldn’t be durable enough so we then put a few satin polyurethane coats over it.
Completed in November, 2013. Still looks great even with 2 german shepherds running around and it’s holding up in the bathrooms too.
I trimmed the bathroom floors with tile chair rail as a base board.
Well, I did it. Here is my “test and learn” on doing a paper bag floor. I just love the results despite the adventure. Thanks for the great tutorial. Here is a recount of what I did. http://apurposefulpath.blogspot.com/. Enjoy!
hey I have Dobermans and was wanting 2 do something different, is it easy 2 peel up like the corners , I think this looks very cool and very different…
Would it work on ceramic tile in my bath and foyer?
Is it best to stay completely off of the floor during the staining drying and poly drying process? I’d love to do my living room but it’s a high traffic area?
Yes, it is best to stay off it (I know it’s super inconvenient). Between coats of poly it will feel dry and you can walk on it and whatnot, but don’t move any furniture back in or abuse it too hard before it cures completely.
Hi! I literally stumbled upon your blog! I was on Stumble Upon and came across this post and had to come see the actual tutorial! We have a dining room and entry way that for sure need to be replaced in our rental home and this is a fraction of the cost than putting new flooring in! I love it! Thank you so much for sharing! I can’t wait to try it!
HI just wanted to say we did this to our bedroom and it only took us a week to get it done and room back together and still looks great
Waiting for the “one year later” post. Where you will be experimenting with other sealers to see which works the best. I’m planning on paper bagging a room in my home, Waiting for Update before I start :)
The one year later post will be out on Monday and the experiment posts should be rolling out after that. I’m experimenting with different types of papers, stains, and sealers, and surfaces. I’m not done yet, all that’s done is the different types of papers (if I was done I’d just quickly tell you what worked best so you could start!).
I saw your One Year Later post…after I had papered my 1637 sq ft shop.. What do you think about using a few coats of oil based poly over the water based, as a top coat? The shop is completely empty right now as I have just leased the building to open my second grooming business and will have dogs housed in play pens on the floor. Now I’m worried the poly wont hold up.
Let me share some of the issues I had so far..lol:
First 4 rolls of paper went down like a painful but good dream, the 5th was a different color after it dried as was the 6th and the 7th. So we have 4 different tones of paper on the floor ranging from tan to grey. I stained with a dark walnut stain to match my brown borders better but just mopping on the stain was too dark. When I put the first of the stain down I kinda freaked out and had my daughter wipe it up really quick and lo and behold the effect of laying down the stain and wiping it back up was GORGEOUS! So what was supposed to be a 2 hour job turned into 8, moping it on and wiping it off!
The stain made the first 4 rolls blend with the 5th and the 7th but we noticed the 6th roll was very thin paper and tore easily when it was saturated in glue. After the glue dried it was rough to the touch unlike the other areas of the floor. This 6th roll was much darker with the stain on it and seemed to soak up the stain quicker than the rest but it still looks amazing and to our luck is all in one spot in the back of the shop area. Because we wiped up the majority of the stain I am only waiting about 34 hours to poly which will be on Friday the 21st. I know its going to cost me a fortune to poly such a large area but it’s still much cheaper than tile!
What do you think? I can send some pics if you want for reference of the different papers, which all appeared to be exactly the same when we bought them. I came across your blog when I first thought about doing this application and it was my deciding factor, I am in hopes that this will just be more information for you to share with your followers.
-Jamie
Wonder if it would work on a counter top ??
This was awesome.. I just love it.. Thanks for sharing this to us.
hey this is awesome and i cannot wait to do it. what type of concrete sealer do u suggest. i live in florida and the moisture will and does seep thru the floor…we just cannot see it and i do not want that to effect my new floor after all the work i will put into it…thanks for help
anne marie
Heh does anyone have any suggestions for a single wide trailer floor. I need to pull up the old linoleum and I don’t like those vinyl tiles after trying them in another room. We have Pergo to lay down but I am thinking that would be better in the family/living room. I want my kitchen to be blue and white. I have a plywood sub floor. What about painting it? Any ideas would be appreciated.
Has anyone tried this on cabinets or walls?
About 35 years ago I saw this done on a floor in San Diego, California. I took the idea and did it on the wall behind my kitchen stove. It held up very nicely, and was easily cleaned of grease or other cooking messes from the stove.
I did something kinda simular but didn’t use bags and was on cement flooring painted floor a premixed gray oil based paint let dry a few days grabbed me a rag wet with stain and swirled. It on painted floor waited a few days pulled out the shellac and covered floor a couple of times let dry for a good week and moved everything in it looked like marbled floors
I was wondering, are you able to just roll out the brown paper instead of ripping it? Or it that a must?
I’m sure you could, it would just be hard to get it smooth and wrinkle free. Not ripping the paper would save a ton if time though, so it’s worth a try.
Hello, i was wondering if this could be done when having floor heating? I’m going to move to a newly build apartment where there is just cement on the floor. Please let me know if this is possible.
Thanks in advance,
Jasper
Can you do this on top on linoleum flooring? What kind of prepping would you do?
Here is the link to a post I just wrote that covers that subject… https://wildfireinteriors.com/2014/04/the-paper-flooring-experiment-part-iv-misfit-questions-other-resources/
What about laying this down over existing concrete tile? Do I need to put a lyer of dura rock down first?
I don’t think so, unless you don’t want the grout lines to show.
Hi Ashley,
Hey I am thinking of trying the paper floor covering in my downstairs bathroom, It’s small so if it didn’t work, It wont cost me to much to re-surface it.
My question is “Linoleum” Can I go over it or do I have to rip it out? And can wall paper glue be used or does it have to be Elmer’s glue?
Thanks for sharing by the way, and it looks really cool !
Hey Julie! I’ve never used wallpaper glue, so Im not sure if it can stand in for Elmer’s glue. I did some experimenting with papering linoleum and it went on great and then peeled up really easily. I would leave the linoleum there and just sand it with some rough sandpaper to give the glue something to stick to.
I just love how they turned out. I posted a video on youtube. Here is the link if anyone would like to see my results.
http://youtu.be/bRxF_El1u_Q
I recently did my kitchen, I was wondering if after u apply the stain and wait two days will the floor still be a little wet and tacky?
Yes, slightly. Just wear socks when you walk on it to apply the poly and it will turn out fine!
Maybe make sealer first coat then poly. May prevent the white effect.
Can I do this over existing ceramic tile? Its the small square tiles and I hate it!!
Yes, absolutely…it works great over tile! You will be able to clearly see all the grout lines through the paper when your finished though.
I tried the paper bag flooring idea out on a table in my camper trailer. I didn’t have the money at the time to buy a new collapsible table. I use only one color paper bag( all bags came from WinCo grocery store). I played around with it quite a bit. I glued some pieces down that I only wadded/unwadded up then some I sprayed with water before wadding/unwadding then glued down. Gave the pieces a more defined wrinkles. Then the first coat of poly I added a bit of glitter that was bronze/brown/copper kind of color. The glitter made it like like sandstone. I gotta tell you I just loved it. Giving it that extra little detail made it original and a conversation topic with everyone who has seen it. I liked it so much that I’m now ripping up the carpet in the camper living room and doing it again just a little darker so it doesn’t blend in with the table to much.
So my advice give it a try on a scrap piece of flooring of your choice and have fun. Don’t be scared of giving it your own spin on it. You can always cover it up later if you don’t like it.
looks great I would like to do it in my kitchen. im wondering if I could do it over linoleum? its in perfect condition I just hate it! and also I cant block of my kitchen for days or even many hrs, curious if you would be able to do this in sections without it being obvious where you had stopped and started again?
I experimented with linoleum in on my my posts about the paper flooring (which you can read HERE) and I would say yes, but you would want to sand the linoleum with rough sandpaper first. I’m not sure about the sections…I did my papering in sections but the staining and sealing all at the same time. You might see lines if you break up the staining, but the paper and sealer in sections would be fine.
I discovered your website by searching for answers to my fear of putting another layer of poly on. I worked hard on a pine 1940s floor, stained and did the first coat of poly. There were spots that I now think were areas where I didn’t clean up the dust from sanding well enough, so I sanded just those areas down again and put more stain over the poly. After drying for a day I wiped off with mineral spirits and now it’s been four days. I’m hoping it won’t do something weird when I put poly on it over the weekend!
Anyway, I love the name “domestic imperfection” and have been engrossed with the tale of your paper bag floor and the challenging counter. I admire your persistence and the way you let your little one help you. I also do a lot of projects that have many, many setbacks and endless trips back to Home Depot for one reason or another, but they always turn out well, though not exactly professional at all!
Thanks for being entertaining and giving me some important tips!
Jo
can you use it on osb board?
Yes, you can (though I’ve never done it myself). Just make sure it’s fairly smooth before you start.
Can this be applied over tile flooring or would the tiles need to be removed first?
You can put this right over the tile.
Can this be placed over ceramic floor tiles or would the tiles need to be removed first?
I am going to be starting this project tomorrow on a plywood floor. I will be using Titebond wood glue. You recommend “3 to 1 water and glue” for wood floors. I hope this isn’t a dumb question but would that be 3 parts water to 1 part glue, or 3 parts glue to 1 part water? It reads as if it is the first, 3 parts water/1 part glue.. but I just want to be sure
Thanks :)
Yup, three parts water and one part glue…but I’ve had readers say they prefer the 50/50 on plywood as well as concrete.
Hi,
I have seen other DIY projects like yours and can’t wait to try it because my carpet is disgusting and I can’t afford to put in wood floors (which I need since I have pets).
I saw on another site how someone made their floor look like wood planks. Since I don’t want to go through the whole painting part of the paper, etc., I was wondering if wood grain wrapping paper would work or if it’s too hard to stick down with the glue. I found that Paper Mart sells it in large quantities. I want to save time and money by doing this. I also have limited mobility and feel that having the “wood look” already printed on the paper would be so much easier for me. Thanks for any advise you can give me.
Hi there! BIG emergency!!!
Finished gluing down the paper a couple days ago. Look ok, a little wrinkly. Read somewhere they would disappear. Applied the first coat of poly last night and they are worse than ever!! Also after the poly was applied, the paper now had a lot of dark splotches on it! I didn’t use stain, just brown kraft paper. Now it looks horrible! My husbands saying he doesn’t think the splotches or the wrinkles are going anywhere:(. Any suggestions? Should I sand? Or what???! Any info would be greatly appreciated!!!
Did you use oil based poly?
Hi! We used minwax polyurethane. Not sure if it’s oil? I just followed a tutorial I saw online. We did do it on concrete floors as well.
I’m honestly not sure how to fix it after the fact. If the wrinkles are just in a few places you can cut them out with an exacto knife and add more paper, but if they are everywhere you might be out of luck. I had a reader e-mail me with a similar situation and it turned out she papered over unsealed concrete and that caused all the wrinkles. She had to rip it all out, seal the concrete, and repaper. Not the answer you were hoping for, I know.
Ok, yeah not exactly the answer…:(. What about the dark splotches?
I know, I hate giving answers like that. As for the dark splotches, I had some too, but mine are from stain and you said you didn’t use any. I can’t tell you exactly, but I have read in other blogs that did this project that oil based poly sometimes results in blotches.
Yeah, I figured as much. If I wasn’t in such a hurry I would have researched it more… I did a lot, but not enough:( I still have a closet and I would like to do my stairs out of it–with treads of course–I would kill myself!!!
If I sanded up where the dark splotches are do you think I could re paper? I guess what have I go to lose!!!
Thanks for your unfortunate reason;)
I’d at least try…like you said, you have nothing to loose! In case you do decide to try again, did you see my paper bag experiment series? I get so many questions about this that I did a ton of trials and wrote about it. Here is the link to the first one, and on the bottom of that post it links to all the others.
Hi Diane,
I actually had to re-paper my floor 3 times. You can re-paper right on top of the old paper and poly as long as you put the next layer of paper down with poly. If you take a look at my blog, you can see my first attempt (where I had to repaper 3 times) and my second endeavor on my basement floor. I found that putting the paper down with poly and adding just a tiny bit (say 1/8th – 1/4th cup per gallon) of stain in the poly and stirring it up and using that to put down the paper creates really pretty, consistent results… I wish you the best of luck in doing your floor. I really really love both of my (my basement and my yoga room) even though it was a challenge getting the results I wanted.
Malinda
Hi Malinda! Thanks for that! I’m hoping you get his in the next bit as I am on my way to Home Depot !! I think the poly I used was oil. Not 100%. Can I use that water based poly on too? And you said tinted poly to lay the paper bit do I put tinted on too as well?
Thanks so much!!!
Hi Diana,
The kind of Poly listed on my first post (A Paperbag floor test and learn) went on top of oil-based stain, so I think that would work. The Home Depot guy told me that it was versitle and would work with both. It was in a white plastic jug and called Pro Finisher brand. I would recommend the Satin finish. Also, I would either add the stain during the application process OR the final coats. We did both and really liked the way both turned out. It was very consistent either way. I wouldn’t do both, because (in my opinion) I think it could end up too dark. :) Good luck!
Ok so do you wait to do the top coat of poly on the paper? Or right away like with the glue? And what did you use to apply the first coat on top? When using the glue my husband tried to use th special applicator and he found it pulled up the paper.
HI Diana,
I applied the poly just as soon as the paper was dry. It didn’t take too long – about an hour. I applied the poly with a paint brush attached to a paint roller (with paint tape!). I basically put the poly in a paint tray, and then put a crap load of poly on the brush. then just spread it thin. It worked great!
The brush is definitely the best way. :)
Thanks for your help. Unfortunately in Canada we don’t have pro finish:( or anything like it!!! So what I was wondering… Could I do it with same oil based polyurethane that I did the rest with??
Ok. Well apparently we are behind the times in canada as we do not have pro finisher water based polyurethabe or any water based poly that is compatible with oil based:(
I did this on my bathroom window because of the size of the window, and the cost of a blind would have been hundreds of dollars.
I used tissue paper and sprayed clear polyurethane on the window looked like stained glass… looked wonderful
also my mother did this in a old farm house walls where I grew up using funnies out of the local news paper, looked great and also helped on heating cost.
My husband and I are turning a barn in to living space and have a very small budget.
I can not wait to do this on our plywood floors….
Thanks for sharing
I have plywood floors in my home. Does it work the same as it does on concrete?
Hi. Just to specify when you are talking about applying to wood floors, did you mean for the glue mixture…3 parts water to 1 part glue or visa versa? I want to be sure. I start my floors tomorrow. Super excited! thanks for the tips!
I would actually do a 50/50 mix, even over wood. As for the poly, do a coat in the morning and a coat at night until you’re done. You can do them closer if needed, but then it takes longer to cure overall and isn’t as tough (at least that’s my experience.)
LOVE the job you’ve done … and all the helpful hints.
When you have time, please comment on this idea: Not to cut them into strips first but to glue the paper onto the floor first and then use a heavy marker for the plank out lines.
What do you think …
I think that would work, depending on how you laid out the paper. Glueing it down in a single large sheet (or even a few sheets) seems like it would be pretty difficult.
Help! I am in the process of doing this in my bedroom. I applied the oil based stain 24 hours ago and it is very tacky and wet yet! I applied the stain with the lambs wool pad in swirling motion. Was I suppose to wipe it down after with a rag?
How long should it take to dry to apply the poly?
I used contractors red rosin paper with Minwax water-based oil modified polyurethane. I added some silhouette images I cut out of brown paper grocery bags. It turned out fantastic. Thanks for the tutorial!
Hey there. I love this idea. I also noticed several people talking about using photos or quotes on the paper, or colored construction paper, or comic book pages. BEWARE of this idea if you plan on reselling your home at any point. That would be a big turn off for a seller, that might not want your personal photos or quotes underneath layers of poly on a floor. Just something to think about!
Hi… so i’m doing this floor in my room right now. I noticed that after flattening all the wet pieces some wrinkles formed as it dried. Once it was dry, those wrinkles remained. Is this going to be a problem for me to stain on top? Thanks Chris.
i saw this on couple of blog. every time i saw this paper bag idea, i make my mind to do it. but its a lot of work. i am so lazy
This is such a great tutorial, I just wish it would have worked for us :( Check out our pics and our paper bag flooring story.http://onblissstreet.blogspot.com
I couldn’t help myself I had to Comment…My sons’ name is Adam Elijah..I had to start by saying that.lol
**You did an Awesome job!! I love it.**
How is this beautiful floor holding up, now that you’ve had it for awhile?
It looks really good and unique but don’t you think it will not last longer as other flooring does? I mean, paper can get decayed very quickly.
I have an idea as to why your poly dried so cloudy with the first coat… I beleive it is because you used an oil – based stain and a water based poly. If your stain was dry to touch but not fully cured the oil and water got in “an argument” lol. I am in the process of doing my floors at the moment just got done with the stain. I am using an oil – based poly when the first coat dries I will let you know if it turns out clear or cloudy! Other than that everything used is exactly what you used!
Thanks for the great tutorial and especially for making me laugh so often during it! Cool design on your website as well.
Look what we did for a little color! I’ll try the facebook link, first the page, then the image.
https://www.facebook.com/photo.php?fbid=10203885421480128&set=pcb.10203885431640382&type=1&theater
https://fbcdn-sphotos-g-a.akamaihd.net/hphotos-ak-xpf1/v/t1.0-9/10891459_10203885421480128_615716970779002317_n.jpg?oh=a53ef1ce218f92a505b8226b92f0acd1&oe=556C61BD&__gda__=1430294402_91f93a96e735e6c340a4c7e9fe3f7d83
Silk leaves, but real ought to work. Too many may be too busy.
Love love love the leaves! Your floor looks amazing. :)
Thank you! We learned it is important to get “silk” type leaves (usually actually polyester or other synthetic) Starch and iron the leaf flat. We did not glue, but poly-ed them down. Not too much under the leaf or it will have too much build-up under neath.
We learned that First layer of poly is important thin, as you advise, but after that you can be more careless and it does not matter as much. But, you should lightly sand the 2nd to the last coat to knock off bumps, stray debris, etc. Also, Dang! If you have pets, do it in warmer weather so you can keep their tails outside for a week! The hair is so light it drifts EVERYwhere!
cool,., learned about paper floors for the first time.,. and that was from your site.,
im enjoying your posts
love from kashmir
We have square tiles on all our floors and counter tops. I understand I would have to sand the gloss off, but would the bag process work on rough tiles or does the surface need to be smooth? Also is it a process I could use on my counter tops where food is prepared? If these questions have been answered already, my apologies.
I absolutely love your floors, I did this to one of my bedrooms in a dark mahogany (you cant see all the lines which bummed me out!) I also did it to the walls and ceilings with no stain or paint whatsoever and it looks great! I really think im going to do the whole house like this that’s how much I love it! hopefully it turns out great so I can find a buyer fast when I go to sell! I have some videos on my youtube channel if anyone would like to check out my paper floors/walls/ceiling!
I put the 2nd coat of stein on my paper floor and it was stunning- then I noticed there were 2 areas that had long wide dark streaks and I decided I could fix those by rubbing the steel wool over the area and reapplying stain and feathering during application. Yuk!! It dried exactly as applied and looks awful- can I sand and reapply stain? Just that area or must I sand entire floor? Also the stain I used has a polyurethane added to it
I did this project in my home (over concrete, no stain) and I am BEEEEEEEE-YOND excited with the outcome. I can’t say THANK YOU enough to all of the people before me who did this and took the time to share what they learned. They were my supporters and encouragers and didn’t even know it. This has changed my whole outlook on my home, and yeah…carpet! If you ever have to pull up your own carpet, you’ll never put down more again. I join Jami on that carpet soap-box.
I did a TON of research before I started this project (but not before ripping out my carpet and baseboards and painting myself into a corner, no pun intended. Ok yes it was.) and I tell you, I honestly don’t understand how this could have become an epic fail for some. I really really don’t. I am in NOOOO way a DIY-er….I am the epitome of NOT being a DIY-er, the ANTI-DIY-er, NOT the person people call even if they’re drawing stick figures. However, I do carry a bit of common sense and I seriously think that is all you need to accomplish this project successfully. Well, and a bit of patience…because when you’re done it is best to let the floor “cure” for a while before putting any furniture on it. So I lived very sheik-ly for about 2 weeks climbing over my entire bedroom as it sat patiently in the living room waiting for me to finish. Oh and it takes some hutzpah…because it is DEFINITELY a lot of work. Once the paper is down, you’re looking at this beautiful floor that now requires another 8-12 coats of Varathane. After the 3rd coat all you really want to do is cry. But you’re committed at this point and MUST go on!
With that said, I don’t have a video to share nor do I know how to post pictures in this blog, so feel free to email me with questions at [email protected]. I am happy to share my experience because of what it has done for me and my home. This is a long read but I hope that it answers all of those questions that weren’t answered for me, even after reading over 15 sites regarding this project. So many questions and fears that I almost didn’t do it.
Materials used:
Blood, sweat, tears, sleeping hours, family time, and old fashioned get-up-and-go
Hammer and chisel to remove baseboards
Muscles to remove carpet, pads and carpet tacking.
Mapai Planipatch to fill carpet tacking holes.
Broom, small broom & dust pan, vacuum, mop w/water only, and scraper to “prep” the concrete
Good ol’ normal Butcher/Contractor Paper
Water-based Clear Satin Varathane (about 3 gallons total for a 200 square foot room)
Cheap 4 inch paintbrush
Box of powder free latex free gloves (no idea if powder and latex would make a difference and I’m not revealing how I came upon a box of them. A girl never gives up her accomplices)
Beverage of choice (mine was wine)
Where to begin? At the beginning…Prep the floor. I think the hardest part of this entire project was prepping the floor. I read blog after blog after blog that gave tons of info on the project itself but all that was said about prepping was just that – prep the floor. What the heck does that mean???? I’ve never seen the underside of a carpet in my entire 40 years of life! Well I figured out that GREAT care should be taken in getting all of the dirt off of your concrete floor. It will save time in the long run. I’m serious – ALL of it…even the little pieces UNDER the sheetrock and behind the baseboards. Yes, I removed my baseboards…I’m EXTREMELY anal and all of my baseboards HAVE to match and I had NO intention of putting up shoe baseboards (or whatev the heck they’re called) throughout my entire home. I really needed to sand and repaint mine anyway and sanding is much easier if they’re not on the wall. So down they came and with that ALL of that sneaky dirt that’s been hiding in my walls came out – YUCK!!! Next, I scraped all of the glue from the carpet off of the concrete and I scraped with great care. I am CHEAP CHEAP so I didn’t buy some high dollar scraper, nor did I purchase some remover or stripper or whatever the Home Redo stores call it. Just a cheap ol’ scraper that resembled a razor blade doubled in length, clipped at the end of a foot long pipe. Come to think of it, I may just duct tape a contraption next time, seriously. Anyway, so I scraped like a crazy woman because I still wasn’t fully confident that I understood what “prep” meant. And throughout prepping I was REALLY nervous about these areas where the builders had obviously had a fight with the concrete and the concrete won. Or where I had not done the greatest job with the Mapai Planipatch filling in the carpet tacking holes. I was terrified that these lumps were going to show or be felt but for the life of me I couldn’t get them up with the scraper. I considered not being so cheap and taking a trip to the Home Redo store, but in the end cheap won out and I figured I’d just see what it did. Now mind you, this is my Master Bedroom, my sanctuary…so I’m not sure what I was thinking but there you have it. Well, come to find out now that all is said and done, you really can’t see or feel the carpet glue or concrete imperfections or Planipatch mess through this floor. Even pretty major imperfections. BUT, you can feel a tiny speck of dirt – go figure. Princess and the pea effect I guess. So I am now glad that I VORACIOUSLY swept, vacuumed, and mopped. But it still wasn’t enough because even after all that I STILL had to have a small broom and dust pan beside me throughout the whole process. If I had it to do over again, I’d sweep, vacuum and mop MORE. Oh and I wouldn’t use Planipatch. It is WAY to liquid-y. I would just use something that has a dense enough consistency to push it into the carpet tacking hole, spatula it smooth, and move on.
So, on to the paper. I used good ol’ butcher paper from Lowes. I think it said Contractor Paper on the label and is actually meant as a paper drop cloth or something. Anyway, it’s perfect and cheap. Some sites said to take note of the underside of the paper by drawing on it…I didn’t. Some said one side of the paper would look and feel differently than the other. It didn’t. I’m a 4 ingredient kinda cook – the easier the better. While that makes me a horrible cook (truly) I think it came in handy with this project and could be why some pieces are darker than others. But to me that is part of what makes this look AWESOME. I had also read that the smaller the piece and the more wrinkled the paper, the more “leather-y” the floor would appear. This proved to be true for me. I am glad that I went with random pieces. Some 6 inches, some 10 inches, some 12 inches in size. Some very wrinkled, some lazy wrinkled…because yes, it gets exhausting. I didn’t tear everything I needed at once, there was no way my math skills were going to tell me how much paper that was. So I just went with a big pile, definitely keeping the straight edged pieces separate from the inside pieces, as you would if you were putting a puzzle together. Some pieces were torn with a rounded appearance to them, some pieces were torn into squares, some were torn into triangles. Friends helped. There was no consistency or uniformity. I think the definite takeaway here is to NOT be anal about the shape and size of your pieces. Otherwise, I would think it would look too contrived, too conformed, so you lose that “look”. Just tear…sip some wine or other beverage of choice…repeat. Make it fun. Seriously, because as I said, this is a long project!
Next…how to apply it? OMG, I read site after site and varying opinions on this process too. Enough to almost scare me away from this project entirely but I had already ripped out my carpet and baseboards so what was a girl to do? Again, my cheap and lazy side won out. I did not use glue !GASP! I used Varathane only. Let me tell you, all worked perfectly. So forego the glue and save yourself some money. Oh and yeah, most importantly – a step in this process because you’ll have plenty. One website, I think her name was Karen, was doing her basement, and she simply applied the paper to the floor using the Varathane. So there you have it – that’s how I applied the paper. This was after much research and much fear so hopefully I can save you some trepidation about not using glue. I did decide to go with the expensive water-based Varathane and I am happy to say that I did because I don’t know if I could have smelled 12 coats of the oil-based, seriously. Oh and I went with Satin. I don’t know if that makes any difference in the grand scheme of life or not, I’m not a DIY-er as I’ve said, I think it’s just a preference. I know some used Semi, some used High…but I’m not into seeing my reflection in my floor, the mirror is enough. I really wanted it to have that “leather-y” look to it yet not too flat, hence why I also chose not to go with the Matte. Like I say, I think it’s a matter of opinion. And I used a cheap ol’ 4 inch paint brush. It was one of those paintbrushes found on the bottom shelf with no pretty packaging and barely a price tag but I tell you, that paintbrush worked PERFECTLY in all its fake synthetic glory. I am VERY proud of my little tenacious paintbrush who is still shining, even after 12 coats. She will be with me when I start the living room. Cheap is also good so that you can buy 3 and make your friends help! Grab your BFF (she owes you right??) and make it a girls’ night in. Grab your Varathane, grab your paintbrush, grab your gloves, grab a small broom and dust pan, grab a small trash bag, grab your scraper, grab your paper, grab your drink and plop yourselves down in the corner furthest from the door because as I’m sure you realize, you’re going to have to work your way out of the room. Or else it will get lonely when the drink is gone and you have nothing to do but wait 12 hours for it all to dry. Put your gloves on and paint a…oh wait, let me stop here and let’s talk about this Varathane for a minute, which I had NEVER even heard of in my DIY-free life. In all of my frightening research, I came across sites that talked about epic fails – cloudy, bubbly, streaky, brush slowly, brush quickly, don’t use too much, don’t use too little. Again, I almost quit because seriously, what the heck does that mean “too much or too little”???? But I have to tell you…this Varathane stuff is THE most forgiving substance I have EVER used. On the spectrum of Unforgiving (10) to Forgiving (1), I consider Stain VERY unforgiving, a 12! You know what I mean right? The crap dries so fast that if you have a bubble or a drip or don’t like the streak you just created, you’re pretty screwed, because if you try to go over it again to fix it, you end up with this gooey gunky over-staned mess. Not with Varathane! My rating of Varathane comes in at a -5 …NEGATIVE FIVE! To me, you might as well be working with water. It’s so easy and smooth and even if there are streaks or bubbles or it looks cloudy at first (come on folks, it’s white…it’s going to look cloudy at first) it’s all gone in seconds flat. So have no fear, if I can do it, you can do it. So with all your stuff around you and your pretty gloves on, get to putting this paper down already! Remember, I ripped my baseboards off so I didn’t have to be too careful about using “edge” pieces around the wall but I would suggest being careful about this if you’re not taking your baseboards down. That way you have a nice straight line. So grab your piece of paper. Dip your paintbrush in the can about a ½ inch and paint an area that’s slightly bigger than the piece of paper you’re about to put down. Plop your paper on top of that and use what’s left in your brush to brush the top of the paper. There is no reason to be specific here, I just say that because it’s the process I used. Some people said to spray the paper with water, well I couldn’t find a spray bottle, so I just went with seeing what happened. Using what was left in the brush was enough to get the paper slightly damp enough to keep it in place while you go to dip your paintbrush, again about a ½ inch. This 2nd dip should be enough to saturate your piece of paper. Just brush it on there – get at it! Don’t be formal or worry, just do it. Use your gloved hand to push the Varathane around and into the paper and flatten the paper to the concrete. Using your hand also helps because you can feel if you’ve missed any areas that should be scraped better or any dirt that needs to be picked up. If you feel any of these issues, just pick up the paper, fix the problem, put the paper back down, and use your hand again. The good news, this process is NOT like putting a sticker on a kid’s tiny Hot Wheels car where you get one shot to get the dang thing on straight. Just make sure each piece is good and wet. And flat. If it feels smooth enough and you feel like the air is out and it’s good and flat, then brush over it to even out the Varathane you were “finger painting” with and start your second piece. I don’t think I took more than 15 seconds putting down each piece, really…it can’t take a lot of talent because I tell you, I don’t have any. On your second piece, slightly overlap it with the first, or go crazy and crazy overlap it. You can’t feel the overlapping once the floor is done so you don’t have to be particular in how much you do or don’t overlap. This was another concern of mine which remained unanswered until all was finished. As I said, I’m very anal. But I wasn’t familiar with this so I didn’t know what to be anal about. I just had to tuck Anal Her away and ignore her screaming and brooding. She is of no use in this project. I think she’d make it worse honestly. So continue on with piece 3 and 4 and so on. As you’re doing the rest of the floor, look up at what you’ve done every once in a while (smile at your accomplishment) and see if there is any MAJOR “lifting” going on. Lifting, as if the corner of a sticker were curling up. Like really curling up. I’m not talking about little gaps in the edges here and there, that’s going to happen at this step but will disappear in later steps. But a major curl at a corner should probably be addressed before going on. I did anyway, though no research I did really said I should or shouldn’t. I was too frightened not to though. So, if you see lifting, just Varathane the corners back down again. It’s that easy. Continue on til you’re done. I didn’t stop in the middle of this process so I can’t tell you if it would create a line or not. I wouldn’t think so and here’s why. When you leave your floor to dry that evening, it pretty much looks at this point like it’s going to look in the morning. I read on some sites that their floor looked a mess and had lifts everywhere and so forth as they left it that evening. Well, mine pretttttt-y much looked the same the next morning. Except there were a few lifting areas that snuck in on me in the middle of the night. No fear, follow the same application process to put another piece of paper down over the lift and you’re good to go. You’re not going to be able to see this “patch” later, I promise. And remember, tell Anal to ignore the small gaps in the edges or you’ll be there all morning and waiting another 12 hours for the floor to dry again. These gaps WILL go away, pinky-swear. And don’t panic that this step will take the entire first can of Varathane and a bit of the 2nd can. You’re using A LOT this first time around and I personally counted this as Coat #1. And now we’re on to the rest of the coats.
As for the coats…from what I have read, the number of coats depends on you and how much traffic the floor experiences. My Master Room, for some unknown reason, perhaps because it’s supposed to be Mommy’s Haven, is the center of the dang house. Every child, adult, and animal that visits is in my room, my bathroom, my clothes, my closet…it is high traffic. So I went with 8 coats. I don’t know yet if 8 coats is enough…I haven’t been using the floor long enough to say. But that used the remaining 2 cans of Varathane and looks amazing so I’m happy with my choice. As I said in an earlier paragraph, this Varathane stuff is so easy and nice and sweet so I wasn’t the least bit careful in my application of the coats. I dipped my brush (same good ol’ cheap brush) about an inch in and used what was on the brush to cover an area about a square foot. Scooted my butt (and my drink) and did the next square foot. All 200 of them. A friend of mine duct taped his brush to an extension pole and that seemed to work just fine too. And I’m sure his back isn’t hurting as badly as mine. But I personally liked being up close and personal for a couple of reasons. First, no matter how clean you are, dirt seems to always find its way in but if you’re up close and personal you can see the dirt and sweep it up BEFORE you put your brush into it. No fear if you paint the dirt, just use your finger to pick it out of the Varathane and move on. Secondly, I liked being up close because it allowed me to see what was going on with this enigmatic Varathane stuff. I kept expecting that epic fail at any moment – for it to suddenly bubble or lump or turn cloudy or the paper to just totally curl or entirely self-combust – you never know! But it didn’t. And thank goodness it never did because after that first coat and counting down to 7 more, I just knew I would cry and need a confessional if this floor went wrong. There were only 2 things I chose to be anal about when it came to the coats of Varathane. The first of which was painting each coat in a direction opposite from the one before it. For example, if coat 1 was painted east to west, then coat 2 was painted north to south. And so on, repeating this for the other coats. I read on some site somewhere that doing this would make it smoother and decrease the potential need to sand the floor in between coats. No way in H-E-double-hockey-sticks was I EVEN about to pull out my 8-inch sander on 200 square feet. I can’t tell you if it helped, I don’t know. All I can say is that my floor is dang smoother than a baby’s bottom and I didn’t sand once. The second thing I MEANT to be anal about was doing each coat no more than 2 hours after the previous coat dried. Again, I had read this would help with not having to sand the floor. This intention flew out the window at 4am in the morning due to extreme exhaustion at this point. I woke up at 10am in a complete panic, totally expecting to take a trip to the Home Redo store to rent a sander. But cheap (and exhausted) won out and again I decided to take the “see what happens” route. There was no need to worry and I tell you, there’s no need to sand a THING! Just do your coats, get ‘em all in that you can and as quickly as you can. Quickly helps to reduce fighting with the dirt that collects. And quickly, because now you will have to wait.
And wait, apparently for it to cure. The amount of time is really up to you. The Varathane can says to wait 3 days but who knows if this is true for 8 coats. The can only instructs to use a minimum of 4 coats. Many sites I researched said 5-7 days. I went with 5 days and also followed the suggestion to put felt pads on the bottom of my furniture because it sounded like good, sound advice to me. All seems to be absolutely perfect!
Yes, I’m exhausted. But I’m so happy and so proud of my work, especially being such a newbie to all of this. I’m very glad I didn’t try to add staining to this process. There were WAY more than enough steps without it and I tell you, the color of the floor when it’s done is a BEAUTIFUL camel/caramel color. So I say for the last time – just do it. Try it. You can. If I can, you can!
I could not find large containers of Elmer’s glue anywhere so I used Mod Podge diluted at 1:1 H2O which it worked great. I also dipped the paper flat then wrinkled it up which made for greater detail when it was stained, however it tended to break down faster. It had to be applied fast and carefully before it fell apart.
Do you think this could be done to kitchen counters. I looking for something to redo my counters
I personally wouldn’t do this on kitchen counters. I don’t see the sealer holding up well enough for daily use, and if the sealer got scratched or came up at all the paper would get wet and it would just be a nightmare. Have you seen all the great counter painting products out there recently? You can make them look like stone, or skim them in concrete… there are lots of options!
Can you do this on wood floors or just concrete?
I completed my floors about 2 weeks ago and as yet haven’t put furniture back since the next step was painting. My floor looks great BUT! the cat got locked in and tried to dig her way out. She ripped up a small circle section. To FIX it should I go back through the original steps: rip, glue, stain, poly or is there another fix. I’m wondered how new glue on the already dried surrounding area will pan out ?
Anyone?
Hi Tanya,
I had to do something similar and I do have some advice. the glue won’t stick on top of the poly, so what I would recommend is gluing the paper down with poly instead of glue. The only potential issue is that you may see a color variance between the areas because the stain will take differently to the poly area… If your floor is pretty dark, I would recommend adding some stain to the poly that use use as glue (you’ll have to mix vigorously). I did this and LOVE the way it works. You may want to do some tests to see how the paper takes to the color to try and closely match up. Check out my blog to see my posts about gluing down with poly and my 2nd post about “learning more stuff”. When I did my basement I only glued down with the poly and mixed the stain in with the poly, saving a step. It was more expensive, but saved time and turned out so great. Love love love it!
I am very keen on the idea of paper flooring, but am having limited success!
For some reason, I just don’t seem to get the patterns in the paper, no matter how I screw-up the pieces. It dries completely flat and looks just like I have laid card-board on the floor!
Here in the UK, the paper sold is mostly ‘heavy duty kraft paper’ and is 90 gsm (Grams per square meter) – it is sold as wrapping paper or masking paper (for painting) So I wonder if the US kraft or builders paper is different in some way?
I have found that I get some lines if I soak the paper in a mixture of black ink and water – but it still does not look anything like as good as photos I see of floors that have been done in the US. It is even hard to see the outline of individual pieces of paper – unless I draw around them with a soft pencil…
Any suggestions, please??
I know you thought it was a mis-step with the building paper having different sides but I think between your fix for the white and the finished product it looks even better than if you had done all the paper the same side. The different sides really give the floor a texture you wouldn’t have had with the other and bonus b/c you didn’t know while you were laying the papers it truly is random. I love the finished look and you did a great job!
I was wondering if this would work on my unfinished stairs leading to the basement. Hubby is worried it would make them slippery. Is this a concern?
I haven’t personally done this on stairs so I can’t tell you for sure, but I’ve had readers do it and say it works well. Also, the bona traffic sealer I used comes in a nonslip version, so you could use that and then it definitely wouldn’t be an issue.
We are enclosing our carport. Do you think the flooring will be ok with humidity etc as it will be wood and screen enclosure ?
How durable is this floor? I’m wanting to do my living room, dining room and hallway. I have a toddler and a dog!
I would really like to see what your room looked like after you got all the furniture back in the room. Personally I think you did a fantastic job on that floor. I am so for he cheapest way to do things yourself, I you can do them right. GREAT job.
I’m in process of putting down floor just as u did..only difference is I’m going to put newspaper clippings over paper bag floor before I poly it…what poly do u suggest that will keep floor from yellowing.appreciate any suggestions u may have..tried magazine pics and yellow showed through but think it was not right poly..I am a huge alabama fan and trying to do floor made up of all alabama stuff
ive been in my house for just under 5yrs and i am just now getting the redecorating bug. Im planning on redoing all of the rooms including the bathroom. My question is….If you were going to repaint and do the floors what would you do first? the painting or the flooring?
I just started the process of putting in this floor in my dining room. Once the paper dried it has a lot of ridges in it. I’ve started poly and have 5 coats on now. Will more coats cover the ridges or is there something else I can do like sanding? I’m freaking out and don’t want to start over after all of this work!
I have the stick on vinyl squares that will leave a sticky glue on the floor so what would I have to do so I can put the paper flooring on
So I am doing our computer room with your instructions and it’s going great!! Well, until today… because of work schedules we let the floor have plenty of time to dry, the stain had 24+ to dry and the first two coats of poly dried well friday night and Saturday morning. We put coat 3 on this morning and it started to bubble up. I put coat four on this afternoon and it bubbled more!! I am afraid to add more poly! Will the bubbles go back down like they did when I glued them?
I actually came here because I googled “how does builder’s paper compare to packaging paper in thickness” and was pleasantly surprised to find your blog. I found my answer within a few seconds of reading an entry. I was so intrigued that I continued reading a few more. I love how your project turned out and the products of your other experiments with different stains.
Ok, I laid the paper in my living room and there are quite a few wrinkles. Can I leave these? will the poly cover them? I also bought the bona traffic that you recommended and was wondering if once I mix it will it still be good if I don’t use the whole gallon. I plan on doing more floors but don’t think my living room will take the whole gallon and at $103 I am worried about waste. Any help is appreciated. Laurie
The paper shrinks when it dries so the wrinkles should even out. Unless it’s already dry…in that case you are kinda stuck with them. The bona won’t be good if you mix and and save it past its pot life (I can’t remember how long it is…like 3 hours?), but you don’t have to mix it all at once. Just mix what you think you will need and save the rest. As long as it stays in it’s separate containers it should be good for a long time, which is good because it IS pricey!
How is the texture? And do you have a problem with it pealing up ? Also do you have to bring the paper up on the wall a little to account for the shrinking ?
Would this technique work on walls
Sure would, and you can skip the sealer (or just do one coat).
Instead of putting down plywood could you do this on an old hardwood floor?
Hi! I have gotten to the part where I am laying the paper. As I’m looking back at the paper that is drying, there are LOTS of bubbles! I tried smoothing them out but they keep popping back up. 2 questions, am I doing something wrong and how would you suggest I fix the paper that is already laid? Thanks a lot!!
I am going to try this but wondered if anyone has tried wallpaper on the floors. I have found some wonderful patterns in wall paper and want to try it. This look so good and is economical.
I hace really dark green linoleum. Can I put that over it? Or will the greeb bleed through?
I love this. Could you put it in a raised house though? I have wood not concrete under my carpet and ugly Leno like tile. I’d really like to put this down in the kitchen and bathrooms but not sure if it would work the same. My husband is skeptical. I on the other hand am determined to do something different than tile in our home. And this almost looks like a stained concrete floor which I love. Like I mentioned, our home is on blocks so the floor underneath is ply wood. I would just like to know if it would work before I got started.
Could you do this on plywood floors? Do you need anything different?
The tutorial I used (and linked to) was done on plywood floors, I took the chance and did it on concrete. I actually think it would work better on plywood, so yup…go for it!
I thought the paper already came with this crumpled effect. It must have been very hard work but the end result was incredible, worthy of a professional. I have a small office where I will test this tutorial, I hope to obtain an equal result. Thanks for the tips, I can avoid many problems.
I love it! The floor looks fabulous! Thanks for the great tutorial.
Could you do a back spash or a counter top using this method. I love that it looks like leather. If so would you use the same polyurethane or a different kind?
Absolutely
How long do you need to wait till you stain it and my floor has bumps and wrinkles in it will these go away after it dries.
hi i seen something like this before only they used wallpaper borders on a cement floor,,i have lost the instructions, can you give me any advise on this.it looked really pretty and had random borders all lined up??? thanks judy
This is GREAT! So how has it held up over time? Floors take a beating. What do you need to do about cleaning.
Hi, I love your floor. I have finally decided to do my master bedroom which had 17 year old beige stained carpeting. I have removed the carpet and padding, and here is my question. When I removed the tackless I did so very carefully because when I did the living room and dining room while taking up the tackless there was holes where the nails were, I didn’t much care because I was putting laminate flooring in but with the paper bag floor I realize that the concrete floor must be even. What do I use to fill in the holes? I thought at first silicone… then perhaps just straight elmers glue, or thinset …. But I am not sure which I should use? I have leftover grout from the kitchen tile floor.. I am wondering if I should use that? Can you help me figure this out? The whole room has to be painted, including the baseboard (which btw I did not have to remove. there is no space between the trim on the wall. And even if there is I figured maybe a quarter round might look nice as a finishing touch. My email address is [email protected]. I am anxious to get started so I hope that you can reply quickly… You did an awesome job on your PB Floor. I did a test on the garage floor and decided rather than stain the whole room, I used RIT dye as the base color. I also added a small bottle of glitter glue to the mixture and wow it looks really pretty. It is not gaudy and when the light hits the sample the glitter is quite pretty. I used gold and silver glitter glue, and just enough to for a very subtle look… I am a new homeowner and the porcelain tile and Pergo Laminate left my bank account a little broke. I hate carpet and decided to go ahead with the remodel in the bedroom. If it turns out crappy looking after a year or so, and once my finances recover, I could always put laminate over the PB Floor. Any suggestions on the holes?
Thank you,
Bernadette Mcginnis
Could this be done for shower walls? 3 of the 4 walls are already tiled and would go over the tile. The 4th was recently demoed due to new shower valve. It will get dura rock for tile.
I personally wouldn’t use this technique for a shower, I don’t think it would hold up at all.
Me podrían pasar datos en castellano de los materiales que se necesitan
Hello –
We have several walls that has this same type of wallpaper — the walls have been brown paper bagged. Any comments on how best to tackle removal of said brown paper bag?.
I would like to do my small bathroom floor. Is it okay to paper bag it on top of the linoleum or should I pull it up.
Would the process be the same for plywood floors?
Could this be done in stages in one room? That is, do half the room then the other half? Or would the entire floor need to be done at once to ensure an even appearance and level, seamless look?
Thank you,
James
My brother did his son room this way and it looks awesome. I want to try it.
How is the floor holding up today?
What a makeover! Congrats!
Wow! I just came here after reading your motor oil accident story. Yeah, this looks so much better. It’s a shame about the paint on the concrete floors but this looks very unique. I like it.
is it slick? i want to do a mud room, but dont want anyone falling if their feet are wet.
I came upon your blog by accident, but just read through this paper floor project and Love It! Girl, you ARE ambitious! I appreciate all the photos too. This paper floor is as nice as the penny floors. Just a share: I have used the water based poly for a re-finish of hardwood and while it was great at first, it hasn’t worn well a couple of years down. But that might be because I didn’t do multiple coats. Multi coats are a must for floors I think.
I did this over Concrete, the videos I watch said to wet paper and ring out, leaving them only moist. I applied polyurethane down then placed paper and smooth out as I applied a coat of poly. I applied several coats after completely dried. I did this in bathroom in salon then loved it so much I did entire salon. Worked out great even a year later. One stylist is completely messy with her colors and stains everything. She got three times the poly. Everyone has loved the new look
Can this be done over tile? Specially bathroom/shower tile?
How well do you think this would hold up on laminate countertops? I’m redoing my kitchen to be more industrial and I think will look great! I’m curious what would be the best way to seal it as it’ll be subjected to water on occasion.
How long does the drying and cureing process take? And does it every start to tare of lift in any places?
This looks great and totally doable. How has it held up to wear and tear over the last few years? I would like to consider this for my high traffic kitchen, but not sure how it will hold up to dirt/mud/dogs.
How sweet! I have fallen in love with it!!! I’m an avid DIYer and always try to be busy with some new projects. Was searching for a unique idea to start. The paper bag floor made me stop and crazy to make it asap! In a hurry to start. Wish me good luck, Ashley! :)
Beautiful work !!! I loved it! Thanks for the ideas, I’ll do it here at home.
How does it hold up to water.. If something is spilled on it?
I love the floors but I laughed so hard at the ‘hey girl’ post. That’s totally me! My husband gets angry at the half finished projects but you know what?! It is ambition!
When you stained it did you just paint the whole area with it
I was wanting to do this out in the shop/man cave. We have an old barrel, wood stove. How do you think it would hold up underneath the stove?
lucky on getting the white spots out.
I did the floor in my bathroom, over concrete. unfortunately I didnt know I was supposed to poly the floor first. My problem is water has gone straight through and is pulling the glue to the top. Any Ideas on how to fix this ? More layers of poly? I used water based.
Hi Ashley,
Thank you for your very informative web site explaining paper bag flooring. I am now going to attempt this flooring. My question is I am using builders grade brown paper and yes I have noticed there is a side that has some sheen to it. My question would be what side is the right one? I do not want to have to do the extra steps you had to do to remedy this situation. I would like to stain it but not a dark color. Any suggestions would be greatly appreciated.
Jackie
HI!!! Could you tell me what concrete you used to patch the holes and cracks on the concrete?
Thank you for your extensive research!! I’d be lost with out you. I’m working in my bed rooms now.
So what side of the paper should you be gluing down?
If you use clear Elmer’s glue it dries kind of glossy.
Wow!! Amazing work!! The result is absolutely great! Thank you so much for the detailed intructions and tips!
can this paperbag flooring be done over particle board? The hallway by my bedrooms i believe has this under the carpet
Yes!