
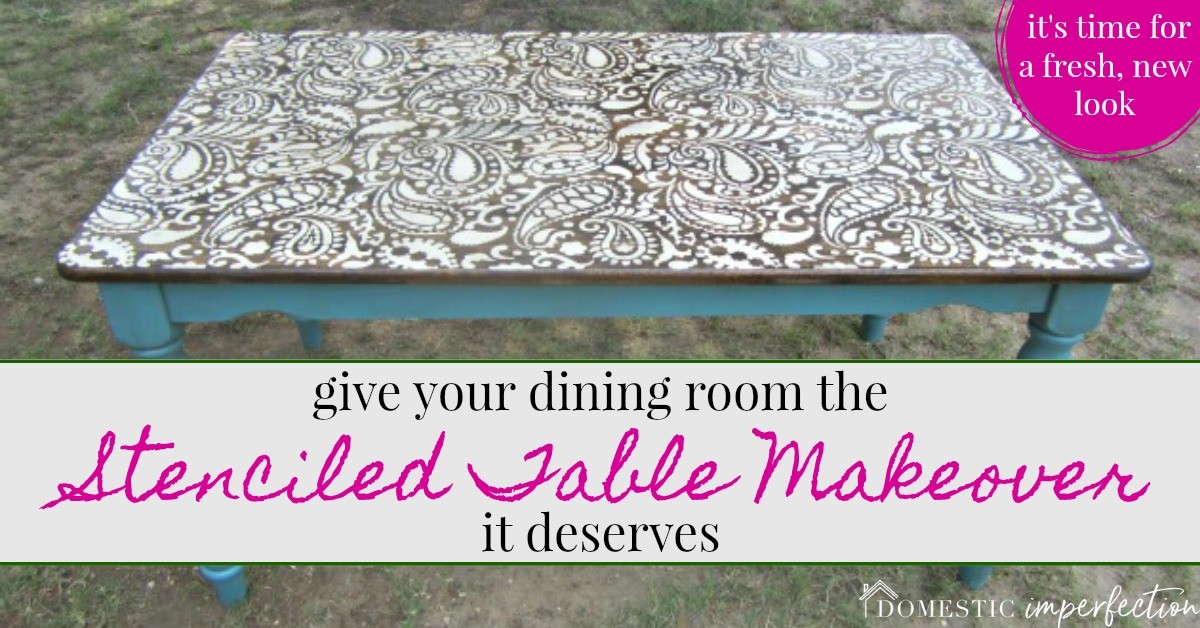
{Awesome} Paisley Stenciled Table
Let’s talk stenciling.
Now, I’ve done my fair share of stenciling, but it’s always been with a homemade stencil and it takes F.O.R.E.V.E.R. to do. Plus the final product always looks kinda wonky when you get up close and the design is very simple. Also it takes forever….that’s worth mentioning twice. So when Cutting Edge Stencils sent me a stencil to review I was super excited. I just so happened to have a spare dining room table sitting on my front porch (what, you don’t?) and it was begging to be experimented on. Before we get started with the how to, let me just say this…this table turned out awesome. I think it’s one of my favorite projects of all time. That’s saying something…also, nothing went wrong, so that’s always a nice surprise!
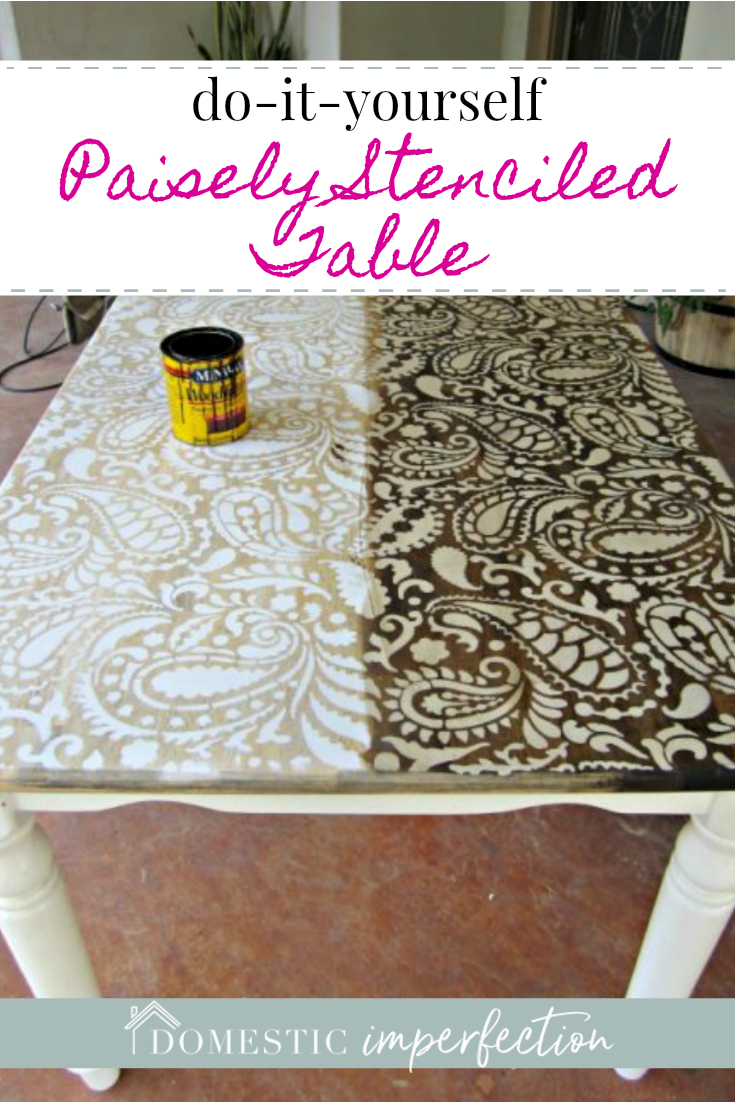
I chose the paisley allover stencil…it’s kinda country, kinda modern, and I’m kinda in love with it. No, I’m totally in love with it because these stencils are so easy to use. I’m not just saying that because they sent me a free stencil and that’s the nice thing to say…really, the whole top took me about ten minutes and turned out perfect. All I did was lay the stencil on the table, secure with a piece of tape, and apply the paint (latex paint in an eggshell finish) with a small foam roller.

It didn’t bleed or smear or anything…though I was really careful about not using too much paint. After it dried (so like two minutes) I distressed it with my sander and this is what I had.

I KNOW, I love it too. Stenciling by hand is for the birds.
Next I decided to stain over the stencil and give the table a more rustic look.

I used Dark Walnut by Minwax and applied two coats. It darkened the white paint to an uneven tan and brought out the wood grain underneath. It actually turned out just the way I wanted it too in my head…love it when that happens.
(Please soak up the dying plants, messy porch and double fly swatter yielding toddler…it does’t get much more real than this!)

As I was admiring my work I couldn’t stop looking at the legs. They just looked…blah. Boring, plain…bright. They were ruining the awesomeness of the top.
I decided to paint them turquoise and give em the old “dirty cowboy” treatment. The dirty cowboy consists of drybrushing dark stain over your painted surface, smearing, and sealing. It just makes it look like grizzled old cowboy furniture ( tutorial HERE).
To seal the top of the table I applied three coats of polycrylic (also by Minwax) and lightly sanded with 400 grit sandpaper between each coat. Doing this will give you a super smooth, super durable finish.
Here is the finished table!


I’m really wishing I had done something fun like this when it was in my dining room….everything I do for my own house is boring and white. It’s waaay more fun to paint color. I’m also wishing I had taken a close up picture of the wood grain showing behind the stain, it’s too late now though, I already gave the table to my sister-in-law.
You may also like –
15 ways to give your furniture new life
Union Jack coffee table (with a twist!)
The table looks great! I have to admit that as soon as I read that you used a Cutting Edge stencil I immediately thought, “Please, please, pleeeeeease say there is a giveaway!”. I have been dying to try one for months.
Um, WOW! That table looks fantastic. I’m super impressed!
Love love the table. Great job and cant wait for the giveaway !!
VERY pretty!!!! i am in the process of redoing my own dining room table and now you have my wheels spinning!! love, love, love!
that is awesome!!! i love it!
Nice!! I love the way the table looks. Great job!
The table looked great at every step. I especially love the stain over the paint. Jo @ Let’s Face the Music
I love it!!! Fantastic & very creative!!!! The turquoise just makes it pop!! Blessings!
Ashley, this turned out so beautifully! Your sister-in-law has a gorgeous piece, especially if she is just starting out.
I’ve seen this stencil before – Lovely Etc. did her plywood floor in this and it looks awesome! It’s worth checking out.
Cheers!
Thanks Jan! You know, I pinned her floors on pinterest a long time ago but didn’t realize it was the same design until just now. I would love to rip up my carpet and stencil/paint my bedroom floors, but we have concrete and that makes it much harder. Doesn’t mean I won’t try at some point though ;)
I think concrete would look amazing! We have a plywood floor in one room where we ripped out the carpet, but it’s so beaten up (for some reason?? Not quite sure how that happened…) that I can’t imagine any amount of leveling compound would help! But concrete, especially with some kind of buffing or polishing coat on top, might be really cool.
P.S. I’m excited for the giveaway! This would be the stencil I would pick, too. (If I won…which I probably won’t but hey! A girl can dream.)
That is just gorgeous! Now you’re making me hate my plain jane kitchen table…
I know, this table was in our house for seven years and it always looked boring. Wish I would have done this a long time ago instead of waiting until I was giving it away!
Wow!! I LOVE the way this project turned out. Can’t wait to see how you did the cowboy turquoise legs. :)
This table is fabulous and you need to copyright your “dirty cowboy” look cause’ I’m sure it will catch on! I used a stencil recently and I was very disappointed…I won’t say what kind but it starts with Martha. So glad to hear there is a stencil that works so well…come on giveaway!
It turned out great. I think I need to get that stencil, I LOVE paisley patterns!
Love it!!
Wow. That turned out gorgeous. I love all of it…the paisley, the stain, the turquoise, and the dirty cowboy technique. And the fly-swatting toddler is always a nice thing to have on hand! Visiting from cutting edge on Facebook. Following you now. Would love it if you stopped by my blog for a visit.
Thanks for sharing This.
Angie
This is REALLY spectacular!! I added this to my Trash to Treasure pin board. Not that this was Trash ; ) But the way you redid it is really creative and inspiring! Good work!!!
I die! That is the coolest table!!!! And come on, the dirty cowboy treatment!?! LOVE IT!!!!!
Love it! It came out beautifully with the stain.
I love it! I am itching to try my hand at painting furniture and this would be the perfect project to start with (just because I love stencils). :-)
How did you prepare the table for this job? Did you Sand, prime, paint, then stencil? what colors did you use? It looks amazing!
I didn’t prep the table, just sanded and stenciled onto the bare wood. The stencil is done in white paint and then stained over top with Minwax Dark Walnut and the color on the legs is Hallowed Hush by Behr. The whole thing is sealed with polycrylic. Good luck!
Did you use any polyurethane or polyacrylic on the top of the table?
Polycrylic! (though we used polyurethane on the farmhouse table we built…only because it doesn’t matter if it yellows and I still think it’s a little tougher.)
I think I have this exact table and the surface was in terrible shape. I made my own stencil using painter’s tape and it looks fabulous so far! Thanks for the great idea!
What Kind of sand paper did you use ? stenciled with white pain onto the same kind of table, & then saw that you sanded it into the wood ? does it remove the pain ? suggestions pls !!
You don’t have to sand over the paint, it’s completely fine if you want to skip that step. I did it because there were some ridges left after I stenciled, where the paint was higher than the wood. I sanded it to make it smooth, which does take off some if the paint. If you decide to sand use a smoother sandpaper (like over 150) so it doesn’t take off more than you want it too.
so as I’m reading this, i didn’t sand before I did the stencil.. the table has a coat on top on the wood, is that something that should be done is sand some of that clear finish off ? didn’t really think about it, but now that I am, I know that I had a previous stencil on the table didn’t like it and was able to remove it pretty easily with hot soapy water and a razor blade without messing up the finish on the table… will the stain not take if I don’t sand before I stencil ?
Wow that is so cool! Now I am trying to figure out what I can do that to!
Holy cow that looks fantastic! I did something similar yeeeeeeears ago and it turned out no where near as awesome as yours. I’m thinking this would be a great craft room table.
Gorgeous!
Those turquoise legs were the EXACT right way to go. Lve it!!
~K!
Want to do this for my teens desk in her room
I absolutely LOVE this table! I could really use this stencil! I’m refinishing a table just like this one for a client right now, but I’m doing more of a rustic farmhouse look. But now I’m tempted to keep it and do this technique:) LOL!
I absolutely love this table…very creative!
I absolutely love this table…very creative!
Wow!!! LOVE – gotta get me some of those stencils!!!
Shared on Pinterest and FB!
Oh this is AWESOME!!!!!! Paisley is my VERY favorite of all. I really want that stencil!
Seriously I just garbage picked a table and I have fallen madly in love with this! I just have to try it!!! I wish the stencil wasn’t so expensive… :( Takes the cheap out of trash picking!
OMG I love your table and I love the Dirty Cowboy treatment! It is perfect. I love the stencil and I love that it turned out like your head wanted it to!
This is Magnificent! I’ve been waiting for something to blow me away to redo my wooden desk. This is the perfect project. So looking into Cutting Edge stencils right now!!!
I am a new reader and I LOVE this project!!!! I have wanted to redo my kitchen table, and also a table in my living room and hallway and you have inspired me. Thank you so much, I am excited to check out your other tut’s too.
Amazing job and what an idea!!!
Awesome is right…this is such a good idea and so well executed. Thanks for sharing your creativity.
I absolutely love this!! Thank you for sharing how you did it!! Awesome!!
I just had to comment!! This is stunning!! Great Job!!!
Also, your newest follower!
I’ve been looking for a way to spruce up a side table of mine…this is IT! Your table turned out so great, I’m completely inspired.
I LOVE IT. I want one…just to find a house so I have room for one!
I just came to your blog via Pinterest – love love love!!! I have to try this one day, funnily enough I was looking at charity shop tables this morning ;)
this table is INCREDIBLE, now just package it up and mail it to me. thanks!!
So I’m pretty sure I am about to refinish this exact same table! (if not the same…very very similar) I was planning just to give it a fresh coat of paint but now you have me thinking I should stencil! You made this table look INCREDIBLE :)
Stopping by from Delightful Order :)
Very awesome;) I have tried to stencile before, needless to say had to re paint the whole thing!!!ugh;( hours spent for nothing!!!lol good to know there is a stencil that works;) I have a wardrobe cabinet for my little girls room that this would look awesome on !!!;) thanks for the post, this is a must try~;>} would love to win one
hi! I found your blog last night, quickly became addicted, and stayed up very late until i read every post/project…. ! You are amazing, and have great ideas, plus your humor is just like mine… eh ehehehehehhe…..
I found the stencil on the site you suggested, it is so expensive… :( I have a corner nook table with benches, and was thinking of re-painting it, but didnt know what to do. Now I want to do this! lol. we will see. money, money ;)
Anyways, I look forward to reading your next entry, and I have you saved in my fav’s list.
Melissa, in Olympia WA!
this is beautiful!!!!
This is so gorgeous! LOVE this technique :)
LOVE LOVE LOVE your stenciled table!
That is an amazing table! I adore it! Great job! I love Cutting Edge stencils too.
I LOVE this! You did a fantastic job, and the end product is perfect! off to try to find a table I could get away with doing this on….
Great work. This is a table I would have ignored in the store. I hate these light colored tables with white turned wood legs. I’m creative, but for some reason they offend me so much that I never would consider repurposing one. Good to know I was very wrong about that.
Just wanted to say THIS is genius. So excited to buy a stencil from them. I am picking the Lily Scroll Allover Stencil and doing the exact same thing with the top yet painting the legs and chairs a glossy rich black. Always wanted to buy an espresso rich wood dining room set that was unique yet even if it’s used- SO expensive! I pinned this to spread your awesomeness. Thanks for saving me a TON of money. EXCITED!!!=)
Oh My Goodness!! I LOVE THIS! So pretty!
This is very awesome …..I must to say your are artist. Great creativity.
LOVE!!!!!!!!!!!!!!!!!!!
Whoop, found me a new project to drive my family nutz with! They’re gonna love it :D
That turned out AWESOME!!!
Way to think outside the box!
OH MY –that is absolutely STUNNING!! Staining it took it to a whole new level of beautiful. Brilliant, gorgeous… did I mention I love it?! Pinning!
<3 Christina
Oh my heavens – that is fantastic!!!!
I love this! Honestly, I kind of like the cream legs a little more than the teal legs, but I play it safe and you clearly do not. Either way, I LOVE this project and am pinning for future use. :)
THIS is AMAZING! and I’ve been looking for just the right thing to do with my own kid stained, plain jane dining table and THIS is it!! I can’t wait to do this to my table this weekend:)
Ashley, this table turned out awesome, even more after the wood stain layers, before it was a bit plain, but once you added the stain, it enhanced the colors and became alive, I love it.
This is really amazing. I LOVE bold, graphic patterns on large surfaces like this!
SWEET! cool how it toned down the white. Great project!
JoAnn
This is totally beautiful! I wonder if my husband would kill me if I stencilled our kitchen table! Love your idea!
This is the coolest table EVER. I’ve already pinned it and sent a pic to my local stencil/paint store owner so she can look into carrying the stencils by cutting edge. VERY COOL!
OH MY I’m in serious love! The stain over the stencil is so great!! Thanks for sharing!
My current kitchen table is DYING for a remake…this is so PERFECT. Thanks for the post (found it through pinterst btw) :).
This is gorgeous! Using stain after paint created a beautiful look. I need to make up a project just to use that idea. :)
Hi, I just found you through A Glimpse Inside and am your newest follower! This turned out so beautifully, I don’t know what I can add that wasn’t said by others. I LOVE that you went with the turquoise for the legs, it really made the whole thing stand out. I LOVE the stencil, and especially the idea of being able to roll it on and that it went quickly.
I have a secretary desk that I need to do this too. I am a huge fan of paisley patterns so I hope when you have our giveaway I can win this one. Thanks so much for sharing this project with us all and for telling us about the upcoming giveaway.
This is fantastic! I love love LOVE the paisley stencil against the walnut stain and the “dirty cowboy” turquoise legs are fab. I just happen to have a spare dining room table in my basement (you are not alone…furniture hoarders unite!). I will definitely have to snag one of those stencils and give this a go. I must tell you that your witty writing style is such a delight and had me smiling through the entire post…the double fly swatter wielding toddler was the icing on the cake! Thanks for all of the great tips and laughs :)
Amy*
wow wow wow. so talented. super cute!
That is adorable!! I love love love it!
Love Love Love this! Thanks for the inspiration!!
I love this table so much that I immediately ran to the store and brought my grandmothers old drop leaf table back to life!! I use the table for my plants during winter months and I hate it during the summer bc it was so boring!! Thank you so much, u have inspired me!! I cant wait to show my table off now!
I have been trying to figure out what to do with my table and this is perfect!
We did this today, and I DO love it, BUT the stain seemed much darker and our stencils didn’t seem to stand out quite as much- I’m still wild about our table, but do you know what I may have done wrong? Because I’m gonna do this to something else, lol….I just have to think about what.
WOW! This looks awesome. And so does that fly-swatter yielding toddler. I’ve got one of them, too! ;)
Now, I am trying to figure out what I can do technique to!
This is awesome! I love it. Pinned it =) We’re moving in a few months (first time home buyers! woot woot!) and I definitely want to refurb a kitchen table instead of buying one =.
The table just kept getting better with every step! I have the same table, which is currently sitting in my teenage son’s room as a desk. I bet he’d like it more with a fun pattern on top. A stencil won’t be for him, but stripes might work. And then using stain on top to darken up the blond wood. I just might try it!
I’m a beginner at refinishing wood furniture. I am in the process of refinishing my wood dining table. I have the legs painted, but haven’t done the top yet because I hadn’t quite decided where I wanted to go with it. Now I know where I want to go with it!!! Love Paisley. Love this table. A couple of questions, if you would be so kind to answer:
1. What kind of paint did you use to stencil?
2. What sandpaper did you use and how exactly do you sand it without removing the stencil?
Cant’ wait to get started!!!
I just used regular wall paint for the stencil, but I’m sure most paints would work. To distress it I used my orbital sander..200 grit? I don’t remember, but it doesn’t really matter…just sand till your happy! Just make sure you sand the top with 400 grit sandpaper (by hand) between each coat of the finish. Have fun!
What a gorgeous table! Awesome job! :)
I love the toddler and fly swatter, and the table top. :)
Looks awesome. Very original. Found you at Mop It Up Mondays. I would love for you to share it at my Furniture Party http://www.decoratinginsanity.com/2012/05/furniture-friday-15-and-features.html
xo…mONICa
I have also Liked you on fb. Hope to see that Stencil with my name on it!!
I love this more than anything words I can write!! I am going to redo my kids play table like this….maybe tomorrow…:)
Shannon@SewSweetCottage
Your paisley table is stunning! It looked great after the first step and then it kept getting better and better!
I really like the Fusion Allover Stencil. I’ve heard a lot of great things about this company/products. I found your blog because I saw your now famous table pinned on Pinterest. New follower – glad I came over to check out your blog… you are super talented!!
AJ@queenofmynest
Love this table! Amazing job. I would love to know what you did with the chairs. I have almost this same table but in black and not sure what I would do with the chairs? Thoughts?
This is goregous!!!! Great job!
So cool and that you went for it and sanded and stained. I’m lovin’ it. I found you through Motivate me Monday at Crafts Keep Me Sane. Hope you’ll stop by my place as well.
Liz
What a perfect pattern that stencil is for your table top. And the stain really sets it off! Love it…
This is so beautiful!! What a great idea and I love the blue with it!!
That is so cool! And the fly-swatter yielding toddler is adorable!
Wow… very nice and very fantastic :) Genial
Very nice and Very fantastic. Genial! :)
Love this!
Love it….and it looks great. I am redoing a farmers table and this would be neat…we will see. Thanks for sharing.
Wow, that is gorgeous! This is a fantastic project!
I NOW know what I am doing with the table in my garage! Love this!!! LOVE, LOVE, LOVE IT!
I am IN LOVE with your table!! It turned out so great. I thought I liked it when you had it lightly sanded. THEN when I saw how you stained it, I liked it even more. Great job.
Ok, so now I need to go out and buy an extra table so I can try this out!! I absolutely love your table!!!
This is absolutely GORGEOUS!
That looks AMAZING!!!!!
that looks awesome!
WOW! This looks great! I have never stenciled anything other than a glass or two, but you make it look so easy. I am gonna have to try these Cutting Edge Stencils!
Love this! I wonder if Annie Sloans Dark wax would work for this. I guess I will be finding out :)
I LOVE This sooo much!!!! your attention to detail made for a beautiful and unique table xo
That table is amazing! I just love it
LOVE, LOVE, LOVE this table and project!! I DO have a table I’m waiting to experiment on, but couldn’t decide what to quite do with it…I think I’ve found my project! Now..to get my hands on that stencil :)
The stain over the stenciled white paint is gorgeous. I love that you can still see the wood grain.
This is definitely SUPER awesome!! I’ve never seen anyone do a paisley print on a tabletop (till now!) I love it with the turquoise legs- too freaking cool. You’re awesome for doing this!
This project turned out beautifully. I love the wood grain showing out from behind the stencil.
Traci
We love this stenciled table! Thanks for linking up to our “Strut Your Stuff Saturday.” We loved having you and hope to see you back next week! -The Sisters
Fan-flipping-tastic JOB! I will be featuring you this weekend on Feature Friday FREE-FOR-ALL! : )
Wow! Love this project!
Ashley, this is beautiful! I love the look after the stain was applied!
That looks AWESOME! I love how you did the stain and I love the colors!
Super Table ! It is truly one of the best stenciled pieces that I have ever seen. This post really makes me want to do this exact same thing to my desk top table in our home office. If I ever get around to that project – I will happily link back to you as inspiration !
This table turned out beautiful!!! I’m really digging the paisley prints right now, so I’m in love with this table. I love the effect that the stain had! I’m definitely going to have to try a project like this!
Great inspiration for me! Thanks
You know how much I love this!
Love it! Love it! Love it! Great job, Ashley! The duuurty cowboy legs were the perfect addition! :) Thanks for the inspiration! ~ Virginia @livelovediy
WOW!! I love it! This should sell for hundreds… if you were selling it. Gorgeous. I’m going to find a way to follow you…
p.s. I also love the toddler with the flyswatter… so cute!
This is amazing! The stain took it to a whole new level.
Did you do anything to prep the table? I have this EXACT table sitting in my basement and want to use it for my screen porch!
Thanks!
Found your site through the link party…LOVE this table! Absolutely love it!
That is amazing! Utterly gorgeous!
The stained stencil looks great and I think it would have looked great if it had been a coffee table, shorter legs so not so much white and more focus on the top. But the Blue, WOW! Now everything pops and gets the recognition it deserves! Groovy!
This is plain out GORGEOUS!!!!!!
I’m in awe……
Thank you so much for linking up your table! I’ve featured your post, so head on over and grab a brag button!
What a fantastic idea, I saw your image on Pinterest, I have never seen stenciling on a table top, you did a fabulous job.
Lee ☺
THIS IS AWESOME!! I want to drag my table out to the garage right now and do it. I need to find that stencil. NICE JOB!!
Ashley, it’s gorgeous! Wow! Beautiful job!
so inspired by this… is there a specific kind of paint that you used?
nope, I just used leftover wall paint!
Gorgeous! Featuring you today!!! Xo, Aimee
Unbelievable! It looks gorgeous before the stain but after…WOW! And the turquoise legs make me happy :)
what did you do with the chairs?
We didn’t have the original chairs, but the ones we were using around it we kept for our new dining table (this was our old table and I gave it to my SIL).
just out of curiosity what did the chairs look like that you put with the table once you were finished. the table looked great.
Since we built the our current dining room table (this stenciled one was our old one and I gave it away) I kept the chairs. The original chairs (that came with it) I had to leave when we moved because they wouldn’t fit in the moving van. Anyway, if I did have them I would have painted the white parts turquoise like the legs, and on the wooden seat I would have put one little paisley on the front corner and them stained over it like the top. Is it weird that I have a plan for chairs I don’t own to go with a table I gave away, lol?
Gorgeous! The turquoise really took a cute table and made it fab. :) The “dirty cowboy treatment” made me laugh.
I am featuring your chair tomorrow… Thank you so much for visiting my party!
Did I really said chair… WOW! I mean your table…♥
Oh my goodness! Love how it turned out! You did so good!
Thanks for sharing at Show & Share…featuring you in tomorrow’s party! :)
I would LOVE to buy this table……. I have been looking for a table for my dining room for months and I NEED THIS TABLE! lol You are amazing!
Just want to say, I love this blog. I don’t know how I found it but everything you do with your furniture, I am dying to do! Love it!
Omigosh!!! My kitchen table looks a lot like yours (pre face-lift) and I’ve been seriously considering replacing it because it’s not so pretty on top, stains and the love of three littles make for ugly kitchen tables. Anywho now that I’ve seen this I can’t believe I didn’t think to give the table a new do! Thanks for the inspiration!
Ashley I just did the Dirty Cowboy on my kitchen table and chair legs–they were already blue, and I adore it. Thanks so much for the tips. If I didn’t have a fake laminate table top I would so be rocking the paisley stencil as well. Right now I am really loving the look of your penny countertop…I will keep ya posted. Keep up the good work, having fun following along!
Glad my directions made sense! You really should add something cool to your tabletop…what do you have to loose? Plus, you don’t have to do pennies, I was actually thinking that river rocks, seashells, or those flat sides marbles would look great too!
Becky–The post under my name (btw I love that feature on your site, Ashley!) shows a little tabletop I covered with the flat sided marbles. I just used hot glue. It probably wouldn’t make the best surface for a kitchen/dining table because it would be IMPOSSIBLE to clean–too many gaps. But couldn’t you pour epoxy over the top to make a smooth or almost smooth surface? I did another table too, to use out by the pool, but now I might have to track down some epoxy and make a third!
Talk about making lemonade from lemons! Wow, what a transformed table. Those dirty cowboy turquoise legs: genius!
I found you on Pinterest. :) I love this table so much. Paisley is my all time favorite pattern. where can I buy this big beautiful stencil…please please tell me. :)
http://www.cuttingedgestencils.com/paisley-allover-stencil.html?category_id=12
It’s kinda expensive, but you can use it forever!
WOW! This table is so gorgeous! I have to try this – without the toddler though. Well, maybe I can borrow the grandson to help (he’s 3)? Hmmm….
this will be my memorial day project! i just bought a stencil!
Thank you for sharing this great idea. I had 73 repins of your photo on pinterest. I just completed my table today. I painted the table black and stencilled the top with maple sugar. I’m totally obsessed with the look! Thanks again.
I’m curious, what do you mean, you “stenciled the top with maple sugar”? (Sorry, I know this is not my blog, but I am intrigued :)
Maple Sugar was the color of the paint I used to stencil. It certainly is confusing the way I worded the sentence. So it is a dark cherry brown. My chairs are black with dark cherry seats.
Ooh, sounds nice! Thanks :)
I first read this post a little while ago and pinned it. Since then I have thought about it and told lots of people about this cool stencilled table. Do you realise you have just started a new trend ;) . I had to come back and read it again and leave some comment love. (I can’t remember if I did last time). Is it weird that I like to re-read blog posts (well my favs)?
I also love that your comment thingy has the option to include a blog link. I have visited quite a few of your commentor posts and enjoyed them too.
Your table is so neat I would really like to try it out for our breakfast area. what are the name of the stencils and where can they be puirchased? I am new at this but and really wanting to try this.
http://www.cuttingedgestencils.com/paisley-allover-stencil.html?category_id=12
I lived the table and would really like to try tis one ffor my breakfast area. Where can I purchase the stencils. I am ready to give this a try
WOw, I could literally cry looking at this it’s just that awesome. I need to make this!’ Thank you for your inspiration!!
I think you can patend the name “Dirty Cowboy Technique” but not the actual technique…. I’m surprised that nobody has pointed out the fact that it’s the technique that most of us use while distressing furniture or just wanting to give the color some dimension. I see it everywhere in tutorials? BUT…I’ve never heard anyone give it a name. Shanty 2 Chic says they “shanty it up”. Guess we all call it something. I just usually say I’m distressing it when I do that.
Oh no, I know I’m not original…it’s just dry brushing. I discovered it on my own way before I knew about the blogosphere, then I quickly realized it was a thing, lol.
Hey! I just did this to my table! Thanks for the info. My table looks awesome now!
Send me pics! A lot of people have done their tables like this, so I think I’m going to put together a post featuring them. Just send a before (if you have it) and one or two afters…and a link to your blog if you have one :)
Absolutely love this. I would love to do this to my pantry door! I am a paisley fanatic! How can I buy this stencil?
This would look awesome on a door…I may have to copy you :) Here is the link to the stencil… http://www.cuttingedgestencils.com/paisley-allover-stencil.html?category_id=12
I just pulled a table out of my neighbor’s trash today, and my neighbor (a different one; not the one who threw away the table) pointed me to your blog. Now not only do I have to follow you, I also have to do all this extra work to my trash table. There is simply no way I can justify circumventing this awesomeness. :) Thanks for posting!
This is gorgeous! I have a couple of questions. How sturdy is the top for someone with kids who like to draw and paint on the kitchen table and if you were to paint some chairs to go with it, what color would you choose?
I can’t really gauge it’s resistance to kids since I gave it away, though I think it would hold up pretty well. Just put plenty of poly on the top…and if you distress the stencil enough then you will never be able to tell if it gets jacked up! For the chairs…I would have painted the legs and backs in the same turquoise, then put a single paisley on one of the front corners of the seat and stained it like the top.
Hi! I found this via Pinterest, and it was so good I had to come by and comment.
Great job!
I’m completely in love with this table and your blog. Awesome work. I’m proud to have a super ugly $15 dinning room table I found at a yard sale last summer. It’s been awaiting a lovely project and this will certainly do the trick. THANKS FOR SHARING!
I am sorry to be so late on this. Can I still order this stencil? Did not see it on the site. Do you want to sell yours? :) Must feed serious paisley addiction!
Love this. Brilliant idea to use the stain over top of the stencil.
I just picked this same table from my neighbors trash Sunday night. Cute idea!
Ohmygosh, I have almost the exact table (with chairs) that will be soon be downgraded to a “craft table” as it is too small for our family and the varnish is ruined on top. Thanks for the inspiration!
Greetings from England! This table turned out really awsome! Thanks for sharing!!
Beautiful! Now to find the stencil. And a piece of furniture! Lol
Ashley, I loved your table so much that I had to have one of my own! I will be using it for a desk in my new office I’m redoing. I’m notorious for starting projects and never finishing them. So the fact that I bought the table and completed it in less than a week tells you how much I loved it! Thanks for sharing your awesomeness. I love your blog!
I tried to leave a comment on your blog, but it won’t let me unless I’m logged into wordpress.com (and I ca’t remember that login info!). But your table looks amazing! So glad you were easily able to copy my directions…don’t you wish you could show the craigslist people what you turned their old crappy table into?
I loooove this idea. I have some crappy farmhouse tables that are begging for love.
So, I have a table that’s mostly laminate. Think I could accomplish this look somehow?? Or am I dreaming?
Hmmm, I don’t know…I’ve never worked with laminate. Is it fake wood laminate? If so, you could just stencil over it and put a finish on for a similar look.
Could you do this technique on an already stained table, because this would be beautiful for my coffee table!?
Totally, all you would have to do is stencil right over what you already have, give it a super fine sanding (400 grit, just to make the paint smooth) and coat it in polycrylic. Easy…your finished product will be a bit more crisp and clean looking than my table, but that’s not necessarily a bad thing.
Awesome! I may just have to try this out!
Hi, where are you from? Im desperate for one of those stencils but cant find any in NZ :( Have even searched the usual auction websites too, any suggestions would be great. Thank you :)
I’m in Texas, but you can buy them online… no need to hunt through stores! Here is the one I used http://www.cuttingedgestencils.com/paisley-allover-stencil.html
if you use the code DIM10, it will take 10% off the price :)
Gorgeous result! And, yes, color is WAY more fun to paint than white…
I also love the fly-swatter-yielding toddler. You’ve just captured the glamour that is my life, too. :)
That table is absolutely to die for! So adorable!! It turned out really great, given me some ideas for fixing up some old end tables!
I love this. not going to lie tho, I liked it better with the white legs :) it is deff a way to fun- up a boring table(:
Your allowed to like it better in white, I know your not the only one! I did think it would have looked cool if I had stained it in a natural/light color and kept the legs white. It would have looked very…I don’t know…serene? Perhaps on a future table :)
I am so in love with this idea, it blows the doors wide open for re-doing furniture!! I’m gonna have to try this soon!!
So cool! I am going to do something like this soon with a coffee table. Thanks for sharing! I hope you don’t find if I post this on my blog soon…with links back to you, of course!
This is one of my favorite DIY’s ever. What means did you use to stain? I am right in the midst of this project but my stain is coming out extremely streaky and it is driving me nuts! Did you just brush it on with a paint brush or did you use a rag?
I always use a rag to stain. Be sure to apply it generously and be fairly quick to wipe it off.
OMG! It’s amazing! I NEEEEEEEEED to do this. Thanks for sharing.
Gorgeous! You could get big bucks for that work of art. I have a table just sitting around waiting to be painted too. I can’t wait to copy you! Thanks!
This is so cooool it came out AWESOME!!!! Thanx for sharing ;)
i love this:) i’ve never seen stenciling covered w stain. stunning. i also would not have tho’t of the turquoise legs. too cool:)
This is seven ways of awesome. I have had two unfinished wood lingerie chests for 5 years and have not finished them because I can’t settle on what I wanted to do with them. I may have found my technique! Ellen
Hi, I just wanted to stop by and tell you that after lusting over your amazing table, I had to try it. I’m quite proud of it, and because of you, I no longer have a fear of redoing furniture. Thanks for making it so easy and inspiring me.
Your table looks amazing! I love the green with the brown stain…I might just have to do green on my next one!
I love this stencil!! I was going to buy it, but it’s so expensive :(
I had over 3 friends this morning and we did a pedestal table for me, and a rectangle table with bookshelf in the middle on top for another friend. Had so much fun and they turned out great!
I love it! I like how you wrapped the stencil around the edges too. Do you mind if I share it on my facebook page?
That would be great – if you shared on Facebook!
Okay, I finished my first painting project! Here is the link to my blog post. I mentioned your blog many times, and included the website and link so readers can come here for complete instructions.
It turned out great! That end table is EXACTLY the style I am looking for for my bedside tables…and you got it for $4! What a steal!
I decided to refinish my coffee table that I spent a ton on & hated. I am in the process of staining it now, any suggestions on how to keep people from messing up all my hard work with condensation rings? coasters never seem to make it under glasses in my house!
As my furniture is covered in condensation rings I’m not the best person to ask…we don’t even own coasters :) If you put a few coats of polyurathane or polycrylic on your coffee table the rings will wipe right up and no permanent damage should have been done. At least that’s how it works in my house…my unfinished trunk/coffee table is a different story though.
So, I realize I’m RATHER late to this party, BUT….holy cow, Ima in love with that table. I got to your site from Better After, she was showing your “inlay” stencil table. I had to check out your paisley that you kept mentioning. LOVE, LOVE, LOVE the turquoise, what a perfect choice. And I really like the staining OVER the stencil. Kudos to you, ’cause stencils scare the crap out of me and I just generally stay away from them. I’m a paint it all one color kind of girl, though I’ve done a couple two tone, paint and stain things lately. Anyway……thanks for sharing this and all your step by step tutorial. Your finished product is gorgeous!
The bottom is an aweful color
I just found you on Pinterest. I love this table, I have it in my craft room. What a fantastic idea!
Found this while searching Pinterest for ideas for a table/chairs. This is PERFECT! Paisley has always been my fav, even when it wasn’t popular. Now that there’s a stencil? So excited to put this to good use on a table/chairs we were going to give away. Thanks for sharing!!
O.M.G!!! As I read your tutorial & my heart started pounding with each step, I KNEW this was something I had to bookmark & try!!!! love, Love, LOVE this idea!! Originally I came across your blog because of your pennytop counter, but I am loving ALL of your creative & fearless ideas. Thanks for sharing!! :)
Glad you like it! Let me know if you run into any questions along the way. I seriously love that your so excited…this kind of response is the whole reason I blog about my projects :)
Can’t wait to get started on stenciling my own table. But I wonder…the table I have is a cheap wood table, probably mainly wood veneer. It was in our sunroom for several years, so it has some water damage and definitely needs to be prepped appropriately before I stencil it. Did you take any prior finish off the table before you began? If so, what’s the best way to go about that? I want this to last awhile, so I want to make sure I give it the TLC it needs to be successful. Thanks for our help!
My table was solid wood so I sanded all the original finish off. I would do the same with veneer, but you have to be super careful not to sand past the veneer or else the stain won’t look right. If you can still see some water damage after sanding it might still be alright, if your stencil is busy enough…and if it’s too damaged to sand down and stain you could just paint it and then stencil it. Hope that helps!
I LOVE!!! how this table turned out! I now need to find a cheap table and do this to it and move into a bigger apartment just to have a table that looks this beautiful!
Oh my gosh that is AWESOME!
xo,
janmloves.blogspot.com
Ashley…You really did a beautiful (AWESOME!) job on this table! I not only enjoyed reading your tutorial, but was drawn in with the whole process, down to the detail of your toddler with the fly swatter. LOL! You are a delightful young woman and it’s a blessing to see you succeed with your gifts and talents. Thanks for sharing!
I have a Paisley crush this is so amazing
Very nice work!
Even if I prefer the white legs
Hi! You have so many comments on this post – but you deserve them, and many more! I love this remake!! You did a fabulous job. Thank you for the tutorial and inspiration! Blessings, Janiene
It looks amazing! I’m going to try this too! Thank you!
Complete awesomeness
LOVE!!! I loved this so much I decides to give it a go myself!!! I’m curious though, what kind of paint dis you use for the stenciling? I’m curious if chalk paint would work? Thanks for sharing your talent!
I just used leftover wall paint to stencil. Eggshell finish, I think. Any kind of paint would work, but just know that the less glossy a paint the more stain it will soak up. So you can use chalk paint, but I’m going to guess it will turn out being more of a tone on tone effect. That’s not a bad thing, as long as that’s the look your going for!
Hello,
Do you know of an alternative place to purchase this stencil at a cheaper price or a similar stencil. The link to this particular stencil is awfully pricey :-/
Thanks,
Nora
I know it’s pricey, sorry. Sometimes they have sales…but they don’t sell to retailers so you won’t find the same stencil cheaper elsewhere. I’m not sure of any similar ones either, I would just have to google it. Sorry I can’t be more helpful!
Ashley,
I’m in the middle of this project but when I stained it the white became extremely uneven and streaky. The first two coats I did w.a rag and with the direction of the grain and for the third I used a rag in circular motions but its still very uneven. I’m fearful of adding more stain because I don’t want to take away from the pattern. The white is now a light tan. Help!!!
After you applied the stain, how long did you wait until you rubbed it off? I didn’t let mine sit for long at all, I quickly applied it to the entire table then immediately started buffing it off.
Can’t wait to try it on my kitchen table!!!
This is such a beautiful table!!! I have several questions for you? What kind of paint did you use, was it chalk paint? When you sanded down after you finised what kind of sander did you use (sandpaper, or sand brush)? The reason i ask is because i finished a table but i have no idea what to place on the top until now. However, i’m aftraid to sand over the stencil and rub off the paint… What do i do?
I used regular wall paint, eggshell I think. Chalk paint is too flat and would soak up a lot of stain and turn out very brown… Which is fine if that is the look you are going for. I sanded with an orbital sander, but that is optional, I just wanted it to look a little roughed up. It did smooth out the paint though, if you skip that it might be slightly raised where the paint meets the wood. Then make sure and finish with a few coats of poly and your all set! Hope that helps!
that looks great!! I’m trying to paint mine with some stencils too!!!
I love the table and I have a tip. If you use repositionable adheasive on the stencil it wont shift and there is much less chance of paint bleeding under the edges. Especially good for beginners.
What kind of paint did you use for the stenciling? I am loving this and want to try it, but I’ve never done anything like this EVER so I want to get it right. Thanks!
For the stencil on the table I want to say I used an eggshell wall paint. The glossier the paint the less the stain will show up over the stencil, so go gloss for a really white stencil and flat for a more tone on tone effect. Hope that helps!
Did you “dirty cowboy” before or after you applied the polycrylic? I hadn’t planned on doing it, but after putting on the poly, the paint on the legs started coming off! AAAARRRGGHHH! So rather than busting the paint back out, I’m thinking of playing up some of the imperfections. I was going to sand the first coat of poly and then distress. I guess that means another coat of poly (haaaaaate). Though maybe since I’m using the miniwax polyshade I can get away without doing more polycrilic. The polyshade stain is supposed to be poly and stain in one.
The table top is okay – I did like yours: stencil, distress, stain (minwax espresso polyshade). I’ve got some brush marks up there, but I don’t think I even need to put any up there. The stain or paint didn’t run on top thank goodness!
I’m impatient – can you tell?
I’m doing this to a table my late uncle built (after I strip the years of bad paint jobs done to it) and was wondering if the giveaway has been given away for the stencil! I’m sure I am a day (or few months) late but hey…it’s worth a try! LOVE this table
i love this table…very nice
What a beautiful result and a great idea! I love how pretty the table looked after staining, and the blue was a great addition.
Thanks so much for sharing Valerie, I appreciate it!
Did you have to sand the table before staining?
I sanded it lightly before staining because I wanted it to be as smooth as possible before I put the finish on. I did sand it completely before I stenciled it though.
I’m churning out a new blog post and wanted to trackback to give credit where due and realized you were my inspiration. So THAT’S how I stumbled upon you! :) I just wanted to tell you 1) to be on the look out for a shout out and 2) that the piece I did (that you inspired) was my first ever paid-for DIY. Now I’m wondering if I owe you some sort of cut for inspiration or something. Ok – back to the blog. ~Dee @deeconstructed.com
I am new to this…So the stain keeps the paint from chipping & you can wash this table and not have to worry about it? Would you recommend this for someone with toddlers- will it be easy to keep clean or will I ruin it when I have to wash off marker, syrup, play dough, etc??? LOVE this and so want to do it to my table! Just want to make sure it’s worth it with my kids!
@Ashley Love how it turned out! and you’ve made it seem so simple.. cant wait to try something similar :)
Hi! Love! Love the table! What type of white paint did you use?
For the stencil on the table I want to say I used an eggshell wall paint. The glossier the paint the less the stain will show up over the stencil, so go gloss for a really white stencil and flat for a more tone on tone effect. Hope that helps!
Love this table!! I actually have done it to my own old kitchen table… of course i made the mistake of deciding i could make my own stencil instead of paying and it took 6 days and raw finger tips.
one question – after you stained, did you finish it with anything?? I want to make sure it stays protected from spills and cleaning it, but not sure if I can use just a basic matt spray finish that I have around the house or if i need to get the finish recommended on the minwax jar. any suggestions?
I’ve never used spray finish before so I can’t tell you if that’s a genius idea or a terrible one. For all my tabletops I’ve used either polcrylic or polyurathane…I usually do three coats and sand with 400 grit sandpaper between each one. And kudos to you for actually making your own stencil, that’s some hardcore DIY and determination right there! :)
I was wondering when you said you distressed the pattern, after initially stenciling it, how did the painted pattern not come off?? Did you use latex paint?? Thx! This is amazing!
Yup, I used latex paint. I just sanded it gently using a fine grit sandpaper (400?). The main goal was just to smooth everything out so that there were’t any paint ridges on the final product. Are you going to attempt your own table? Good luck, feel free to shoot me an e-mail or comment if you run into any problems!
this is stunning!
All I can say is FABULOUS! We just purchased a vintage horse trailer and are in the process of redoing the living quarters. Think I will be building a drop down kitchen table with this stencil and technique. Love love love it!
Next time make sure your new sister-in-law will last for
longer than one day before you give her a hand-painted table!
I stumbled upon your website through a Pinterest post. I love the paisley design. Not only does this look great on furniture… but it would also look great painted on a wall! Oh the possibilities!
I used idea to make a growth chart and over the paint it won’t dry. Should it take more than 24hours to dry?? It’s just sitting on top of the paint. Help!
Don’t worry, it’s okay and totally save-able! When you applied the stain you should have wiped it on, let it sit for just a few seconds and them wiped it (more like buffed it) off. Even if you did that it will still be tacky over the painted parts (mine always is), just poly right over it and it will be fine!
Did your latex paint now smear with the oil based stain? Im aftaid of wiping my table. I just finished stenciling, tomorrow I plan to do the stain but im afraid of the stain breaking down the latex paint.
I have attempted this project and I’m still in the middle of it! I need a little advice, though…. I stenciled, but didn’t sand over it. I then applied a cherry stain (wanting to closely match some existing chairs) and the stain is WAY too light. So…I decided to use a darker red stain on the second coat….and it’s still not dark. It’s like the light colored wood just went to one color and don’t want to budge!!! What do I do!?!? Any advice would be greatly appreciated.
Do you know what kind of wood the table is made of? If it’s a closed pore wood they don’t soak up stain well (I am trying to stain something maple and it’s not going very well). I would do one of three things 1) just keep adding stain. Sometimes I have to do six coats to get the color I want, 2) Try a much darker stain right over top of the others, or 3) sand it down to bare wood and start over. This would suck to have to do, but the second time I would stencil, use a prestain, then use a darker stain.
What kind of paintdidou use for this? I am coping you and the stencil doesn’t show up as well on mine. Help!
It sounds like you used to flat of a paint? The glossier the paint the less the stain will show up over the stencil, so go gloss for a really white stencil and flat for a more tone on tone effect.
Hi did you use flat, eggshell, or semi gloss to paint the stencil on the top of the table?
I used eggshell.
Hey Ashley! Ok, so here it is…I started following you and your blog when I stumbled across this table on Pinterest. And I love you. You know that right? RIGHT?!? Well I did it. I finally did it! I stenciled my kitchen table! With hidden Mickeys too because that’s how Disney freaks roll! Come over and see it!!!
Hi – I am in the processing of doing this to my table! So excited. But how did you sand over the white paint without all the paint coming off too?? I’m nervous to try that…. why did you sand over your stencil??
I just used a super fine sandpaper to go over it because I wanted to even out the stencil. It was slightly raised over the parts where there wasn’t paint and I wanted it to be smooth. You can totally skip that step if it makes you nervous!
I’ve been admiring this table for quite some time, and have been thinking of doing something similar to some plywood to use as a countertop in my laundry room. Instead of using a wood stain over the white stencil, I want to do a color wash (using a paint/water mixture…like a whitewash, but with blue paint instead). I’ve been searching the internet for days, and I’ve found several color washing tutorials, several stenciling tutorials, but nothing quite like what I have in mind. Have you ever tried anything like this?
I’ve never tried that, but I think it would work just fine. If the color washing makes you nervous then you could also use colored stain, it comes in blue (and a bunch of other colors). I would just try it out on a scrap piece of wood…though I had never seen the stain over a stencil thing done before, I just went for it. My experiments don’t always turn out so well though!
I finished my table a few days ago and I am so in love with it!! Thank you! Here is my completed table: http://www.ramblingsofaheartmomma.com/2013/06/diy-stenciled-table-top.html
hey I just tried this method but I used a oil based spray paint on it. let the stain sit about 2 hours, wasnt getting any residue off when I wiped it, but when I wiped on the first coat of polyurethane (everything is oil based) its like it smeared the dark stain into the white paint and really looks unnatural. what could I do to fix it? I was thinking either I have 220 girt paper lightly across it or I have a 320 sponge i use in between poly coats i could use to try to “clean” the white but not kill off the stain. then how long shoud I wait to try to poly again since I plan on using about 3 coats of gloss?
I wish I had a clear answer for you, but I’m not really sure. I avoid oil based stuff because it’s always such a pain. If it were me I would probably try to sand it down really lightly and let everything dry for 24 hours before applying the next coat.
hey I just tried this method but I used a oil based spray paint on it. let the stain sit about 2 hours, wasnt getting any residue off when I wiped it, but when I wiped on the first coat of polyurethane (everything is oil based) its like it smeared the dark stain into the white paint and really looks unnatural. what could I do to fix it? I was thinking either I have 220 girt paper lightly across it or I have a 320 sponge i use in between poly coats i could use to try to “clean” the white but not kill off the stain. then how long shoud I wait to try to poly again since I plan on using about 3 coats of gloss? sorry if a double post, i didnt see it show up before.
Do you think blue paint would work as well as the white paint with the stain? I’ve never stained over colors.
Your tabletop is absolutely beautiful! Makes me want to do that to my 35 year old table that’s been in my dining room all these years!
waouuuuuu….c’est magnifique…..bravo
The table’s looks great. Great Creativity. And i must to say you are a genius and great artist.
Giiiiirl… you have made me so happy with this!
You inspired me! I’d like to send you photos of my newly redone table! :) How can I do that?
Wow, how depressing is that this, not the write-up but the variety of sheep who invest in in to this crap.
I stumbled across this idea earlier in the year and decided to try the stain-over-stencil idea as I love the effect! Unfortunately I am relatively new to stains, and I had a few problems with it, mainly because I was using a gel stain that went on waaaay too thick and then entirely covered up the stencil. But I gently sanded/distressed it back through the finish, then touched up the stencil with more paint and got smarter with the stain… so, in the end it worked. But to save a LOT of effort I would definitely recommend using regular stain, not gel stain. :)
Hi!
Thank you so much for the great inspiration and tutorial. I actually got up the courage to try this out (I am usually pretty bad at this kind of thing, FYI) and my table turned out great!
Yay, that’s so great to hear!
This is awesome, a great idea that turned into a marvellous table.
Want to try it some time.
Can you tell me what type of white paint did you use???? I would like to make sure that wax will cover it.Thanks.Zuzanna
I used regular latex paint in an eggshell sheen.
Love, love this table. Going to take the plunge and try this on my existing dining room table this weekend! One question….I do not own an orbital sander. In preparation, would manual sanding or using a sanding block work? I’m hoping so as to not have the expense of buying a sander. Thanks for being generous with your time in answering all the questions about your great project!
What type of white paint did you use? I didn’t see it in the description.
I used white latex paint in an eggshell finish. Here is the thing with staining over your stencil…..the flatter the paint you use the more of the satin is going to get absorbed. So if you want a bright white design you will need to use a glossy paint, and if you want something really subtle use flatter paint.
Of all the beautiful projects I have seen on Pinterest, your table is my favorite. Thank you for sharing! I am about to re-create your project on my kitchen tabletop and had a couple quick questions. Now that it has been over a year since you posted, how has the table and design held up? In hindsight would you do anything differently? What sheen of white paint did you use – flat, egg shell, satin? Do you think it would matter?
Thanks!
Just wanted to say thank you for the inspiration. I just finished a similiar project on my kitchen table and wanted to share it with you. I don’t know how to upload a picture to these comments, so here is a link to the photo on my facebook. Thanks again!
https://www.facebook.com/photo.php?fbid=10151924422316895&set=a.10151924420281895.1073741835.634521894&type=1&theater
That looks fantastic…and your table is HUGE! You must have some amazing family gatherings around that thing. Also, I went onto your timeline (cause I like to put a face with a name) and saw that craft paint mess. OH MY GOODNESS. Did it ever come out? I know my time is drawing near for something like that to happen, there just too much tempting paint around here.
Would you believe that the previous home owners left that table with the house? We were happy to inherit it when we moved in!
I really try to have a home with “unique and personal” touches, but I’d have to say our one-of-a-kind stairs was a bit much for me! That is when I discovered my youngest son had an artistic side :) Unfortunately, even after much dedicated work, I wasn’t able to fully remove it from the carpet. On the positive note, we pulled up the carpet on the stairs, where most of the masterpiece was, and discovered some beautiful hardwood underneath. There is still a trace of the stain in our foyer, but in a house with 4 kids seven and under, I am pretty used to stains and other evidences of well lived in home :)
I wanna be your sister in law
great table i will be biting your style and use this on my kitchen/ dining table
Is the stain oil or water based?
I always use oil based stain
What kind of paint was used in the stenciling?
Latex paint with an eggshell finish
i was hoping you knew what color you painted over the white legs….also if you had the chairs what would you have done with them ( color,etc)?
The blue color is called Hallowed Hush, made by Behr (Home Depot). If I would have had chairs I probably would have painted the legs and the backs the blue color and given it the same dirty cowboy treatment, and stained the seats, no stencil. Or maybe put on little paisley in the front corner of each chair.
i love this table! beautiful. something i would never have tho’t of in my wildest imagination:)
Have you ever considered about adding a little bit more than just your articles?
I mean, what you say is important and all. But think about if you added some great visuals or video clips to give your posts more, “pop”!
Your content is excellent but with images and videos, this blog could undeniably be one of
the most beneficial in its field. Terrific blog!
Wondering if you just did one coat of paint on the stencil?
Yes, one coat.
Did your latex paint smear with the oil based stain? Im afraid of wiping my table. I just finished stenciling, tomorrow I plan to do the stain but im afraid of the stain breaking down the latex paint.
You won’t have any problems, I promise. I put stain over paint on a large chunk of my projects and have never had any issues.
This table is so beautiful, I decide to craft my own … here you can see the result. http://oderose.ca/?page_id=71
I didi reference your site :o)
Thank you for that wonderful idea!
Love this table! Question…did you wipe off the stain after you painted it, or did you simply just paint over the white stencil?
About how long did it take for each step to dry? A short time for the light coat of white paint but what about the stain and the 3 layers of sealer? I’m dying to do this on my table before my Bunco group comes over but I want to make sure I have enough time and it won’t be tacky for the players! Thanks so much.
All the layers dry pretty quickly (the stain takes the longest). I’d say if you start at least 48 hours before bunco your table should be good to go. The sealer dries to the touch in about an hour, but it will need to let it sit untouched for at least 24 to let it cure before using it.
Wow, what a BEAUTIFUL table – so creative! I’m just discovering this today (11/22/14), more than two years after you did this. I hope the finish is holding up well! This is just in time for me, because I have a gift dining room table that is screaming for a makeover, and after much searching and pinning, I think I have finally found “the one” that speaks to me. Yay! :)
Hi there, this is awesome and I am currently in the process of doing the exact same thing to my exact same table! However, I just started staining with Dark Walnut and the white part is getting totally too dark and the wood isn’t picking up the stain as well, so instead of providing greater contrast, its making the whole thing look very muted :( so sad! what am i doing wrong, do you have any idea?? and can i fix it? please help!
thank you, casey
My paint color turned gray and I used the same exact stain and My table was basically the same one only smaller, and it didn’t change the wood colot very much either. Idk what I did wrong!
I have learn some just right stuff here. Definitely worth bookmarking for
revisiting. I surprise how so much effort you place to make this
kind of excellent informative website.
Wow! Amazing table. I am trying it in my little desk.
I love your paisley table!! Do you still have that stencil and would you be willing to part with it? I would love to buy it from you! Message me
I love what you’ve done with your pieces, they are so pretty and the photos are beautifully styled.
Wow what a beautiful table! Is there a special kind of paint you used? I didn’t see that mentioned…..nor a list of supplies. Please share that. Thank you so much for the post. Jules:)
Thanks girl! Yeah, the directions in this post aren’t the best, but this stenciled table post I did has much better ones – https://wildfireinteriors.com/2014/08/stenciled-farmhouse-table-country-living-magazine/
What kind of paint did you use on the stencil?
Regular latex paint in an eggshell finish
Hi Ashley! I’ve decided to do this project on my own kitchen table. However, I am a complete (and I mean COMPLETE) DIY novice. So this is probably the most basic question you’ll ever be asked – what kind of white paint did you use? Thank you so much in advance :-).
I actually get asked this question all the time :) I used regular latex wall paint in an eggshell finish. The glossier the paint you use the less stain it will absorb and the brighter the pattern. So if you want something tone on tone, get flat, and if you want a bright pattern use gloss.
Thank you so very much Ashley. That’s exactly what I needed to know. For this project I don’t want too much absorption, so now I know to use a glossier paint. Thank you again :-).
What kind of paint do you use? Is it a satin or flat?
Satin.
Hi! I am in love with this table and mine is already in the works but I have run into a problem. I followed the instructions for the type of paint on the stencil instructions and not yours. So I have stenciled using a craft acrylic which is very flat. I just read how you used a glossier paint so the stain doesn’t absorb as much. I do not want this stencil to be brown! :( Do you have any suggestions? I thought maybe going over it with a second coat of some kind of clear coat?? Maybe my best bet would to just go over it again with a white gloss paint. Thoughts??
Hi! I’m an editor for Remodelaholic.com and am writing to request permission to use one of your table photos in an upcoming post. We would like to feature this in a round up and would include a backlink and clear credit to you.
Additionally, we routinely publish round-up style posts on our site and if you’re willing to allow us to use one photo from other posts you’ve done, we would love to add you to our directory of sites to feature. As a bonus, your site would then be on our radar for possible Facebook shares as well.
Please let me know if this would work for you. Thanks for your consideration!
Kimberly
Hi Kimberly! Yes, you are more than welcome to feature my table in a round-up and add me to the directory.
Wow! I hate doing something with wood because I always break it up. But, this looks so simple for me !! I love it and I will try to make a new table for my family. Thanks for the inspiration!!
Your blog is very informative. I have solved my many problems with the help of your articles. In the way, you write is very amazing, it increases my interest and I read more and more. Thanks.
wow,am in love with this and i must try by signing up into the links you provided and buying 1 cool stencil.
Natasha,natural aquarium hobbyist, http://aquariahobbyist.com.
This is my first time using chalk paint, and let me tell you it was so easy. I painted my bedroom set from black to white with this paint and it was so easy. I only needed one and a half cans for everything. I am talking about 2 night stands, 1 dresser a bed and 1 chest. And I had to do two coats bc I was going from dark to light. Love this paint I will definitely be using it again.
Your project was the inspiration for my first of many projects. I get so many compliments on things that I have done. I am now dabbling in chalk painting on wooden furniture. But my favorite are my stencil under stain projects. Thank you!
Hello, I just want to know what is the white paint? Is it acrylic or chalk paint or something else? Thank you!
It is regular latex paint in an eggshell finish.
Woww, so much talent. Awesome job! I would love to have a table like these! Thanks for sharing!
This is the easiest thing to do, I just got to tell you after I red your post a week ago. I went to buy a used retro table. And just copied what you did. SOO easy to do. Thank you for sharing Ashley!
How do I get a free paisley or other stencil to you. Thanks
I want one too! You clever girl, i love love LOVE turquoise, and would never have thought to do that. I have an old table with “leaves”. I dont think the stencil would work as beautifully, do you?
Can you provide instructions for when you applied the stain? I get confused there. Thanks!
I applied it after the paint was dry on the stencil (roughly 10 minutes or so).
I have tried this with this exact stencil! I’m having a hard time lining up the stencil after each section. Any ideas?
Hello,
Would you know the stain would go over white chalk paint just as nice?
Kindly,
Jeanne
This table looks amazing! I was inspired. I bought the stencil but I can’t figure out how to make it continue . . . Horizontally. I got it vertically but I have a big line down the center where I can’t seem to figure out how to make it blend. I looked for a tutorial but all I found were tutorials using stencils that were stand alone . . . That is they were not a pattern that continued like the all over paisley. Do you have tips or know where there are directions for this?
How beautiful! Paper cutting requires a pair of dexterous hands.
Awwww! The result looks so awesome!
Wow it’s such a cool idea. Any suggestions on how to remove the stains left by the paint?
amazing table, i was searching for the same design, thanks for sharing it.
thanks for sharing it.
Its very well written; I love what youvegot to say
Nice table Even CEO of Wikivela.com is impressed
WOW Ashley. what an art work. table work is amazing and i agree with one of your line that its legs are plain n bright. They were ruining the awesomeness of the top. but still its nice work.
well written
I just loved the finished table,keep posting
Your art work awe inspiring.It ll looks amazing.Precision and quality is awesome.kEEP THIS UP
Amazing work, great job!
Amazing post, I am in between decorating my home and definitely going to go with these tables designs.
You have given a good bit of information. I was thinking to buy my home furniture. Right now, then read your blog. I have got very useful information from the. blog,,,,,, Specially that table…WOW
Thank you for the inspiration! Beautiful project ;)
This design is really amazing, i think should have in my room :-D
The article is bookmarked :-)
Minwax is a great product. Cheap and readily available on amazon or home depot. I use their spar urethane for doors and outdoor patio furniture. Works like a charm. Thanks for sharing. I love the design!
Nice! I also want try. https://www.nytimes.com/
Tnx for you great article for android.you fix my problem.
This table is really on a next level. and a perfect example for newly made homes.
The table ended up delightful!
Thanks so much, I just may revisit to try out the same thing myself <3
Awesome Table Designs !
I have never expected to see such a lovely piece of art that is more then amazing to see for someone who is in love with the art. I am glad you shared this useful topic and its really interesting. I appreciate this thing and got amazed to read all.
Love this
Awesome! I just need to get that stencil, Love paisley patterns! Amazing Luxury
You Know I’m really wishing I had done something fun like this…I’m Mad blogger!!!
This one looks a must try for sure!!
Wow, that is very good tables look amazing I am very much impressed!
I love the table and would love to get the stencil can you tell me where to buy one please.
Excellent tutorial. No wonder it’s gotten so many good reviews. The addition of stain really makes it look amazing.
What a great article share. A great contribution especially for someone looking forward to buying a car subwoofer, amplifier and enclosure. If anybody wants to install a new one, this is the most effective share, that will be very helpful for best choice. Thanks a lot for the post.
Thanks for sharing this awesome trick.
This is so beautiful! I wish I can do something similar for my room!
I’ve read this blog, this is a great blog and great information.
Thanks sharing information about Embroidery Digitizing and designs
Nice!! I love the way the table looks. Great job! Thanks
Wow, that is so beautiful! Now I am trying to figure out what I can do that too!
Awesome!! Thanks for sharing your creativity. This is such a good idea and so well executed.
LOOKS NICE THANKS!
This Blog is Awesome & Useful
Applesplus Best Shoping Site
I anticipate that you will thank for your season of this marvelous read!!! I definately welcome every single bit of it and I have you bookmarked to take a gander at new stuff of your blog a particular fundamental read blog!
Amazingly accommodating post. This is my first time I visit here. I found such countless interesting stuff in your blog especially its trade. Really its phenomenal article. Keep it up.
Your website is really cool and this is a great inspiring article. Thank you so much
wow, great, I was wondering how to cure acne naturally. and found your site by google, learned a lot, now i’m a bit clear. I’ve bookmark your site and also add rss. keep us updated.
Great post full of useful tips! My site is fairly new and I am also having a hard time getting my readers to leave comments. Analytics shows they are coming to the site but I have a feeling “nobody wants to be first”
Hey – great blog, just looking around some blogs, seems a really nice platform you are using. I’m currently using WordPress for a few of my blogs but looking to change one of them over to a platform similar to yours as a trial run. Anything in particular you would recommend about it…..
Thanks Jan! You know, I pinned her floors on pinterest a long time ago but didn’t realize it was the same design until just now. I would love to rip up my carpet and stencil/paint my bedroom floors, but we have concrete and that makes it much harder. Doesn’t mean I won’t try at some point though …
Applesplus Best Shoping Site
Thanks for Your Support. This Blog is Awesome & Helpful. All the Articles are the Best.
Applesplus Best Shoping Site
Wow, its amazing creativity. But I have one question.
Is it washable or not?
Allen Moreno is a 30-year-old secretary at a law firm who enjoys coin master hack, going to the movies and helping old ladies across the road.
I just shared a platform where you can catch mirror apk’s and more about reviews of your favourite products.
All the content in this post are real and unique. Keep it up.
Best Gaming Mouse
Like!! Really appreciate you sharing this blog post.Really thank you! Keep writing.
You made a master piece no one can creat like this.
Keep work
Do it on glass table.
This is REALLY spectacular!! I added this to my Trash to Treasure pin board. Not that this was Trash ; ) But the way you redid it is really creative and inspiring! Good work!!!
Thanks Jan! You know, I pinned her floors on pinterest a long time ago but didn’t realize it was the same design until just now. I would love to rip up my carpet and stencil/paint my bedroom floors, but we have concrete and that makes it much harder. Doesn’t mean I won’t try at some point though .
Thank you for a wonderful post! The table looks absolutely wonderful!
Stenciled table ideas are really amazing, love it!
Really appreciate you sharing this post. Thank you very much! Keep writing!