
Nursery Sign Semi Success
So the saga of the nursery sign for my nephew continues. Two weeks ago I posted about my first attempt at a name sign for baby Chandler, and I ended up with a sign that was wasn’t bad, but also wasn’t my favorite. And then there was the fact that I couldn’t bring myself to give it to my SIL because it was over eight feet long and completely ridiculous.
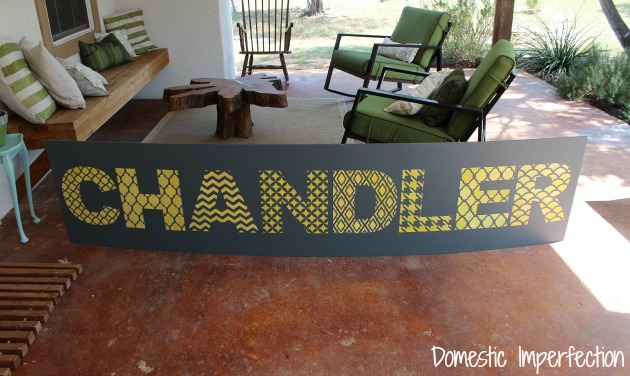
So I decided to try again. For the first sign I used the 12 inch letter stencils from Cutting Edge Stencils, in all different designs. I wanted to use stencils again because they were really easy to use and the project went pretty quickly, so I ordered the smaller 8 inch letters (see all the available sizes and designs here).
Okay, so here is what was going through my mind when I started on sign attempt number two. Chandlers sisters sign, that I made from buttons a few years ago, is going to be in the same room.
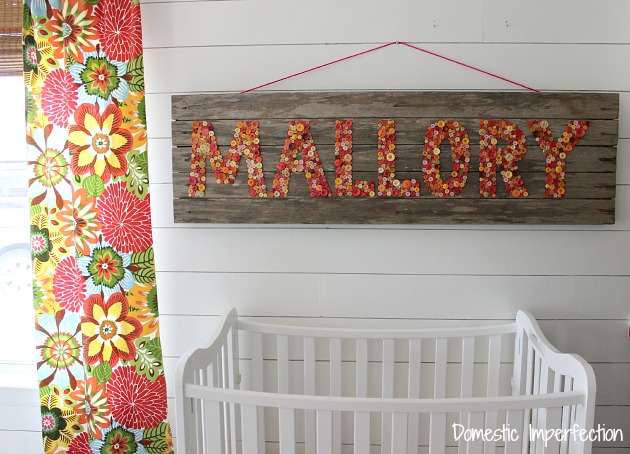
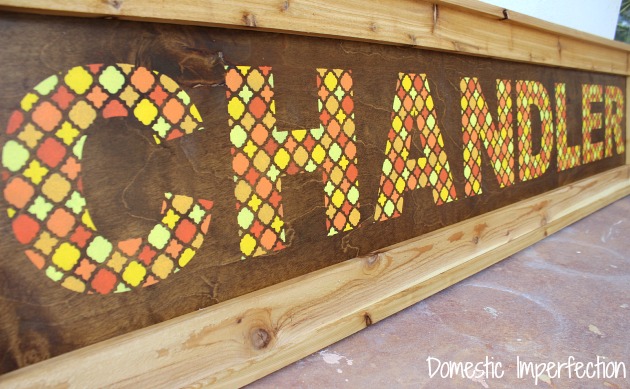
I wanted his sign to have a similar feel, so I ordered all the stencils in the same design, Moroccan Tiles.

So grabbed some plywood, and instead of painting it I decided to stain it. Because wood is manly…wood and metal. But I didn’t have any metal.
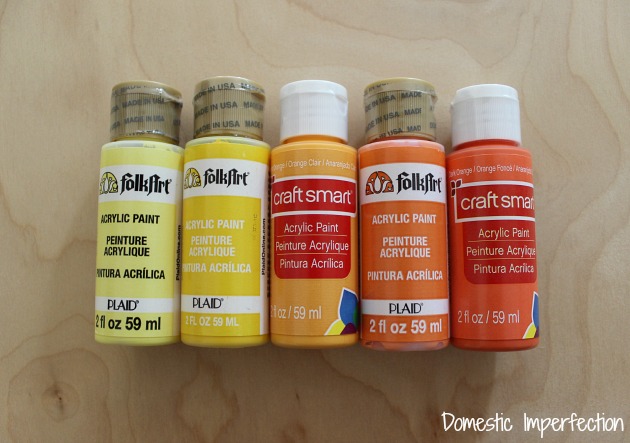
I decided to copy the colors from the button sign, but leave out the pink. I thought about painting them in blues instead, but the sign in going on a blue wall so I wanted something in a contrasting color.
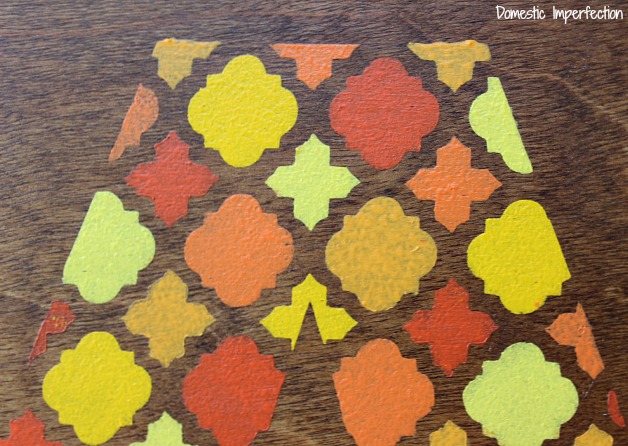
So I started stenciling, adding the colors randomly until all the holes were filled.
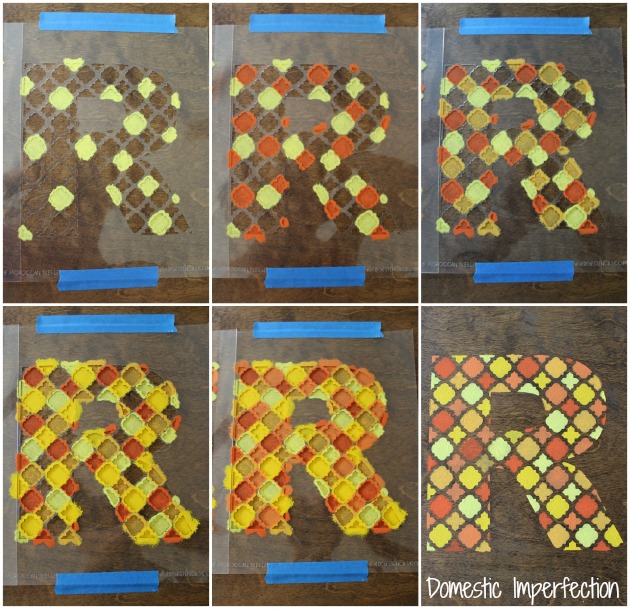
The letters turned out crisp and awesome..except that the one of the orange paint – called pumpkin – looks slightly pink. Sorry Chandler. Though guys wearing pink is apparently cool these days, so I should actually be saying “you’re welcome” for putting you a step ahead of the game.
Next came a coat of polycrylic before handing it over to my husband for framing.
He used rough cedar to make a rustic double frame. I was outside helping him when he did that thing he does when he doesn’t love one of my projects. He asked me “Do you like the way it turned out?” (acceptable alternatives would have been “So what do you think?” and “is that what you thought it would look like?”)
I answered and said “I don’t like it as much as the button sign, but it was easier to make and turned out alright. I’m guessing you hate it?”
“No, I just think it looks like it came off the set of That 70’s Show.”
Dang if he wasn’t right. It looks like it came straight out of Eric Foreman’s bedroom…if Eric’s name was Chandler. I knew I should have gone with blues…or painted the background blue. If I was willing to do the project for a third time it would be perfection, but that’s so not happening.
So here is the final product. It’s smaller than the first sign by two feet…but that still makes it six feet long and pretty substantial.
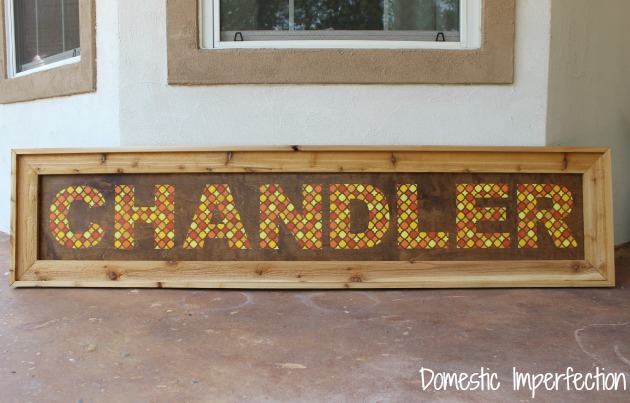
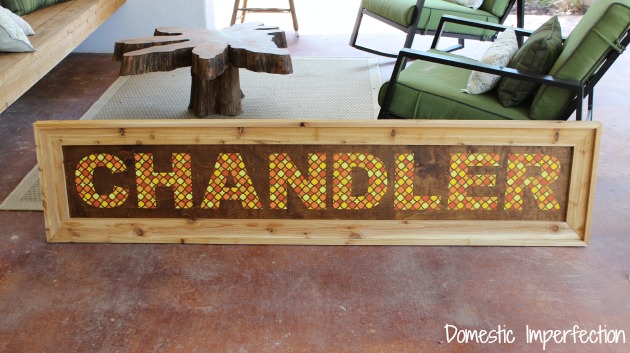
I think once it gets up on the blue wall surrounded by furnishings it will look more modern and less like it should be paired with bell bottoms and platforms. My SIL hasn’t seen it yet, so Jaime….hope you love it. And I hope it fits in your car.
enjoyed the post
It looks fine! But if it really bugs you, go back in and put some blue over that pink and then poly it in place. No one will know and you’ll be able to sleep soundly at night. :) Now, I have to go back and see if you responded to my original comment where I was asking you to resell me some stencils…
Let me know if you think of any perfect words and I will send them to you!
ok, here is what i think- i like it but compared to the feel of the one you shared- that one has a more weathered and rustic feel and yours has a very new feel…. i think i would try lightly sanding your stenciled area so make it more worn.
That’s a great suggestion. I was only thinking about the colors and not the newness factor, but I think sanding would make them feel more cohesive. That and leaving the Chandler sign in the sun for six months or so :)
I think it looks awesome! Even if it does look like linoleum from a 70’s kitchen :D I’m sure Chandler will love it forever and take it with him to college, where all the 70’s fads have come back in style, and he’ll be the coolest kid in his dorm. Great job!
p.s. I really want to make some now, but at least my girls’ names are both only 4 letters long.
70’s linoleum is the PERFECT way to describe it, haha.
I really love the button sign, and I think you are close on this one! I know nothing about these things, but could you put a light coat of the same stain you used for the wood over it? Would that mute the colors without covering it? However, I also wonder if the paint doesn’t seem brighter on the background where you took some of the pictures than it will hung in a room because in the first picture without the green chair in the background, I do like the colors and don’t feel they are too bright. Overall, what a cute idea!!
I really love how this turned out!
The colors are gorgeous! I especially love it up close where you can see all the detail. Awesome job!
I think it looks cool. That’s a neat idea to paint the different colours in the one stencil. And – you’re done! :D
Your stencils are so crisp! I love it!
And honestly… those autumn colours are fantastic, especially against the wood. Plus, Eric Foreman was a total babe. Win-win.
Haha, best comment ever. Tara, try to control yourself when you see this picture…
I can’t argue with you though, he reminds me of of my husband when we were dating in high school. Scrawny boy next door, the mischievous good guy. And the puffy hair… Adam had the puffiest hair, lol. And both of them grew up to be hotties :)
I know you love polycrylic and I finally tried it. I hate it. I want to love it, but I really, really don’t. I did some searching through your posts but don’t find one that addresses my problem. I converted an old side table into a pet bed. Normally I don’t seal my painted things, I figure paint is sealed and done. Since I will be selling it for a fund raiser I wanted to make sure it would stand up to drinks or whatever someone would put on it. I applied gloss polycrylic and it went on totally bubbly and showing brush strokes. I reread the can and after a light sand the second coat I made sure to not over brush, didn’t brush both ways, etc. Still bubbly and showed brush strokes. Went for the third coat as recommended and same thing. I am really disappointed because even with all my efforts it is not great looking. The bubbles came out but it shows brush strokes and is not an even finish, some looks like there wasn’t quite as much polycrylic and has a little different sheen. Thank heavens I only did the top and not the sides or I would have had a huge mess. As it is I only screwed up the top and top trim. I am going to leave it but would like to be able to use the product successfully. Is the gloss finish the problem and satin will cure all? I do have some satin also but chose to use gloss on the table. Can you use a foam roller and get better success? Any tips to get a better finish? Is it really necessary to seal paint and why? I have done some other google research and really haven’t solved the problem. Sign me, “Failed at Polycrylic”
I’m sorry to hear it didn’t work for you! I haven’t encountered those problems, but I’ve never used gloss poly and always use a foam brush to apply it (so no brushstrokes). When I put polycryclic on a flat surface, like a tabletop, I put on a coat, let it dry, lightly sand with 400 grit sandpaper, and add one more coat. It turns out silky smooth every time. Also, I always seal my painted furniture, unless I use gloss paint. I made the mistake of not sealing my cabinets when I painted them (because I bought a expensive paint that said it didn’t need it) and now it’s three years later and they look horrible. I need to completely redo them.
I love painting with the foam rollers because it ends up perfectly smooth, no brush lines. I think the polycrylic says to not use foam, good to know the foam brushes work. I still wonder if the foam roller would work. I wonder what would happen if I did some light sanding on my table and trim and then tried the satin on it. Maybe it is only gloss that is my problem. I would really drive my husband crazy if I started in on it again, he kept saying to leave it alone as I was complaining after each coat. I did a second table at the same time and since I hated the polycrylic I used a clear spray finish to seal it. Hated that too, it never would get a consistent finish even after multiple light coats and trying two different products. I ended up repainting it but it was simple since no contrasting trim like I have on my polycrylic table. Sorry to hear your cabinets are so bad, that is a big job to have to redo. Thanks for the reply, maybe I will try the satin…
Thought I would give you an update. I hated the un even gloss on the table top. Hated it. So I did a light sand and used satin polycrylic with a foam brush. What a massive difference. Half the bubbles compared to the gloss/chip brush. And it dried with an even sheen. The problem was the black foam sponge was leaving tiny black specks so I had to keep wiping them off and re brushing. Even so it was so much better. I even put it on my second table top. For a second coat I did a light sand and then tried a chip brush to avoid the black specks. This worked out fine also and didn’t leave any brush strokes. I still want to try using a high density foam roller but didn’t want to chance it on these tables. So my take on it is that the gloss polycrylic was the problem and I won’t be using it again. I don’t know that it is worth the bother to seal the sides of my painted things but I will do the top surfaces again.
Thank you for having a simple entry instead of 20 things we have to follow or like or buy or whatever. This is really appreciated!!!!!
My pleasure! I’m personally annoyed when I have to do all those things to enter a giveaway, so whenever possible I make my giveaways easy. Some companies make you add those things in order to host a giveaway, but if I can get away with it I leave them out.
Thanks so much for the giveaway, your blog is lovely!
I absolutely LOVE the Our “Chandler” sign!!!!!
Love it girl!
I actually rally like this sign! When I saw the teaser photo, I thought it was a bar sign with the letters being made of stained glass and some light shining through. The letters do remind me of stained glass tiffany style pendant lamps that hung in a local bar and pizza joint around my neck of the woods. I think it’s nice!!
you are in point of fact a excellent webmaster.
The website loading speed is amazing. It kind of feels that you’re doing any
distinctive trick. Moreover, The contents are masterpiece.
you have performed a magnificent job on this matter! http://www.aeriagames.com/user/carolynlowman/
A aura condoimento refrigerador exigiu adolescentes modelos desde apresentações que
permitiram a em grau superior cidadãos apreciarem esse
líquido orvalhado. http://ppag.pl/2014/index.php/ksi%c4%99ga-intencji-ppag-2015
Se tomo este diseño para tener mas espacio para extensiónes. http://world-tradingcenter.com/cgi-def/admin/C-100/YY-BOARD/yybbs.cgi?list=thread
Thank you for any other informative blog. The place else could I get that kind of information written iin uch an ideal
way? I’ve a mission that I’m just now running on, and I have been on the glance out for such info.
) William Hill Casino – Already boasting world-class sportsbook and poker section,
William Hill took their immense experience with the gambling world to generate the
most effective online casinos around the market. You can just spend your merry time playing slots
within the comfort and safety of your family home. Almost most people enjoy to try out video
gaming, nevertheless the games folks select are invariably many different than somebody else may choose.
However, website owners must be extremely cautious while hiring theses professionals.
Learning the most effective solutions to protect crucial
computer data and store it while using newest products and ideas is
the best way to be ahead of the game. With the majority of homes wanting a
higher speed high speed broadband connection the
sector is currently very have probably had letters from a couple of the key services dropping via your letterbox every week,competing against the other.
Awesome Pics