
Bright & Rustic Button Sign
Last year I made something that I never blogged about. Saying I ‘made something’ is a really bad description though, what I mean is that I made something that is pretty stinking awesome and one of my favorite projects ever. And then I gave it away before taking pictures of it. Like a giant dork.
So what is it? It’s a huge button monogram for my unborn niece…
Well, she was unborn when I made it…now she is very much born and almost walking. Even though I made the sign over a year ago I can remember every detail of this project….which is really saying something since I often call my kids by the wrong name.
So lets set the scene –
It was the fall 2012 and my sister-in-law was great with child…the first child in our family that wasn’t birthed by me. Hallelujah! I was helping plan her baby shower and still needed a gift. At first I thought “I’ll just buy her something cute”. Then I felt a little guilty about being gift-lazy and thought “I should really make her something unique”. Then my brain started to work and I got a little excited. Then I got really excited and thought “I should totally create something HUGE that will be the focal point of her nursery!”. I mulled over ideas for a few days in my head…I wanted to create something unique, colorful, and feminine…but not frou-frou girly overkill. I’ve never liked overly girly stuff, and even though this isn’t for my kid I stick to my guns. It’s all about principles, you know? It’s probably for the best that I have boys.
After going through quite a few ideas I decided on rustic wood + bright colorful buttons. The problem? You know when you’re looking for something specific you can never find it…and when you’re not looking for it you see it everywhere you go? Once I started looking for long planks of rustic wood they seemed to disappear from my area completely. Then one day I was over at my parents telling them how I couldn’t find any when my brother into presented me with this…

A super old and grizzled section of fencing. He had randomly brought home even though he had no use for it, figuring someone in our family could use it for something. He was right!
So I brought it home, reinforced it, and cleaned up the edges, and got rid off all the creepy crawlies.

Next I drew out my nieces name-to-be on some butcher paper, cut out the letters, and traced them onto the wood.

Next came the buttons.
Before I go any further let me show you what I wanted the overall room to look like. Yes, the whole room…my brain kept going from “I want to make her something HUGE!” to “I want to decorate her whole freakin room!” I had found the fabric below and instantly loved it, so I bought a bunch so I could make curtains. (Kiki Pinata by Robert Allen at fabric.com.)

Isn’t it awesome? Perfect for a little girls room – colorful, fun, and feminine and not overly pink. I choose blue for the walls…like the blue in the fabric, only lighter and more on the neutral side. For the buttons on the sign I wanted varying shades of pink and green.
You know what else is hard to find? Buttons…especially buttons like I wanted in mass quantities. Also, buttons can be kinda pricey, especially at craft stores. I ended up buying all my buttons from a website called Buttons Galore. One of the ways the sell buttons is by color, so they sell big packs where all the buttons will be shades of pink, but different shapes and sizes. Basically exactly what I wanted.
I bought packs of pink, green, and orange and started filling in my traced letters. I got about two letters in before I stepped back and realized that it looked terrible. All those colors together were too much.

I tried it without the greens and it looked much more harmonious.
Here is the beautiful part of my mistake. Adam and I had recently finished the penny countertop in our kitchen and our mistakes on that were fresh in my head…I knew to NEVER glue things down until you are ONE MILLION PERCENT sure that they are EXACTLY like you want them to be. Thank goodness for mistakes right?
So starting over was easy. I Even let Elijah do it because he had been itching to destroy him some buttons.

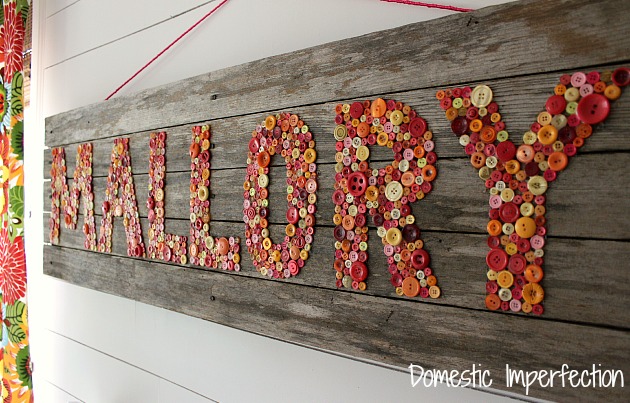
Then I started over, this time tediously gluing each button in place.
The final step is the most important – last thing I would want is for a button to pop off and have my niece choke on it. After all the buttons had been glued down I taped around the letters and completely covered them in Mod Podge.

Those buttons aren’t going anywhere.

The Mod Podge dries completely clear so you don’t even know it’s there. But it is, heroically guarding my adorable niece from death by button.

Here’s the final product!

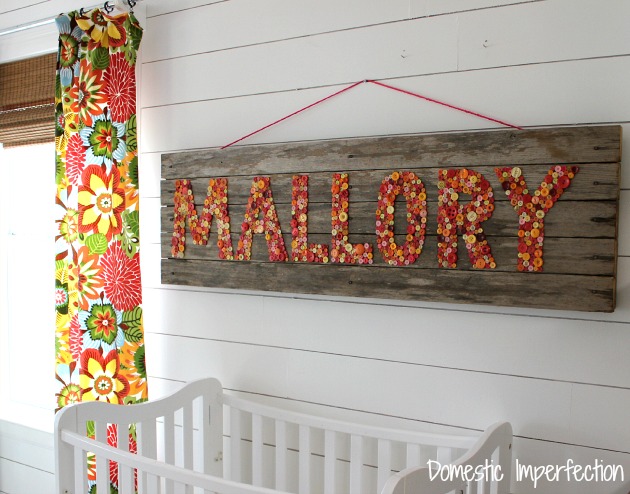
In case you’re wondering why the walls aren’t blue and I’m not showing you the completed nursery, it’s because my BIL & SIL’s house is undergoing a complete gut job remodel and there’s not really a room to show you. In order to take pictures of the completed sign I brought the sign home and staged it in my kitchen.

That curtain actually looks really good there…then again, pretty much anything looks good against a white plank wall.


That really is awesome, I’ve been desperately trying to come up with something for Little Man’s side of the room (Little Miss has a crocheted flower picture) and now I totally want to make button art!
I noticed from the last picture that your boys don’t find anything strange (or even worthy of investigating) about Mummy putting random objects into the dining room and then photographing them…!
Have a great weekend!
Haha, nope…it’s all standard procedure to them!
Nice job Ashey! Love the pink/ orange contrasts with the rustic wood. The buttons look like tiny litttle flowers and are a beautiful idea! Pinned it!
Cindy@GlassSlipperRestorations
Thanks Cindy and thanks for pinning!
This is fabulous!! I can never seem to find those beautiful aged wooden things.
What a great idea! I love the colors, different for a nursery, but I love different. I am always drawn to these colors. Love the drapes as well. Thanks for sharing!
Seriously adorable. I used to have jars and jars and jars of the buttons my great grandmother and grandmother had hoarded during the Depression. Over the years they’ve been used for many things, most recently a ‘100 days’ project for my middle son. I wish I had enough left to do a project like this one!
How cool to have a so many vintage buttons! I’ve seen some really pretty single initials done with buttons and framed, perhaps you have enough for that?
This is great! Perfect for our daughter’s room! Can you tell me what specific colors and sizes you ordered? Thanks!
Yes, I actually can! I got the mango madness, tangerine tango, and watermelon. Each package should come with a variety of button sizes.
That is super cute!!
Haha, I was like, what, does everyone in her family have planked walls? I love the project, and the fabric you chose. I also think you shouldn’t limit yourself to having boys – there needs to be MORE mamas out there that eschew everything all pink and girly! Our girls are being drowned in a sea of princess…
Seriously, you HAVE to make those curtains for your room!! They are perfect. Honestly. Just do it!!!!
Just wondering how many packages of buttons you needed and how big each letter measures? Just want to know how many packages to order to make my own sign! :) Thank you for the wonderful idea for my little guy’s room!
I ordered two packages of each of the three colors. Not sure how big the letters are…maybe close to a foot tall?
You’re so right, everything does look fantastic on a white planked wall. I absolutely love yours! The button art and curtain fabric are amazing together. Great job!
What a great idea!!! you are always so creative! I love the colors – and that fabric for the curtains is YUMMY!!!!
the sign turned out really great, perfect for a baby girl!
I LOVE THIS!! I’m going to make this for my girls…currently looking at all the colors of buttons and it’s going to take me forever to find a combo that I love =) Great Job!!
I have no words!!! It’s amazing!! How on earth did you never blog about this? Glad it finally made its way onto the blog. I love it!
I AM IN LOVE with your site! your kitchen…TO DIE! i have kept pics of it up on all our computers as we are going to gut our kitchen. i LOVE the higher cabinets and the hanging shelf below. yum!!
love this for mallory too. what a blessed niece!! God bless, kt
The colors are fantastic and I love the rustic look. The tones are all fall shades and it is amazing you can do this using buttons. What a great idea!
This is so cool! I love the bright colors you went with; it really pops against the wood!
Ha ha. You had me cracking up with the concept of “death by button.” This is gorgeous, Ashley! Sharing it on my FB page tomorrow (today).
This is so fun, Ashley!! I am smitten over the character of the old wood…. it’s just beautiful!!! Funny, I made a chalkboard frame out of buttons!!! It. Is. So. Time. Consuming. But button projects are so cute when done!!! ♥ it!!!
Would you make a custom button sign for my baby?
Hey there! This is beautiful! I’d love to do something like this for our newest daughter coming in March. I know this post was written quite some time ago, but I’m wondering if you remember what size button packs you purchased and about how many buttons were needed?!?
I do remember..or at least I looked it up in my Buttons Galore account :) I ordered two each of the mango madness, tangerine tango, and watermelon. I have a jar of leftover buttons too, so it was more than enough.
Thank you for the help! I’m a big fan of your blog!
This is a very cute project but you might want to change the name because a full name isn’t a monogram. A monogram is an initial or initials.
Love, love this project!!!
What type of glue did you use to glue the buttons onto the wood?
This is SO adorable!!! Pinned for reference for when we have another baby! Love it. :)
OH MY GOSH! I love this so so much! Genius idea!
OMG! I LOVE how this turned out!! I made my son something sort of similar for above his crib but this makes me want to do an entire name! Great stage job too!! ;)
http://www.poofycheeks.com/2014/07/button-letter-plaque.html