
Kitchen Command Center
So this whole command center project started one day when I was at World Market…I saw this one and thought “man I could really use a command center in the kitchen”.
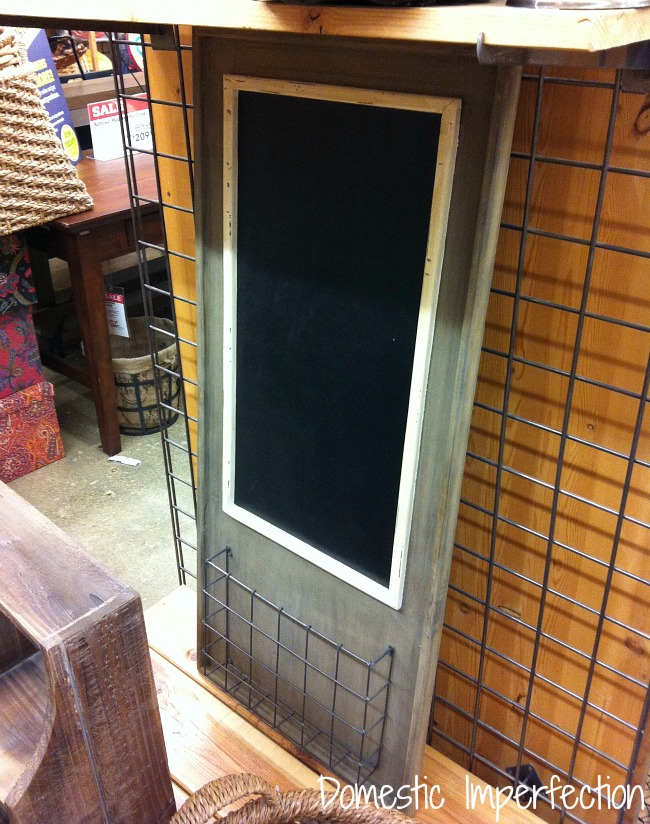
I kinda sorta liked this one, so I looked at the price tag…it was nearly $80 bucks! It’s just some plywood, chalkboard paint, trim and a basket. I bet I could make it for $15… probably less since I have most that stuff on hand.
So, I (of course) decided to make my own, more original, more useful and more unique command center/mail sorter. It all started with an ugly blank wall and a random old frame I got a a garage sale…for free. I found it leaning up against the wall in a barn and asked “how much do you want for this?” And they said “I don’t even know what that is or why anyone would want it, so please, just take it.” And take it I did.
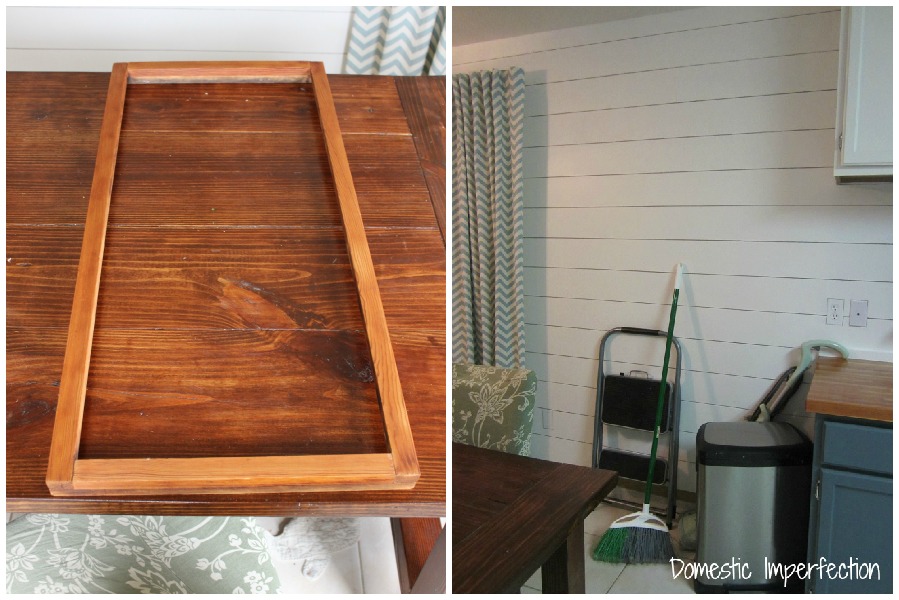
Adam cut me a square of plywood to fit in the frame and I decided to give magnetic paint a try. I’ve heard good things about it, plus the paint is ridiculously heavy…which means lots metal for magnetic goodness.
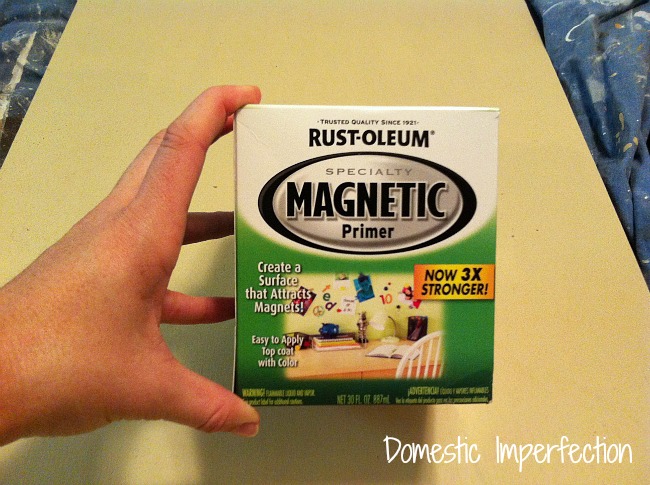
I followed the directions perfectly. I stirred like a madwoman and did three thin coats, letting it dry between each one. Then I went and grabbed my magnets to give it a try…and my magnet didn’t even THINK about sticking. So I did three more coats with the same results. Then I slopped on three more super think “you’d better freakin work” coats, and and the magnet stuck, but barely. It wouldn’t even support it’s own weight, it stuck to my board and then slid slowly down to the floor. My plan was to Mod Podge a map over the magnetic paint, so this was not going to work and I ended up returning it and buying sheet metal. Consider yourself officially warned about the effectiveness of magnetic paint.
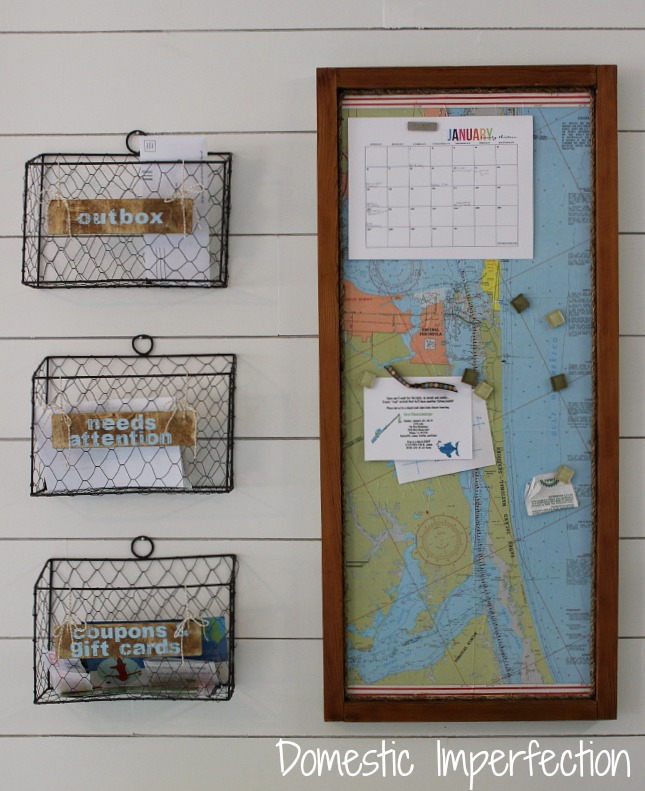
The sheet metal works like a dream though! My parents graciously donated a map of the Texas coastline for my magnet board and I Mod Podged that sucker right on.
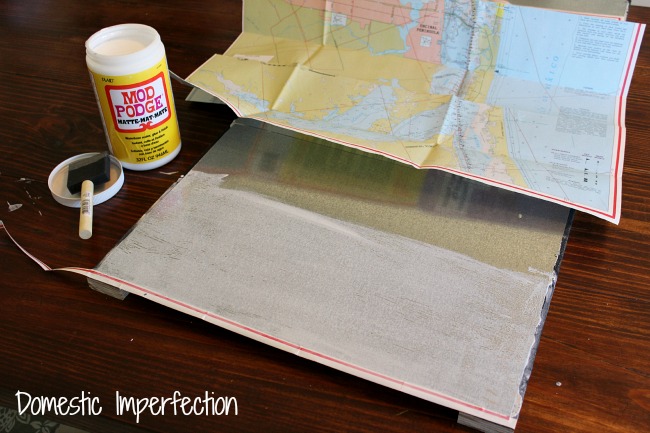
In hindsight I really should have waited for Adam to get home to do this, an extra pair of hands would have been really helpful. Despite my best efforts it turned out superbly wrinkly. 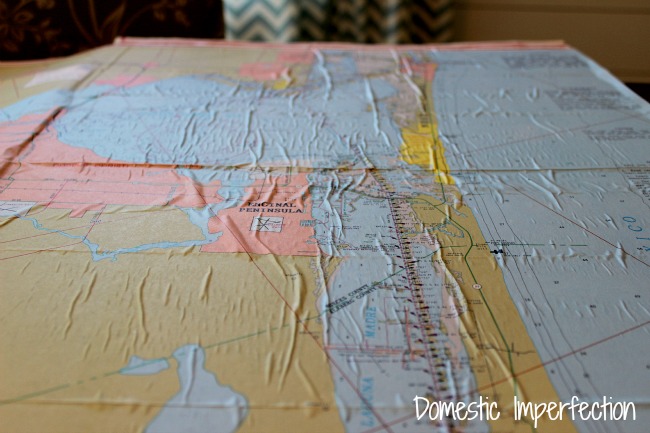
It did smooth out a little as it dried, but it’s a far cry from smooth. Half of me wants to be pretty upset that its a wrinkle factory and the other half is like “whatever….farmhouse baby!” It’s still too early to tell which half is going to win.
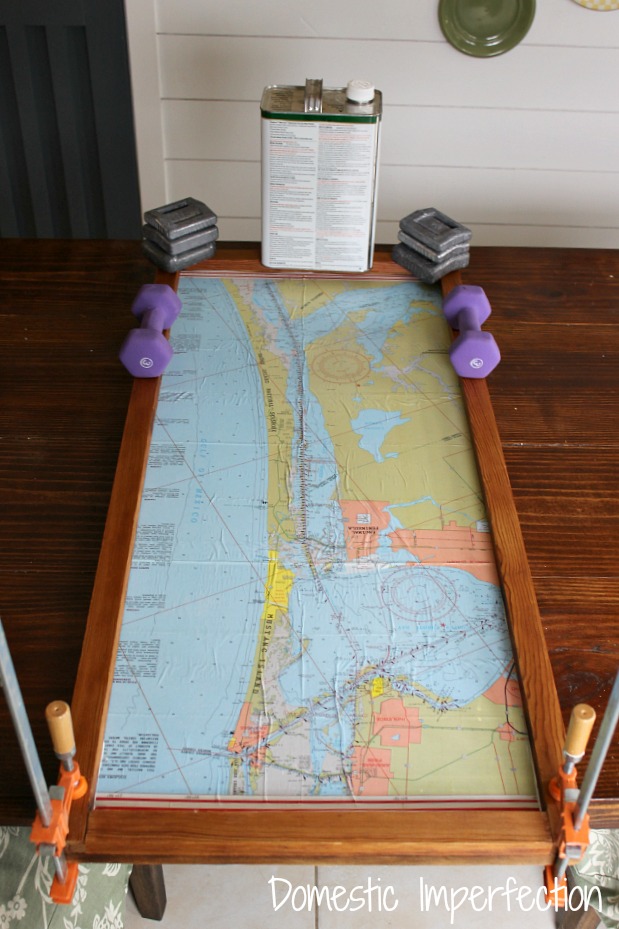
Next glued my magnet board to my frame using liquid nails and let it dry for what felt like forever. On a side note, I really need more than two clamps! I mean scuba weights work great, but still…
The back part of the frame wasn’t looking great, so I taped it off and painted it green for an extra hint of color.
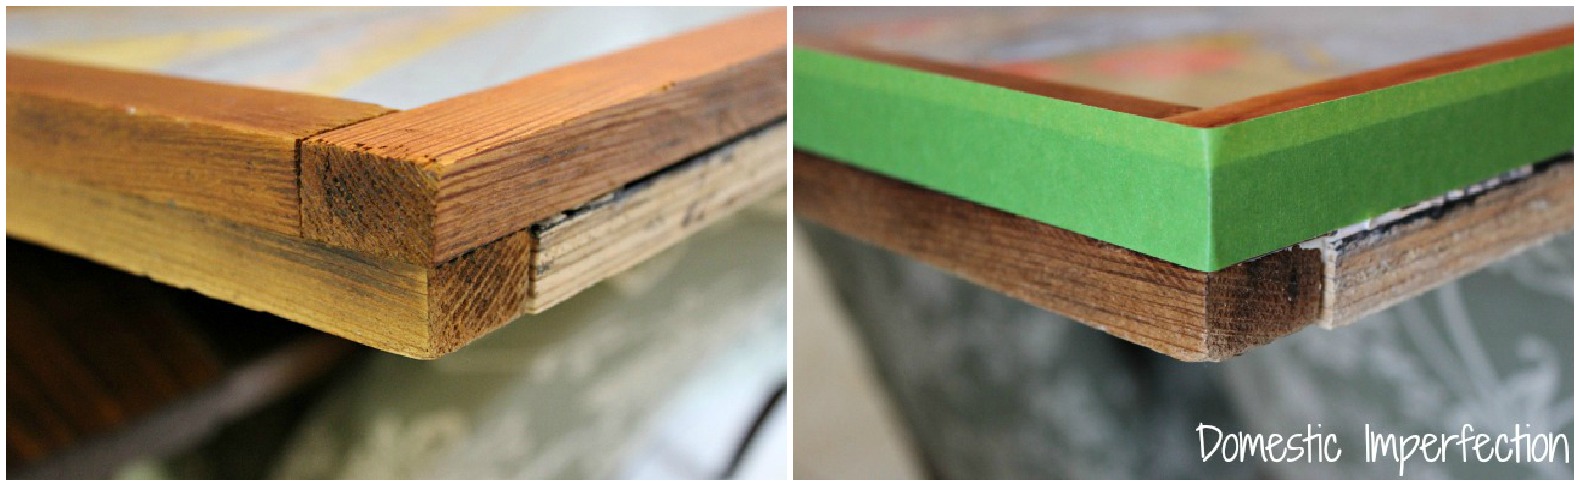
Ehhh…nice right? (Oh and I added some rope to the inside edge because the top and bottom looked a little ragged.)
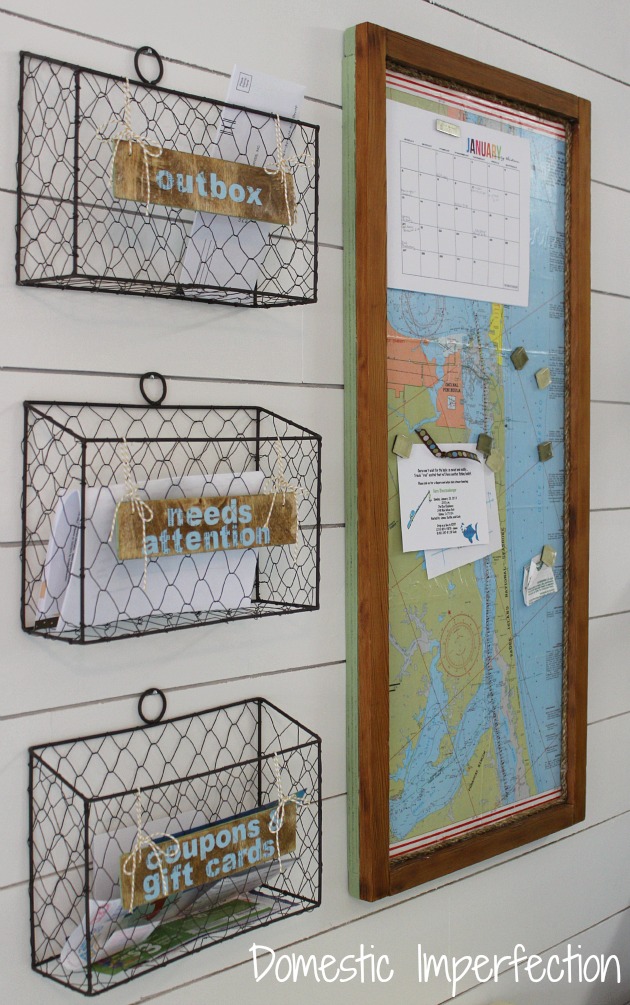

The baskets are from Pick Your Plum…it’s a deal a day craft site and I couldn’t believe my lucky stars when these popped up. I labeled them a little different than your usual mail sorter, I have “outbox”, “”needs attention”, and “coupons and gift cards”. I used “needs attention” instead of “inbox” cause I need something that’s gonna light a fire under my butt and “inbox” just wasn’t going to cut it. It also seems like coupons and gift cards are always floating around my house, so I gave them a home.
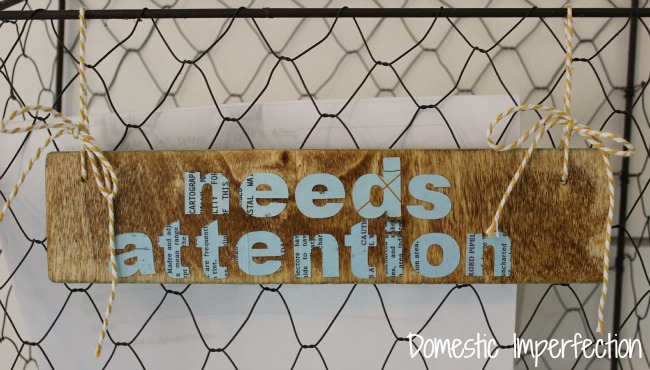
The labels are just cut pieces of plywood (leftover from the plank wall). I stained them, painted the edges green, used leftover map bits to make the letters, and tied it up with some bakers twine. I’m pretty sure no one else has labels quite like this!

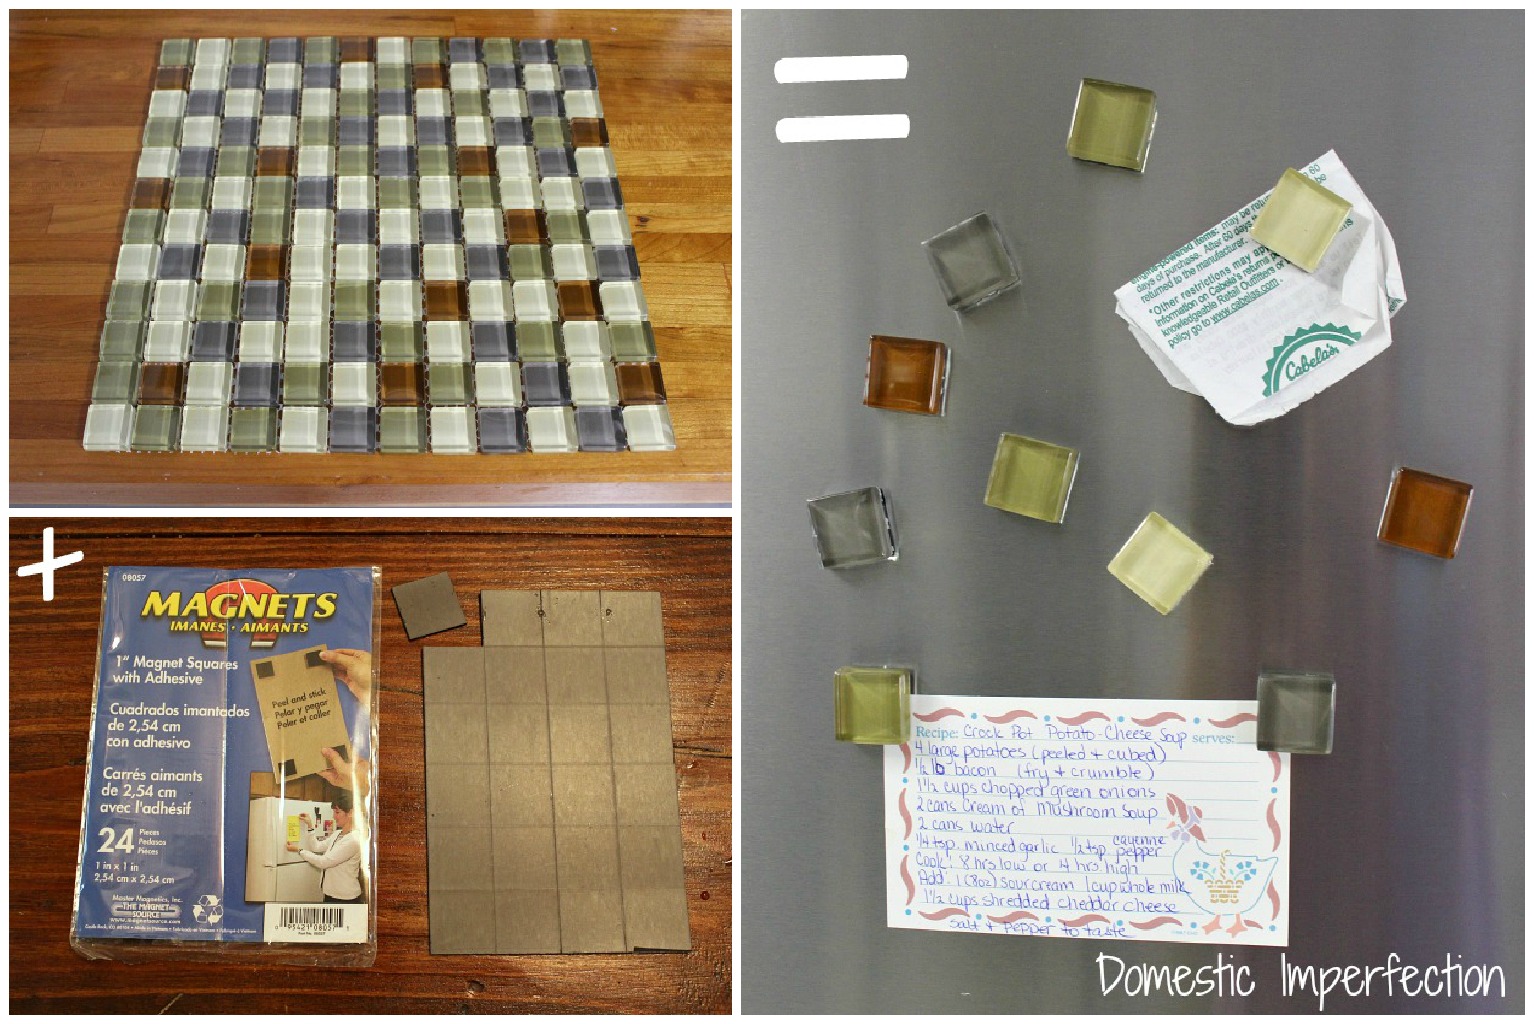
As for the magnets (I know, this should really be like three posts), they are glass tiles. I love them and they are the easiest things ever to make. This collage below should explain the process well enough…
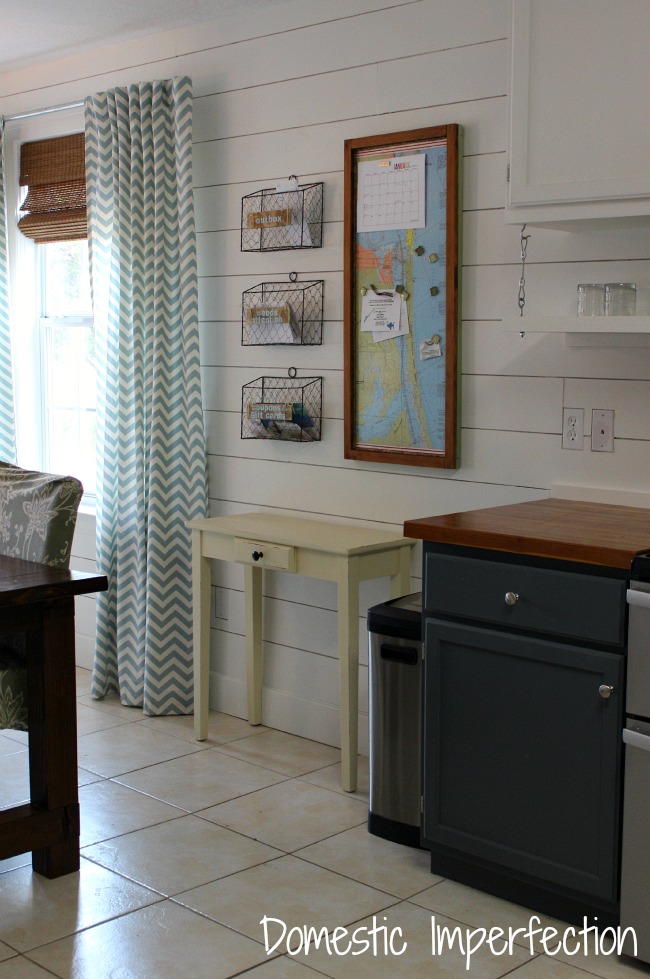
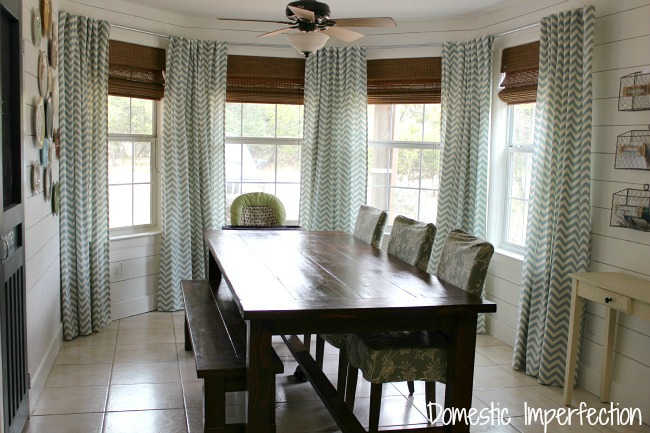
Here’s the whole thing again, stepped back for a little perspective. That table is a new craigslist find and it is getting a makeover next!

Ten dedicated reader points to the person that can point out what else is new (and not yet blogged about) in that picture, and ten intuitive reader points to the person that can correctly guess what color I’m going to paint that table!
BTW, I know your dying to know what I did with all that “stuff”…the step stool and brooms and whatnot. Well, it’s cleverly stored right here…
Don’t see it? How about now…
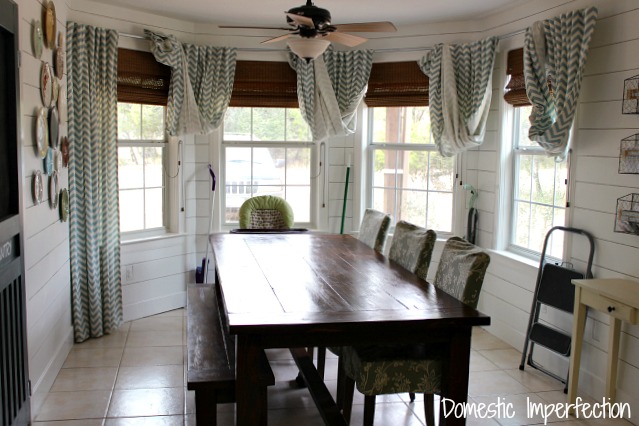
I’m not gonna lie, I kinda feel like an evil genius :)
Anyway, now I just need to finish up the command center by painting that table!
turned out great!!
OH !!! This looks AWESOME!! Thanks for the magnetic paint heads-up, was looking at this the other day for a section of wall in my scraproom. I have hid a few things behind curtains in my day too. Loving the hanging shelf treatment, could that be the “yet to be shared something new”? I am predicting a green Craigs-List table…
I know Ashley’s magnetic paint was a flop but I have had success with it. I think it’s more about the strength of the magnet you use. Not all of the ones I tried worked but lightweight constructed ones with a strong magnet are holding up on mine just fine. I will say that cutting some sheet metal is way easier though!
Love this! The map is awesome…and I feel your pain with the mod podge wrinkles…they are pretty much unavoidable, but I think they give it character. :) And what a smartie you are for hiding stuff under your curtains…I love it!
Just wanted to throw in a tip about mod podge and wrinkles. If you wet the paper first (just spray it with a squirt bottle of water until the whole thing is damp, not soaking wet), before applying the mod podge, you won’t get a single wrinkle. Wetting the paper first allows the fibers to expand and “relax”.
Melly, where have you and your Modge Podge tip been all my life? thank you, I can’t wait to try this!
I love this project and your ‘whatever…farmhouse baby!’ attitude. And how clever you are with hiding the daily household bits like the broom and mop. Keep up the great work, Ashley!
I am totally stealing these ideas!!! Brilliant! :)
I am going to get the bottom boards on the wall are new! But I’m not really sure and my guess for the table is the green that you used as the trim on your command center and labels… I guess I will have to wait and see! Love your updates!
looks great! I’m very impressed with your secret broom storage :). I’ve read similar warnings before about the magnet paint (you’d think they’d have stopped making it by now, it seems so universally unloved)–I want to do a biggish area of my kitchen wall as a magnet board/chalkboard, and I’m trying to figure out if there’s a way to get the sheets of metal they sell at Lowes, et. al. to go together to make a big area without having seams that slice fingers. hmm……
Such a smart and pretty way to keep organized! I need something like that in my kitchen!
Jeanine
I’m going to guess the open shelving under the cabinets… because I immediately thought, “Oh, I love the way she (Adam) fastened the shelves to the underside of the cabinets with cable!” Love it. And if you weren’t going to blog it, now you have to…. Muah ha ha…
I’m just betting you will paint that table green — like the trim on the memo board frame :)
Ashley, I just love what you did, especially the little letters cut out of left over map bits. The whole thing is too adorable. What passes for a command center at my house is pathetic. You have inspired me to aspire to “greater command”. Thanks!
Liz
love the command center! and that clever storage under the curtains – great idea!
Found you via the diy showoff. I just love your kitchen and command center. Can’ wait to view the rest of your blog. Thanks for the inspiration. Draperies are awesome!
I see a nifty swinging under counter shelf I have never noticed and I’m going with the orange in the map for the table. Is this your evil genius way of getting ideas for paint colors Ash?? And I hope you post a photo of the ‘up’ shot of your apparatus hiding spots on the magnet board…I would definitely need that or I would have a perpetual game of ‘What’s behind curtain #3’ when looking for the broom. ~dee
This is a fabulous take on a kitchen command center. I love using maps for things too. I could totally see my hubby being on board with something like this in our kitchen ;o)
That really is like 4 posts worth of content there! I love your magnet board. I love your magnets. I love your sneaky hiding place! :)
It looks wonderful, wrinkles and all!
I want a command center!! Your map is a topographic map now. :)
I have those PYP baskets – woo hoo!! SO excited to revamp my family organization center to include them! GREAT ideas!!
It looks great! Every time I think that room looks beautiful just the way it is, you add something to make it look even more awesome. When I do stuff like this, my husband whines about me bringing “more stuff” into the house! haha.
I’ve had a mirror I wanted to paint with that magnetic stuff for a while and haven’t yet……so glad I read this first! Think I may change my plans now.
My husband is a stuff hater too, the man will throw away anything! He lets me do my decorating thing though, cause he’s a smart man :) As far as magnetic paint, another commenter suggested having the paint department shake it for you then using it as soon as you get home. It just might work, you can always return it if its a flop.
Those baskets are perfect! How long ago did you snag those? I can’t believe I missed them. I usually check PYP every day but never saw those!
Awhile ago…maybe November? They came up again the last week if December too. Sorry you missed them, I hate when that happens!
Oh wow! Well I will def be paying closer attention now. Thanks!
WHat is the web address for pick your plum? When you click on the link you have, it pulls up a blank page.
To quote my father “You can never have too many clamps” – the man is brilliant I tell you! The command center is perfect I love that the map has crinkles it gives it character and using curtains to hide cleaning items – GENIUS!!!
OMG you did your shelves!!! I can’t wait for that post!!
Yes! They look awesome, I can’t wait to show you!
You crack me up Ashley!
I love the command center.
My guess is that the table will be pale YELLOW! At least, that’s probably what I’d do.
The green would look nice too though.
Are those new shades? I want some.
Yes they are! You can read about them in this post…https://wildfireinteriors.com/2012/11/dining-room-windows-done/
The new thing is the under cabinet shelf. I am guessing the table is going to go blue like your cabinets. I have folders labeled the same as two of yours but my 3rd one is “needs to be filed” instead of the outbox one you have! Sadly, it’s my thickest one, I hate filing stuff away but at least it’s all corralled in one spot waiting to be done instead of floating all over.
I also had lackluster results with chalkboard paint. I figured it was because there was some thick sludge at the bottom of the can that I just could not stir into the mix. Way better to blame the paint instead of one’s self. :) In case it was me, I figured the thing to do would be to ask the paint department to put it through the shaker when you are going to purchase it and then use it that day! Obviously they only normally do this when you are adding color but I wouldn’t think they would mind. That’s a thought for chalkboard paint and whiteboard paint, too.
That paint shaker thing is a great idea, I’m sure they wouldn’t mind doing it for you. I’d be interested to see how much it helped. I shook and stirred really really well, but it is hard to keep that stuff off the bottom!
LOVE, LOVE, LOVE those baskets…why didn’t I order them? Great job!!
Great project!
I see shelves!! :) under the cabinets.. also the table should be greyish-green something to match the rest of the furniture..or a happy teal blue :)
Love it! Plus, the slightly wrinkled effect isn’t perfect or “farmhouse”….I think it’s perfect.
I love it! It looks awesome! And really practical :)
And I’m with Dee – I see the table in the orange colour from the map! Can’t wait to see it painted!
It’s YELLOW!!!!! My first thought was yellow, but then I thought that you’d already done a yellow table so you’d be doing something different!! Still, it looks GREAT!!! You’re posts are always inspiring – although I haven’t attempted anything yet..!
Super job Ashley! Looks great! Now, if only everyone will use it ;) I swear I’m going to come up with coat hooks on the kitchen chairs one of these days…is it that hard to hang your coat up in a closet that you’ve just walked by?? Love how you hid your brooms. I need to find a place for mine.
What if you cut off the backs of some thrift chairs, hung them on the wall & added hooks? Think your family members would get the hint? At least then everyone would be happy! :)
LOL! That just might look really cool! I’ll have to think on that. :)
Lol, I liked Dees idea for the chairs! BTW, I was looking over my 2012 analytics and you were my fourth most frequent commenter! Thanks for sticking around and being so dang loyal :)
You are one clever cookie! First…the command center is perfect, I love the magnet tiles! The wall…I hadn’t noticed it before, gorgeous! But I am blown away over how you hid your cleaning supplies behind your curtains…totally awesome!!!
I LOVE this! I have a thing for wire baskets and maps. What a great way to organize and have it look great. Your dinning room is beautiful! I’ve pinned your baskets, and I’m your newest follower. Thanks for sharing and inspiring! Have a great day!
Yep. You ARE an evil genius! What a great idea! I love your curtains. I still need to figure out which ones I want in our dining room…the options are endless. However did you choose a pattern?
Lura
x
I scoured fabric websites (fabric.com is the best) for weeks and ordered my two favorites, then I just picked the one that looked best. I second guess it all the time though!
I need to give you a huge thank you, I was going to try magnet paint myself on a project soon, guess I will nix that idea. I also appreciate that you shared your wrinkles from use with modge podge. I thought I was the only one that had trouble with this, I feel so much better about myself now.
I would guess the table will be green to play off the color you used on the frame, am I right? I love how you store your brooms and what not, gives me a few ideas for my place.
Finally, I love your command center, it’s gorgeous and so much better than the $80 one at the store.
Thanks Lois! You are in good company with wrinkly Mod Podge projects, mine are never smooth. Except for when I Mod Podge fabric, for some reason those always turn out great. And the tables not green… :)
Beautiful! I kinda like the wrinkles and think it adds some personality. It would look like a dull piece of pretend artwork if it were flat. Just my thought. I look forward to your daily work! Thank you.
Thanks Alisha! You know, I thought the same thing (after I decided not be upset about the wrinkles), that if it was flat it would look store bought…and therefore, lame :) LOL.
Is the hanging shelf new? Even if its not…I LOVE it. Oh and the command center – but that shelf is stealing the show for me.
Yes yes YES! It looks awesome! I’m trying to be all fancy and organized, so according to my “blog planner” that post should be up on the 16th. Whether it will or not is yet to be seen :)
Great idea with the map, World Market is a great place for interesting little finds!
Loving how the whole thing came together!!! The labels for your baskets fit perfectly!! Don’t you love Pick Your Plum!?
Your command center is great. I like it much better than the one in World Market.
Mary Alice
That whole command center situation you have going on is freakin’ awesome. I need something just like it! I’ve been thinking about how to DIY something for a while but I don’t think I could make anything as pretty as those pick your plum baskets. Glad to hear that about the magnetic paint too! PS: This was really like five posts worth of content. Pinning!
Hi, I love this idea. My oldest starts school this year and I was looking for some way of keeping myself and all things school related organised. I so love those wire baskets. I’m a new subscriber. I hope you will drop by my blog too – http://www.restylerelove.com. Thanks, Julie
Haha!! You really are a genious Ashley!! Not an evil one though ;) Love the idea of hiding stuff behind the curtains! I need to put up some new drapery too – where did you get your lovely fabric? WOuld you mind telling me where you bought your blinds too? I have some up and they are custom made for our windows….but not liking the color of them so much!! Your command center is fantastic!! Great work!
Very cool!
Well, this is awesome. I love it. And I’m totally copying your magnet idea. Like tomorrow. Also, I think that hangy shelf is the new project yet to be blogged about. And I think you’ll paint your table cabinet blue, curtain blue, or green. Nice work! Glad to know about the magnetic paint, too. I’m sure I would have been disappointed by it at some point! :)
What a great job! You are not only creative and talented but funny too! I love where you are hiding those objects!
I LOVE the command center! It’s very commanding ;) I’m curious: have your kids found the cleaning stuff behind the curtains yet? Lol when they do.
I love the look of that map – not just the wrinkles, but the coastline and how it makes such a dramatic contrast with the ocean. And then the magnets – what a fabulous way to get simple magnets in such a perfect array of colours! I am def going to steal that idea.
I really like the things on Just Jane, but unfortunately they do not ship to Canada (jeez, we’re not THAT far away) so I had to cancel my subscription, because I would really like something and then never be able to get it. :( I think you made a great choice on the baskets, and also I really like that you separated the elements, didn’t stick the baskets on the map or something.
I made two makeup magnetic makeup boards in frames using magnetic paint, and I had exactly the same experience as you did. However, unlike you I couldn’t find any place to buy sheet metal, and so had to soldier on. Fifty eight coats later, and with a very thin fabric on top with no decoupage glue, and bigger magnets glued three deep to the back of each makeup item, I finally had a less-than-mindblowing gift for my friend who is a makeup artist. :S (They still sometimes slide down. But only if you breathe on them.)
Thanks for such great ideas, as always! Cheers!
Fifty eight coats? FIFTY EIGHT!?! Holy cow Jan, that is some dedication. I’m glad I stopped when I did if that is the case! My kids know that stuff is back there, but they don’t really mess with it. Elijah will go and grab the broom sometimes and start sweeping saying “clean up so Daddy come home”. LOL, I always have us clean up around 4:45ish so the house won’t be a total disaster when Adam gets home, so Elijah thinks that if we clean Adam will come home..even if its 9am.
BTW, whats Just Jane? I googled it but a few different sites popped up… now I’m curious.
Elijah’s logic is like when my kids used to ask for something and I would say we didn’t have any money, and they’d say, “Well, just go to the bank machine, Mummy!” Ah, would that I could…
I meant to say Pick your Plum. Just Jane is another daily deal thing and I got the names mixed up.
And I’m not sure if it was EXACTLY fifty eight… it might have been fifty seven…or fifty nine… all I know it was multiple, multiple coats! Lol.
Ah – I just love everything about this! And I especially LOVE the backdrop to it all on that planked wall! I’m going to have to spend some time clicking around your blog now to find out more about it – just love it!
Thanks Ashley! I do love my planked walls…I might or might not have planked walls planned for two other rooms in my house!
Oh My… hiding things behind the curtains… brilliant! I love the idea of the hanging baskets and magnetic board. I have a couple of large frames that I’ve been wanting to put to use. This will be on my February crafty to-do list. Thanks for sharing!
Love your kitchen and I think it is AWESOME that you are storing thing behind the curtains! The command center is great too!
– Lora
Love your command center and now I am kicking myself that I didn’t order more of those baskets from Pick Your Plu (what was I thinking by just ordering 1??) I do love how you labeled them though and I totally get your mixed feelings about the wrinkly map. Trust me been there before with projects but honestly I think in your case it adds character and you can’t really tell!
Can you come revamp my house? :D Love your ideas and this is no exception. thanks for sharing on BeColorful.
p
I love your commend center, it will help you stay organized! Wish I had seen those baskets I would of bought a few myself. Also thanks for giving me a spot to place my step ladder at, can’t see it now behind my curtains, such a clever idea! Also thanks for sharing at Sunday’s Best -you are being featured today.
Perfection! I love the little signs you made for the mail boxes and how freakin’ cute and easy are those magnets? I love it, great job!!
Love it! And you ARE an evil genius! :)
I’m so glad that I found your blog, I’m your newest and hugest fan! :)
Haha, thanks Kimm….and welcome welcome!
Haha! You evil genius, you! Your command center looks amazing, wrinkles and all. ;) You’re technique for storing the extra items right there in the room behind the curtains is a little brilliant…or evil!? Love the one-of-a-kind tags you made.
It looks amazing!! Holy cow – I neeeed a command center like this asap. And seriously – haha I love the way you hid that stuff. Evil genius, indeed – it’s brilliant.
A LITTLE TIP ABOUT THE MAP WRINKLES: Save yourself the aggravation. Take the map to your local picture framer and have it drymounted onto foamcore. You can then frame it yourself. Foamcore is easy to trim with a nice metal ruler, and a very sharp blade.
That does sound much less frustrating, I really wanted it to be magnetic though. I wonder if you could just use the foamcore and do pushpins?
I love this! And I love your blog and your personality totally comes through ;) I love it. It’s awesome. I’m a new follower ;)
I am totally jealous of this project! It looks fantastic!
Looks great! I’d love if you shared this project at my Show & Tell party this week. http://www.gingerlymade.com/2013/01/show-tell-9.html
I LOVE your wall organization. Of course, I was drawn to it by the map…always drawn to maps, for some reason. You’d think my parents had been Gypsies or something. Anyway, that’s a great idea for a magnet board and I’m going to try to find some of those wire baskets. They’re perfect!!
Great blog!
Congratulations on being featured on SixSistersStuff! Your command center is amazing. I love the tiles for the map and the baskets are the best. I am also featuring this post on my Wednesday Blog Hope this week — Wonderful Wednesday Blog Hop on Ducks ‘n a Row. Stop by and add some links?
New follower and fan here. Sinea from Ducks ‘n a Row ♥
OMG, I LOVE this. I have tried at least 8 different things for a kitchen command center, but nothing ever works for very long. I love this idea, though, and I’m thinking it might be my lucky #9. :) One question, though (warning, it might be a really dumb one): how did you cut the sheet metal? I want to do sheet metal on the inside of a cabinet door to hang spices, but I’m not sure if I have the right tool to cut it. I was planning on asking at Lowe’s when I went to get the metal, but I figured I’d ask you too. Thanks for sharing!!
Hey Jenn, In case Ash is tied up this weekend & you want to get started what you’ll need are tin snips. They are overgrown scissors that slice through the metal easily. They range between $10-30 depending on brand and you can get them at any home improvement store. Be *very* careful cutting sheet metal (you can get it in either the HVAC dept in sheets or in the roofing dept in smaller/cheaper rolls. Just make sure you get galvanized if you want it to be magnetic) as it is super sharp. Good luck!
Thank you so much for the tips, they are super helpful!!
Fabulously doable everywhere! Thanks.
Great job, it turned out beautiful! I’ll be featuring it on Craft Gossip this morning :) Oh, and we have the same table I think! I have the bench too but different chairs, love the kitchen!
Thank you so much for the Craft Gossip feature, I really appreciate it!
Just clicking through to give you some love for the East Coast Creative’s DIY Contest! Good Luck! You do great DIY Projects and deserve it!!!
I have to say that I love this idea. My husband won’t let me put anything up in the kitchen except a clock and a couple of wine pictures. I so want a command center that it isn’t even funny. I think I will have to do this for my office/computer room since it is mostly my domain. Right now I have stuff scattered everywhere.
I’ve seen this everywhere. Me thinks because it’s fabulous! But I’ve not commented or bragged on ya. Super cute and WAY better then the $80 version. So much more functional too!!
…. and you are an evil genius. Love that cheater storage solution!!
This is a great idea. Thanks for putting it up on Pinterest, I just had to repin it to one of my boards for later reference.
It seems like the kitchen is the place where all the junk accumulates!! So anything that helps is a godsend, lol.
obviously like your web-site however you need to take a look at the
spelling on quite a few of your posts. Many of them are rife with spelling issues and I in finding it very bothersome to inform the truth nevertheless I will definitely come again again.
So INPRIRED! Thank you for sharing!
I have had the same problem in the past with “decopage”. Try this method on something small and see if it will work for you next time.
http://www.designsponge.com/2010/10/diy-project-brennas-book-page-fabric.html
oh how i love this! :)
I love the command center and the map modge podge onto metal. I had the idea while cooking supper that you could sand off the raised areas of the map. This would um, “delightfully distress” the map, add character, and eliminate the ridges. Love your projects! Kathy
I love that you put things behind your curtains! Awesome!
Haha…it works great! Thanks goodness, because I literally have no other place to put them besides the detached garage.
Your command center is gorgeous! Great score with those baskets. I am working on rounding up some command center inspiration for a blog post this Friday and would love to include your beautiful project. I would love to use a picture with a link back to your site. If you would rather not be included, please let me know. Have a great week!
What are the dimensions of the baskets?
Thanks for the info about the magnetic paint…I was eyeing some pretty hard last night at the hardware store but wondered if it was all gimmick. I think I will stick to chalkboard and cork and keep the magnets on the fridge.
I realize I’m super late on this, but can I just tell you I had that EXACT experience with their white board paint? It made me sad :(
Can u tell me about the chair covers in your dining room? I have a similar dark table w bench and have been wanting to lighten up the whole look while keeping it kids friendly aka easy to wash!