
Rustic/Industrial Bathroom Vanity
This post is a little out if the blue, huh? I didn’t give y’all much warning, but yes, we’ve been working on our guest/kids bathroom. Never a dull moment around here!
I’m just going to jump right into it and show y’all the before picture….

That is the original before picture….gotta love that bright salmon that plagued our house! Since that picture we had painted it green (same as the living room and laundry room), so here is the “right before” pictures…

Not terrible by any means, but it still had to go. You can’t tell in these pictures, but the vanity was in kinda rough shape thanks to the previous owners dog. Also, it didn’t have any counter space. So we ripped everything out and sold the whole set up on craigslist. We pretty much have to give things away to have people drive to our house to pick them up, so we sold it all for $75.
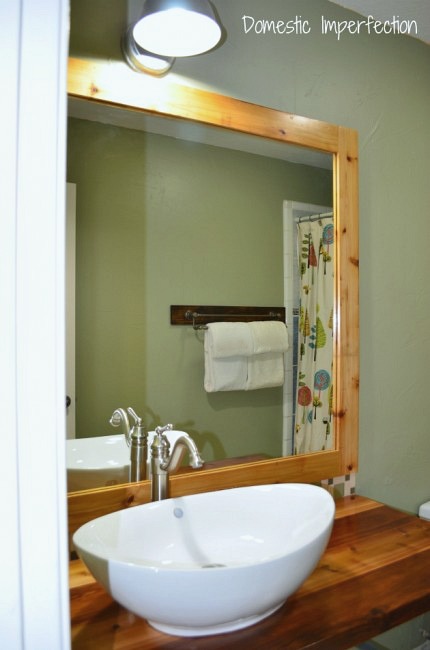
Anyway, this isn’t a tutorial and I don’t really have any progress pictures, so here is the after picture!

I’m sure about 50% of you are cringing right now, it’s a love it or hate it kinda bathroom. I love it, and I promise the colors look better in real life. It is really REALLY hard to take pictures of this bathroom, it’s cramped and there is no natural light…and I just have a point and shoot camera. So I apologize ahead of time for some of the pictures.
The counter is made of cedar 2X6’s and coated in polyurathane…total cost is about $18.

The mirror was free from a very nice contractor at Adam’s work, and the framing is cedar 1X4….total cost about $6.
The tile for the backsplash I found on clearance at Lowes…total cost about $6 (plus a tiny amount of tiling supplies).

The sink and faucet were bought from Amazon. I searched and searched for the best deals on these and ended up buying the cheapest non ugly stuff I could find. I figured that if the faucet crapped out, I could replace it four or five times before it equals the cost of a name brand one. I’ll take those odds. So the sink was only $85 and the faucet was $60. Oh and I had to buy a drain kit which was $18.

The light is from Lowes and cost $25. I was dead set on a big galvanized barn light and in my head anything barn-y should be cheap. Not so…they are hundreds of dollars. I almost gave up and went with something else when I stumbled upon this one…it’s not as big as I wanted, but I still think it looks great (way better than in this terrible picture).

Since you look up and see the bulb I decided that a regular (ugly) swirly bulb wasn’t going to do. I found a cool looking nostalgic bulb for $10 and think it looks great. The light it gives off is a little yellow, but I guess that just adds to the nostalgic feel.

Here is where it starts to get expensive. We made this whole plan for the legs using industrial pipes and whatnot. Then we went to go buy our materials and oh. my. goodness…those babies are pricey. I’m totally taking a shot in the dark here, but I’m going to say we used about $100 worth of pipe and fitting to make the legs. I really have to start writing this stuff down.


So obviously we aren’t finished yet…the trim needs to be done, I want to add a cedar shelf on the supports, galvanized buckets for storage, and we need to rewire the outlet. Also, I should really take the stickers off the pipes. And we cracked a tile by dropping a pipe on it….

So the total price (when I add in about $20 for plumbing related stuff) comes to $330…$255 if I subtract the $75 from selling the old stuff. Not to shabby, especially considering all that we did.
I do have one project related picture I have to share. Adam had to sand down the wall in order to put the mirror up because we have crazy texture on our walls. It was really dusty and pretty much impossible to keep a Elijah (the most curious of toddlers) from getting into it. He made a huge mess, but he also made THE CUTEST little footprints you’ve ever seen.


Great job on the bathroom – I love it !
What a cool makeover. I have that same shower curtian! You have great taste too! lol
i like it! the sink you had in there before…very boring and big box store. i like everything you did in there!
I’m not sure what I love more, your amazing achievement of finding gorgeous pieces for a low price or those dusty footprints!
The bathroom looks really nice! Lots of bathroom counter space and storage is definitely a must for me and I love the wood you used for the counters!
Wow, I REALLY like that vanity you built! So unique and yet very cost effective. Definitely pinning it for future reference. I think your bathroom looks great, it’s a “love it” from me!
I just love your bathroom and those adorable little footprints. We just put our very first ever offer in on a new home last night and I’ve been thinking about you and your blog a lot since then. Your projects are so inspirational to me… and I love how hard you and your family work together to make your house a home. I’ve never really commented before, but I wanted to let you know now :)
PS: I wish we could hang out because I think our sons could be BFF’s.
Thanks for commenting Katie! I read a lot of blogs but rarely comment…I mostly just lurk around quietly, lol. I’m glad you enjoy my projects, and yes, I pretty much have an open invitation of free food and a warm bed to anyone that wants to come help with projects. It’s worked out pretty well for me so far! Congrats on almost being a homeowner and it is too bad we can’t hang out…most of my friends with kids Elijahs age have girls!
That sink that sits atop the vanity is so neat!!! Love the light and the rustic look it gives the bathroom!!!
Put me in the LOVE column please! I love anything mixed with industrial. You did a great job.
Love it! I love the pipes that gives it an industrial feel/look. :-)
Hi Ashley! I really like what you did with the bathroom. I think the wood is beautiful and that sink is gorgeous.
Cheers! Jan
I can see how it’s a love/hate thing. I definitely love it though. I wish I had done this to our bathroom as well.
Love the bathroom, LOVE the foot prints too! ;)
That looks amazing! I’m not cringing at all … in fact, your thumbnail has been popping out at all the linky parties!
:)
Linda
LOVE the industrial pipe and that countertop is fabulous! The lights are perfect too (love the Edison bulb)!
What a cute photo of those adorable footprints!
Kelly
Fantastic transformation!
I’m definitely in the love it category! It looks terrific!
Love how rich the countertop looks!
Love your blog
This makeover is amazing!! We appreciate you linking up with us!! It’s so fun to see all of the great ideas and recipes! We hope to see you back again soon! -The Sisters
I am definitely in the LOVE IT camp!
Found you via How to Nest for Less linky party. This bathroom is looking amazing; love the lighting. I think my favorite things, though, are the tiny footprints!
That wooden benchtop looks spectacular, especially with the white basin perched on top. I’ve just finished renovating my purple retro bathroom and turning it into a modern grey beauty. Well Im almost finished, few more things to get done actually, is it just me or does it never seem to end! The joys of renovating I guess :)
I love it! I love the industrial look! I have to say that my by far favorite part is the barn lamp. I need one now. I’m loving your backsplash though, and the galvanized legs…oh-so-fun! Great job. My favorite photo is the footprints. Great job capturing that ;)
Great job! I’m not usually crazy about the industrial look but I love how you incorporated the rustic look to it!
I ADORE this transformation!
Looks amazing! Love the backsplash too :) And those footprints are adorable, you should frame them!
Featuring you tomorrow…it’s all FABULOUS! XO, Aimee
Such a great and rather unique look. It is fun to see something a bit out of the box. The footprints are adorable and I love that name. Thanks for sharing this week on BeColorful.
p
Oh wow! It’s gorgeous! Beautiful job!
I love this and I am doing this in my downstairs bathroom. I totally fits our house. Thanks for the idea!!!
The bathroom is fabulous! And the footprints too. Just installed that light in a redo at our house. you probably don’t want to hear this now that you are finished but… I once (along with my Pop) made a desk for my son out of pipes. I wanted the look you were going for but nearly fainted when I added up the cost. Sure there was a way I asked my Pop if he thought PVC would be sturdy enough. He said yes. (And he never built anything that wouldn’t hold an elephant.) So I bought PVC for everything but the flanges, those I “splurged” and got iron. And of course several cans of metal spray paint. And with a bit of worked no one could tell the PVC from the iron. Well no one I knew anyway, lol! It held up beautifully and I think I eventually sold it at a garage sale, as we move a lot and things tend to come and go. Funny things is I always thought it would have made a great sink! Ha Love love your blog. Thanks
I actually wondered about that, if we could have saved ourselves a bunch of money (and a broken tile) by painting PVC. Now I know! I bet your sons desk was pretty cool looking ;)
Wow!! What a qualitative change!! It looks much better. What about those cabinets in the before pictures dude? Nice work!!
I just ordered the same faucet and a very similar sink from Amazon…and constructed a vanity using Ana White’s plans….I was considering making shelves using pipes…very similar to the way you made your vanity. I love the way it turned out in your bathroom…it’s like a teaser of my bathroom…if I ever get it finished!
nice bathroom :)
You are genius, Ashley! I just LOVE this as well as so many other of your ideas. I am a huge fan of yours! Thank you so much for all of the fantastic ideas!
My favorite part…the footprints. I take so many “footprint” and “handprint” pictures. You are precious.
so question, since i am loving this a bunch , it has sparked my ideas for my bathroom, (which has not been functional for over a year now because of finances, thank god i found you,) anyway my question is , how do you plan on attaching the shelving to the supports?
thanks so much!!
How did you join the 2×6’s for the counter top? Thx.
We used a Kreg jig. http://www.kregtool.com/pocket-hole-jigs-prodlist.html
Did you use polycrylic on this counter too?
I used polyurethane. I like to use polycrylic because it doesn’t yellow and is easier to work with, but on stuff like this I use polyurethane. I think it does a better job, and it doesn’t matter if it yellows on wood.
I actually really like the feel of this bathroom, especially for boys! If we had a houseful of boys (its just one lonely boy with a pack of sisters) I would totally do this. I’m thinking clean up would be a breeze.
Do you have a post on how you hung/framed the mirror and how to do the tile? Would love to know!
I actually do! I have two similar tiling posts…
https://wildfireinteriors.com/2013/08/the-easiest-way-to-tile-a-backsplash/
https://wildfireinteriors.com/2012/05/lazy-girl-tiling/
And I wrote a mirror post for our master bathroom, it’s similar to the way we hung this mirror…
https://wildfireinteriors.com/2013/08/bathroom-remodel-hanging-the-mirror-light/
Hello Ashley!
I would love to know how that wood stood the test of time.. We are about to do something similar at our new house and my husband is dubitative at best :s
Also, if it did do well, do you recall exactly what polyurethane product you used?
Thank you so much!! (and congrats on all of your family’s wonderful projects you share with the world!)
Iaël
The wood has held up great, it is still shiny and even. It does have some dents and stuff because we chose a softer wood (plus, kids) but besides that it’s been great. I can’t remember what sealer we used for this countertop, but we used Waterlox on our butcher blocks countertops int he kitchen and that is what I would recommend.
Thank you so much Ashley!