
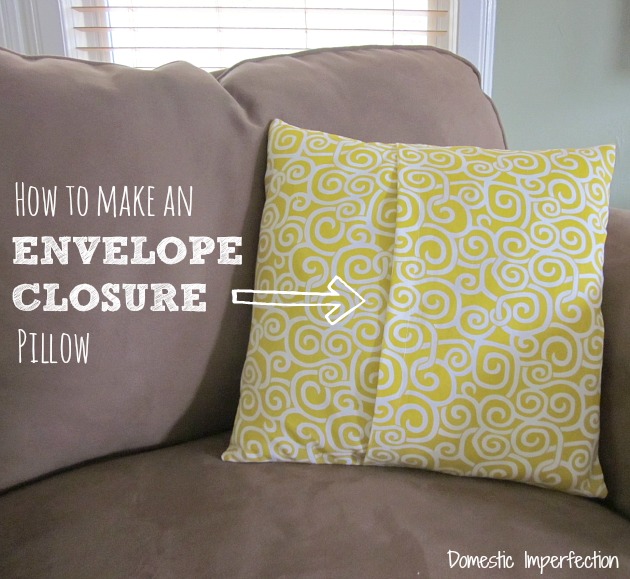
How To Make an Envelope Closure Pillow
I’m not great at sewing. In fact, I pretty much stick to sewing square things like pillows, curtains, book slings, tablecloths, and handkerchiefs. Okay, not handkerchiefs (do people actually use those anymore?), but you get the picture. Luckily sewing an envelope closure pillow is super simple and a great place to start if you’re new to sewing.

So here is the process…
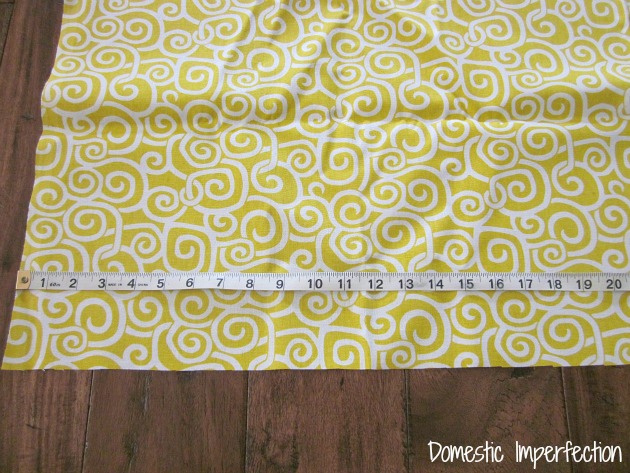
First pick your fabric. This is the best part! Don’t be afraid to go with something bold, its just a throw pillow and is so easy to change whenever the mood strikes.
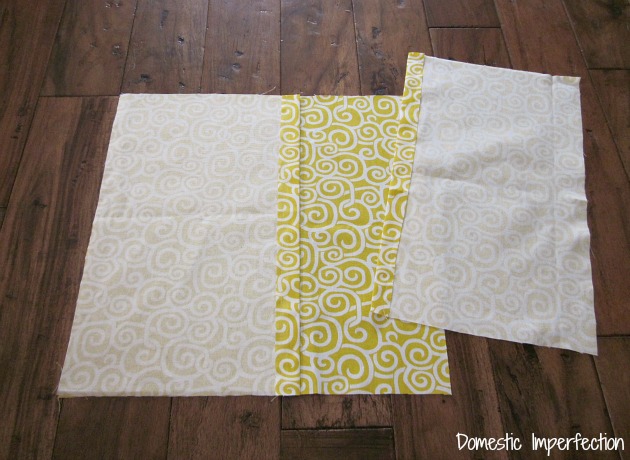
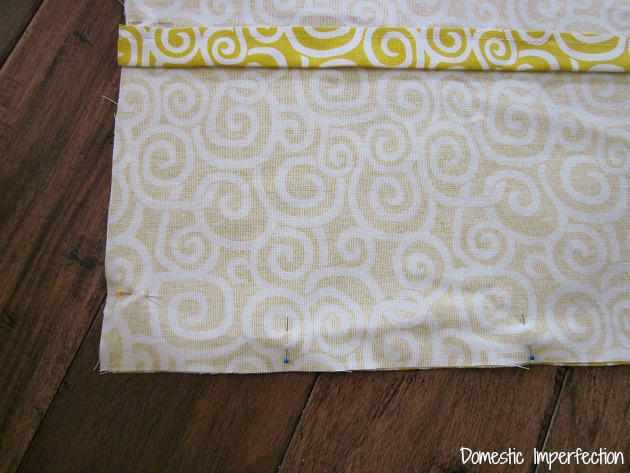
Next measure and cut your fabric. For a 16 x 16 pillow you should cut one square at 17 x 17 and one at 17 x 25. The second piece must be wider to accommodate the overlay of the envelope closure.
Here is what your pieces should look like. Helpful hint – if you have hardwood floors like I do (or tile), use the lines in the wood to cut straight lines. (I know the bottom piece here doesn’t look like a square, but it is, I promise.)
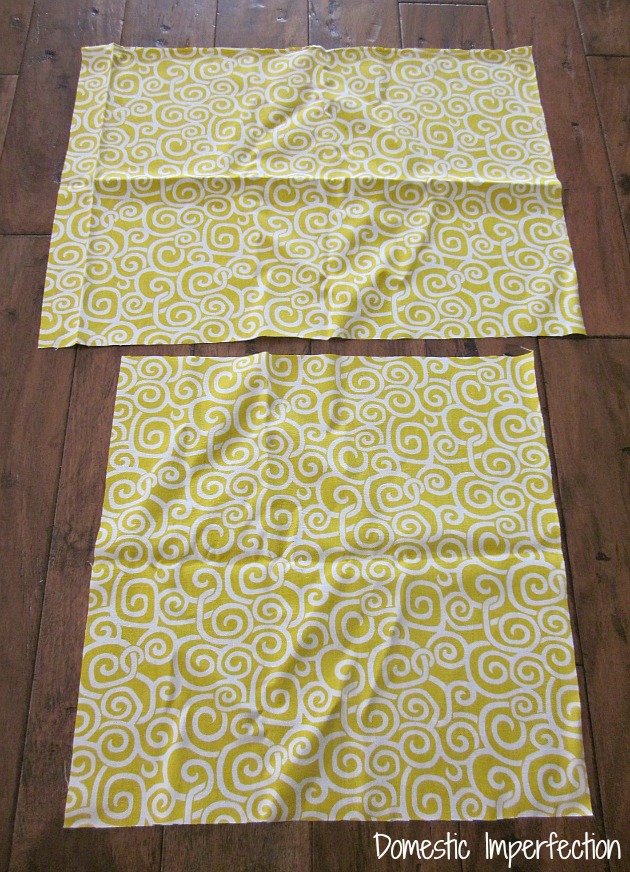
Next, cut your wider piece in half.
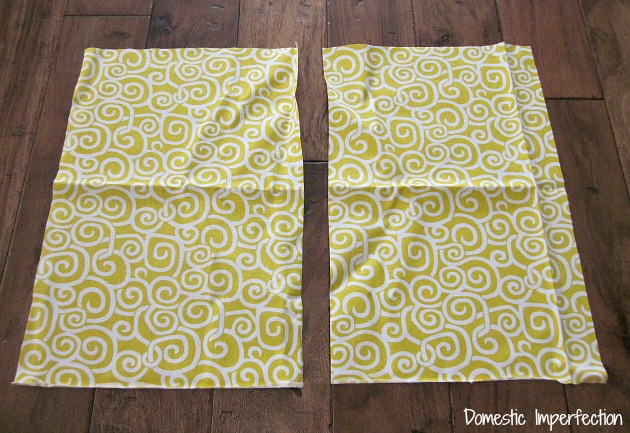
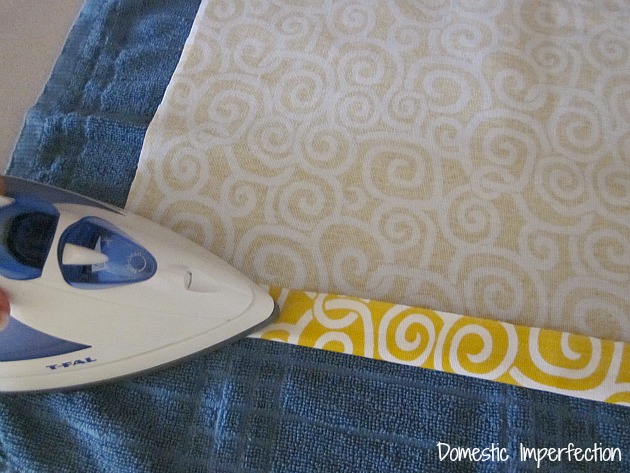
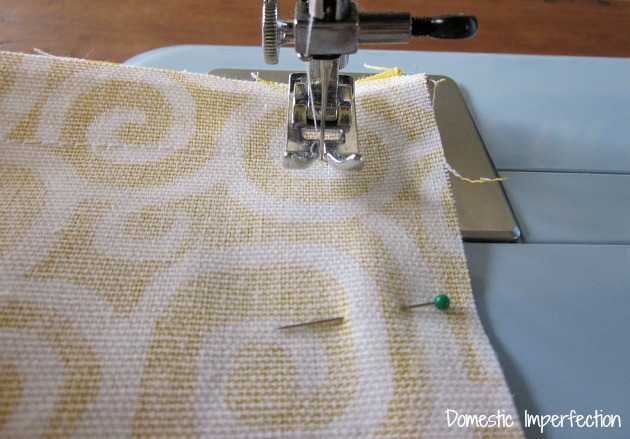
At this point I broke out the iron, but it’s not a must – you could just use pins for this step. Fold over and press (or pin) the long edge of the pieces you just cut. This will make the finished edge on the envelope closure.
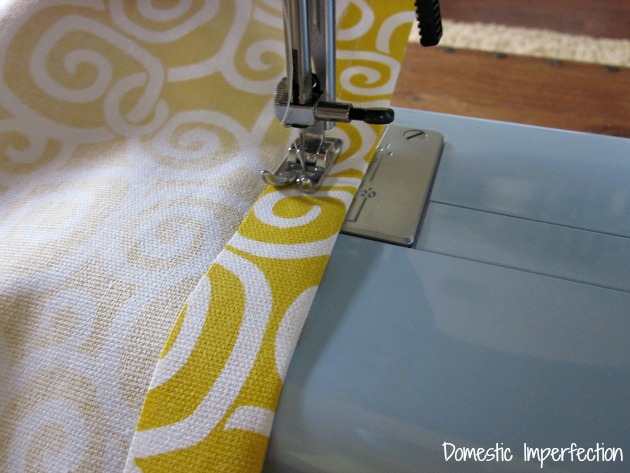
Bust out the sewing machine and stitch along the inner edge of the fold. You could hand stitch this if you don’t have a machine or use Unique Stitch (glue). Buying a machine doesn’t have to cost you an arm and a leg, I bought mine six years ago for $60 and it does everything I need. Plus its blue…bonus!
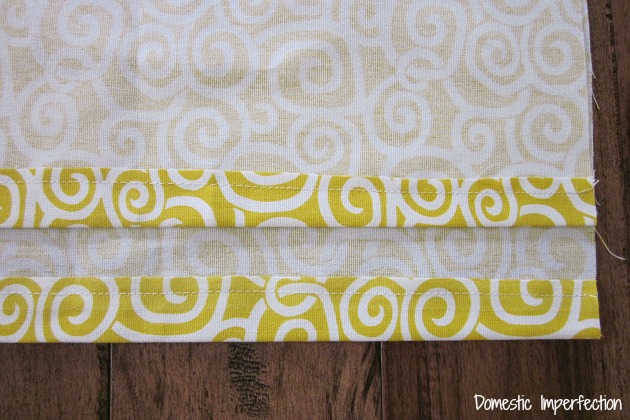
If your stitching isn’t exactly straight, don’t worry about it. See how the top piece is kinda crooked? I put that one on the inside of the envelope… no one will ever see it.
Place your pieces together with the printed sides on the inside and envelopes toward the center.
Pin the edges to keep everything straight while your sewing. You don’t have to go crazy here, 3-4 pins on a side is more than enough.
Sew around the perimeter of the pillow. When you come to a corner just lift the foot on the machine, turn your pillow, and keep going. It’s best to keep one continuous stitch.
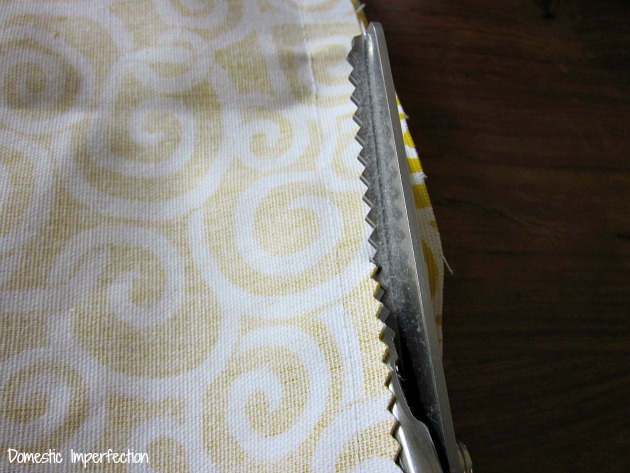
Cut off the excess material from the edges. If your stitch is very near the edge this may not be necessary.
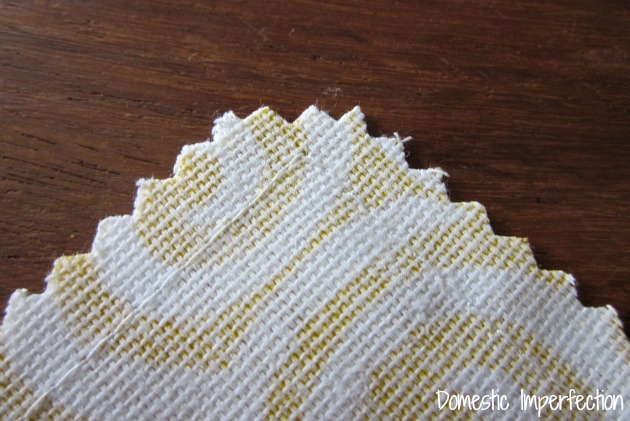
Square off the corners. This will make for pointier corners than ones that have too much fabric in them.
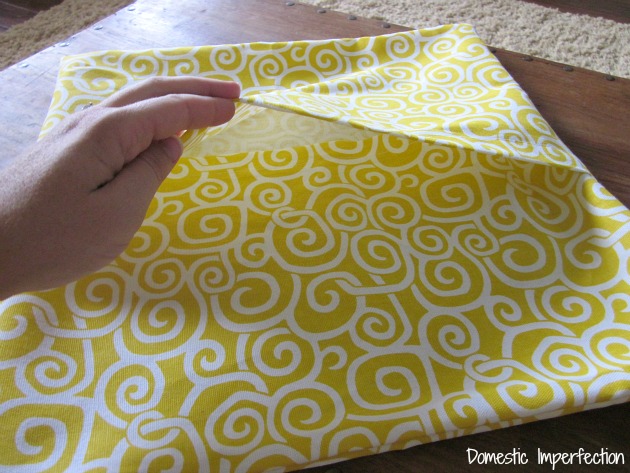
Turn your pillow cover right side out – here is how the envelope closure should look.
That’s it, just stuff in your pillow and your done!
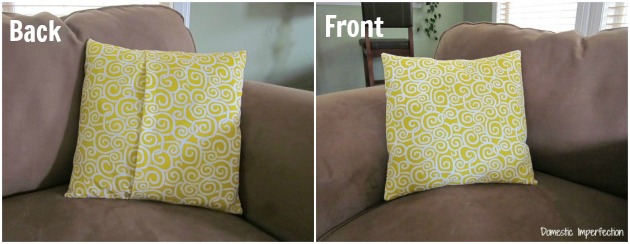
Hope that was helpful! Once you get this down it’s easy to start adding embellishments and whatnot – the possibilities are endless!
Want to see how to make and even easier pillow? GO HERE

You make it look so easy!! Love you fabric – and that color! You'd be so proud, I'm buying a sewing maching next month! I'm getting domesticated! =)
This is just what I've been looking for! I've got the fabric, the pillows and the sewing machine; now I have instructions. Thank you.
And BTW – I love your little decorating blog. Such great ideas. I'm a new fan!
Hi! I’m following your blog and wanted to stop by, say hi and invite you to our blog hop if you haven’t already. Please come by when you get a chance. Hope you are having a Sweet Week.
A Mommy’s Blog Design Studio
Join us every Friday for our Blog Hop!
Review and Giveaway Blog Directory
If you feature Reviews and Giveaways come add your blog here!
Love the pillow! Hi! Just stopping by. Following you from the You Like Me Friday Blog Hop. Would love a visit and a follow back on my blog: http://blog.writerslairbooks.com. Thanks! By the way, we are GIVING AWAY an IPAD 2 and would love for you to enter if you haven’t already! Nice to meet you!
Ooooh, so cute! I must try these! I can never seem to find pillows in the right fabrics, and with these, I can change them as often as I like! Visiting and following via You Like Me Hop…hop over to my blog and follow back if you like!
http://mom4realky.blogspot.com
Jessica K
Thank you for the tutorial. I love the pillow.
New follower from the Boost my blog Friday hop.
I got myself a sewing machine for Christmas and am, frankly, scared to death of it. With lots of u-tube video's, I managed to get it threaded and bobbin'ed and all that stuff. Managed to sew some curtain panels together. And that's pretty much it… This actually looks like something I could (should) be able to do! ~Following from the Boost my Blog Friday Hop. Visit me and follow if you like: Kerrye @ http://impossiblecleanliness.blogspot.com
What a cute pillow {and fun fabric}!! I'm not much of a sewer, but you make this look so easy! Thanks for great tutorial! xo, Reannah
looks great! love the fun fabric. i'm trying to debrown my living room, so i made some pillow covers out of napkins and fabric glue. basics!
That looks “sew” easy! I've been wanting to do this, so thanks for the tutorial. :)
Visiting from http://www.hsdays.blogspot.com
You make this look so easy! I might get the courage to try this sometime this week!
I love that fabric. I have the same fabric in aqua in my daughter's room. Thanks for sharing at my Sizzle into Summer party.
Sew easy! Thanks for the idea and thank you for linking to Wicked Awesome Wednesday!
Thanks for sharing how to do this – I am not a great sewer so your instructions are helpful.
Great tutorial! I was so bad at sewing the holes closed on my first pillows that I'm really thinking the envelope is the way to go…I'll definitely bookmark this!
Oh, and I love your fabric!
Thanks for the tutorial. Now I just need to suck it up and try it myself :)
I used the same tutorial for my first set of pillow cases. Such a great one for first time sewers! Thanks for sharing.
How cute!
♥Sweet Tea Serendipity
Thank you for posting this! I've looked at half a dozen envelope pillow tutorials and still couldn't get it. With yours it finally clicked! Thank you again!!!
This is great! Unfortunately I don't have a sewing machine yet-but I'm hoping to get on for christmas! I would love it if you would link this up to my weekly link party Tutorial Tuesday!
Kari
Newlyweds on a Budget
Thank you for sharing tutorial…..like it so much….:))
Great tutorial, and I just love that fabric! Thanks for sharing!
VERY cute…and what a great tutorial!
Thanks so much for linking to “20 Below Thursday”! And thanks for linking back to my party too :)
What a timely post for me. I am looking for pillows for my living room and not finding what I was looking for I am considering making them but didn't want to have to tackle the whole zipper thing. Thanks so much for the link up to Motivated Monday at BeColorful
Pam
Thanks for the great tutorial. It is easy to understand. I would love it if you would stop by and link up this post with the crafty link party I recently started at Lines Across My face.
:) Rachel
http://linesacrossmyface.blogspot.com/2011/07/craft-link-party-2-cure-for-common.html
Thanks for the tutorial! :) I cut out fabric about 9 years ago to make some the same… but I was too chicken to sew them. (I only just started sewing recently) You have inspired me to pull them out and give it a shot! :)
I love this tutorial! And the fabric you used. :) I featured your project on my Terrific Under Ten Tuesday! http://athomewithk.blogspot.com/2011/08/terrific-under-ten-tuesday-25.html
LOVE the fabric. More the Merrier Monday will be open until Wednesday at midnight. I would love for you to stop by and link up your pillow. http://diyhshp.blogspot.com/
Pretty pillow and easy to follow tutorial! Thank you for linking with Air Your Laundry Friday! xo Jami
Projects are beautiful. Lovely DL Envelopes Background.
Thank you so much for posting this tutorial! I just finished covering 2 pillows for my daughter’s bed using your instructions and they look great…best ones I ever made.
When you sew them together which pieces are you doing? After you do uoi initial “hem”. Thanks.
Anyone know a good online fabric site?
I used to buy all my fabric from fabric.com, they used to always have great coupons. They stopped about a year ago and now I like onlinefabricstore.net
Oh my gosh, I think you just saved my sanity! I have been wanting to experiment with using embroidery quilt blocks as throw pillows, but was unsure how to sew everything together while still being able to take the pillow form out and clean the case by itself. This is exactly what I was looking for, just didn’t know the terminology of “envelope”